Rules to Better AI-Generated Media - 10 Rules
Mastering AI-generated media is key to enhancing creativity and efficiency. These rules cover everything from generating images to transforming them, ensuring you're equipped with the best practices for AI-driven content creation.
Imagine a scenario where your project requires unique artwork, but you're working with a tight budget or limited time. You don't have much bandwith to brainstorm artwork or search for what you need. In situations like this, experimenting with AI image generation can be a quick and productive solution.
Some of the benefits are:
- Lowered Artwork Costs
- Fast Experimentation
- Accessibility
There are many cases when AI-generated images can come in handy:
- Web Design - You can use AI to create unique background images, icons, and UI elements
- Marketing Campaigns - AI can be a useful tool to help with social media graphics, newsletter images, and event promotions
- Content Creation - You can use AI to add interesting visuals to blog posts, social media updates, and more.
Imagine you’re browsing through an art exhibition online and you come across some strikingly unique images. Upon reading the descriptions, you realize they were all generated using Artificial Intelligence (AI). This piques your interest, and you find yourself wondering, "Could I create something like this?" The answer is yes. Here is how you can do it yourself.
Video: How To Generate INSANE AI Art For Beginners (2 min)Note: Midjourney is no longer free as it was in this video demo.
How AI Image Generation Works
AI image generators are tools that utilize trained AI models to create new images. The models are trained on databases of existing artwork. The most popular AI image generators are Midjourney, DALLE-2, and StableDiffusion.
These image generators work by reading your text and using it to create an image. The text you input is called a ‘prompt’, and it guides the model towards the type of image that you describe.
Each AI image generator works slightly differently, but the basic idea is the same: text ➡️ image.
Generating Your First AI Image
The exact process will vary depending on the generator you're using, but generally, you can follow the following steps:
- Navigate to the generator’s interface.
- Write a short description of the image you want (optional: include a negative prompt (specifying what you DON’T want in the image)
- Generate the image: The tool will create an image based on your specifications.
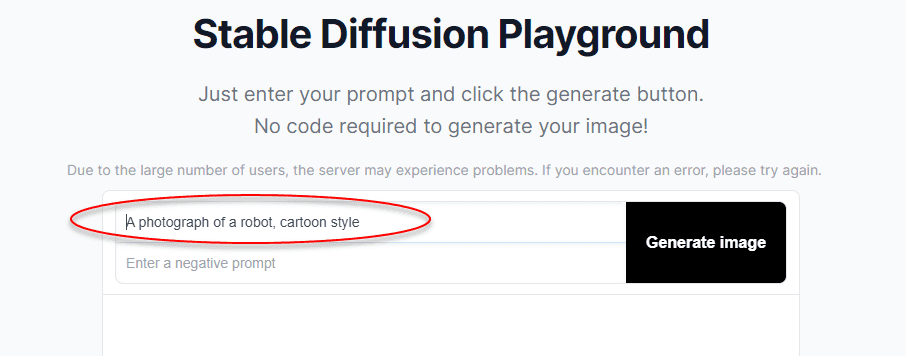
Figure: Good example – Writing a prompt into an AI image generator Practice makes perfect
The more you experiment, the better you'll understand how different inputs affect your results. Try new things and make mistakes – it's all part of the learning process!
Current rankings suggest Midjourney as the top tool, followed by ChatGPT Image Generation (GPT-4o), Google's Imagen, Adobe Firefly, Stable Diffusion, Leonardo AI, and Flux. Beware, other tools may produce noticeably less natural images.
Midjourney
Midjourney generates high-quality images via Discord (/imagine command) or its new web interface.
- Cost: Starts at $10 USD/month ($8/month annually)
- Offers subscription tiers with GPU hours and commercial usage options
- Supports detailed prompts for customized images
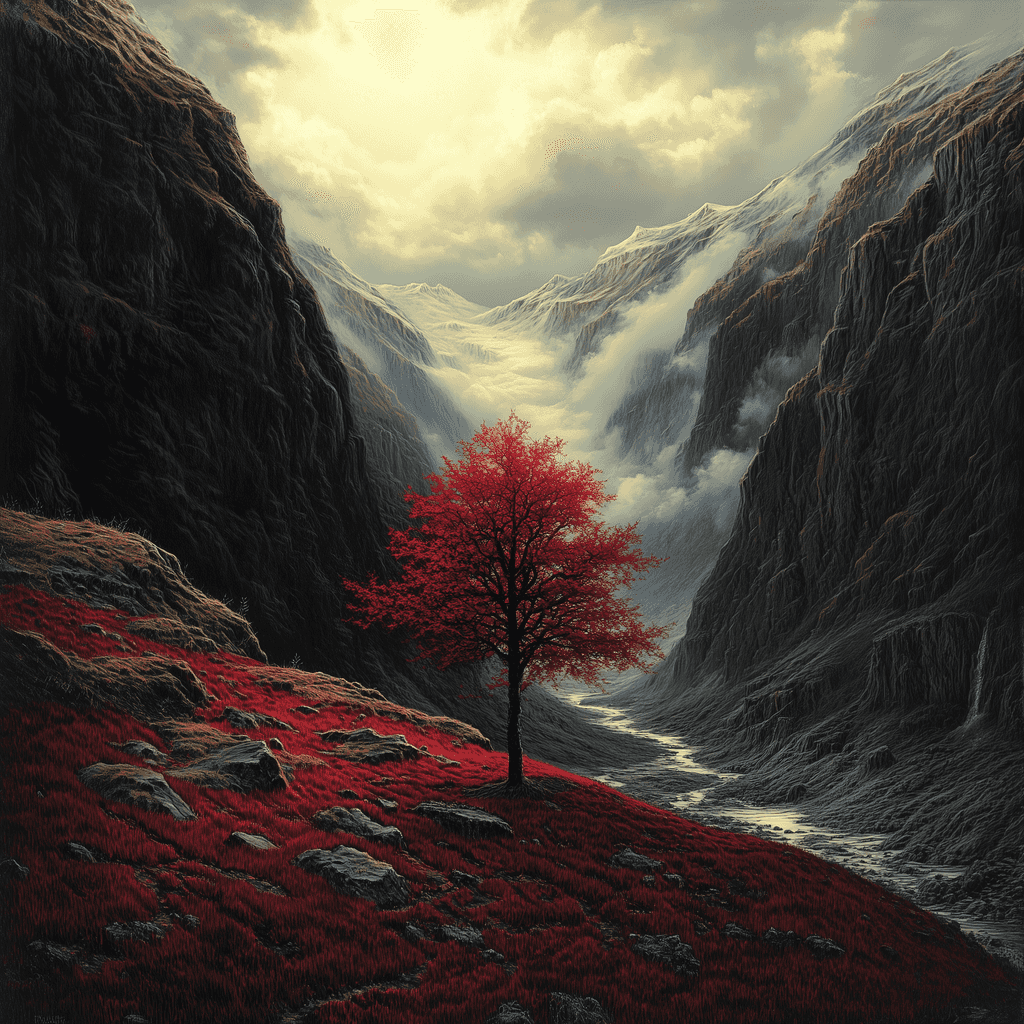
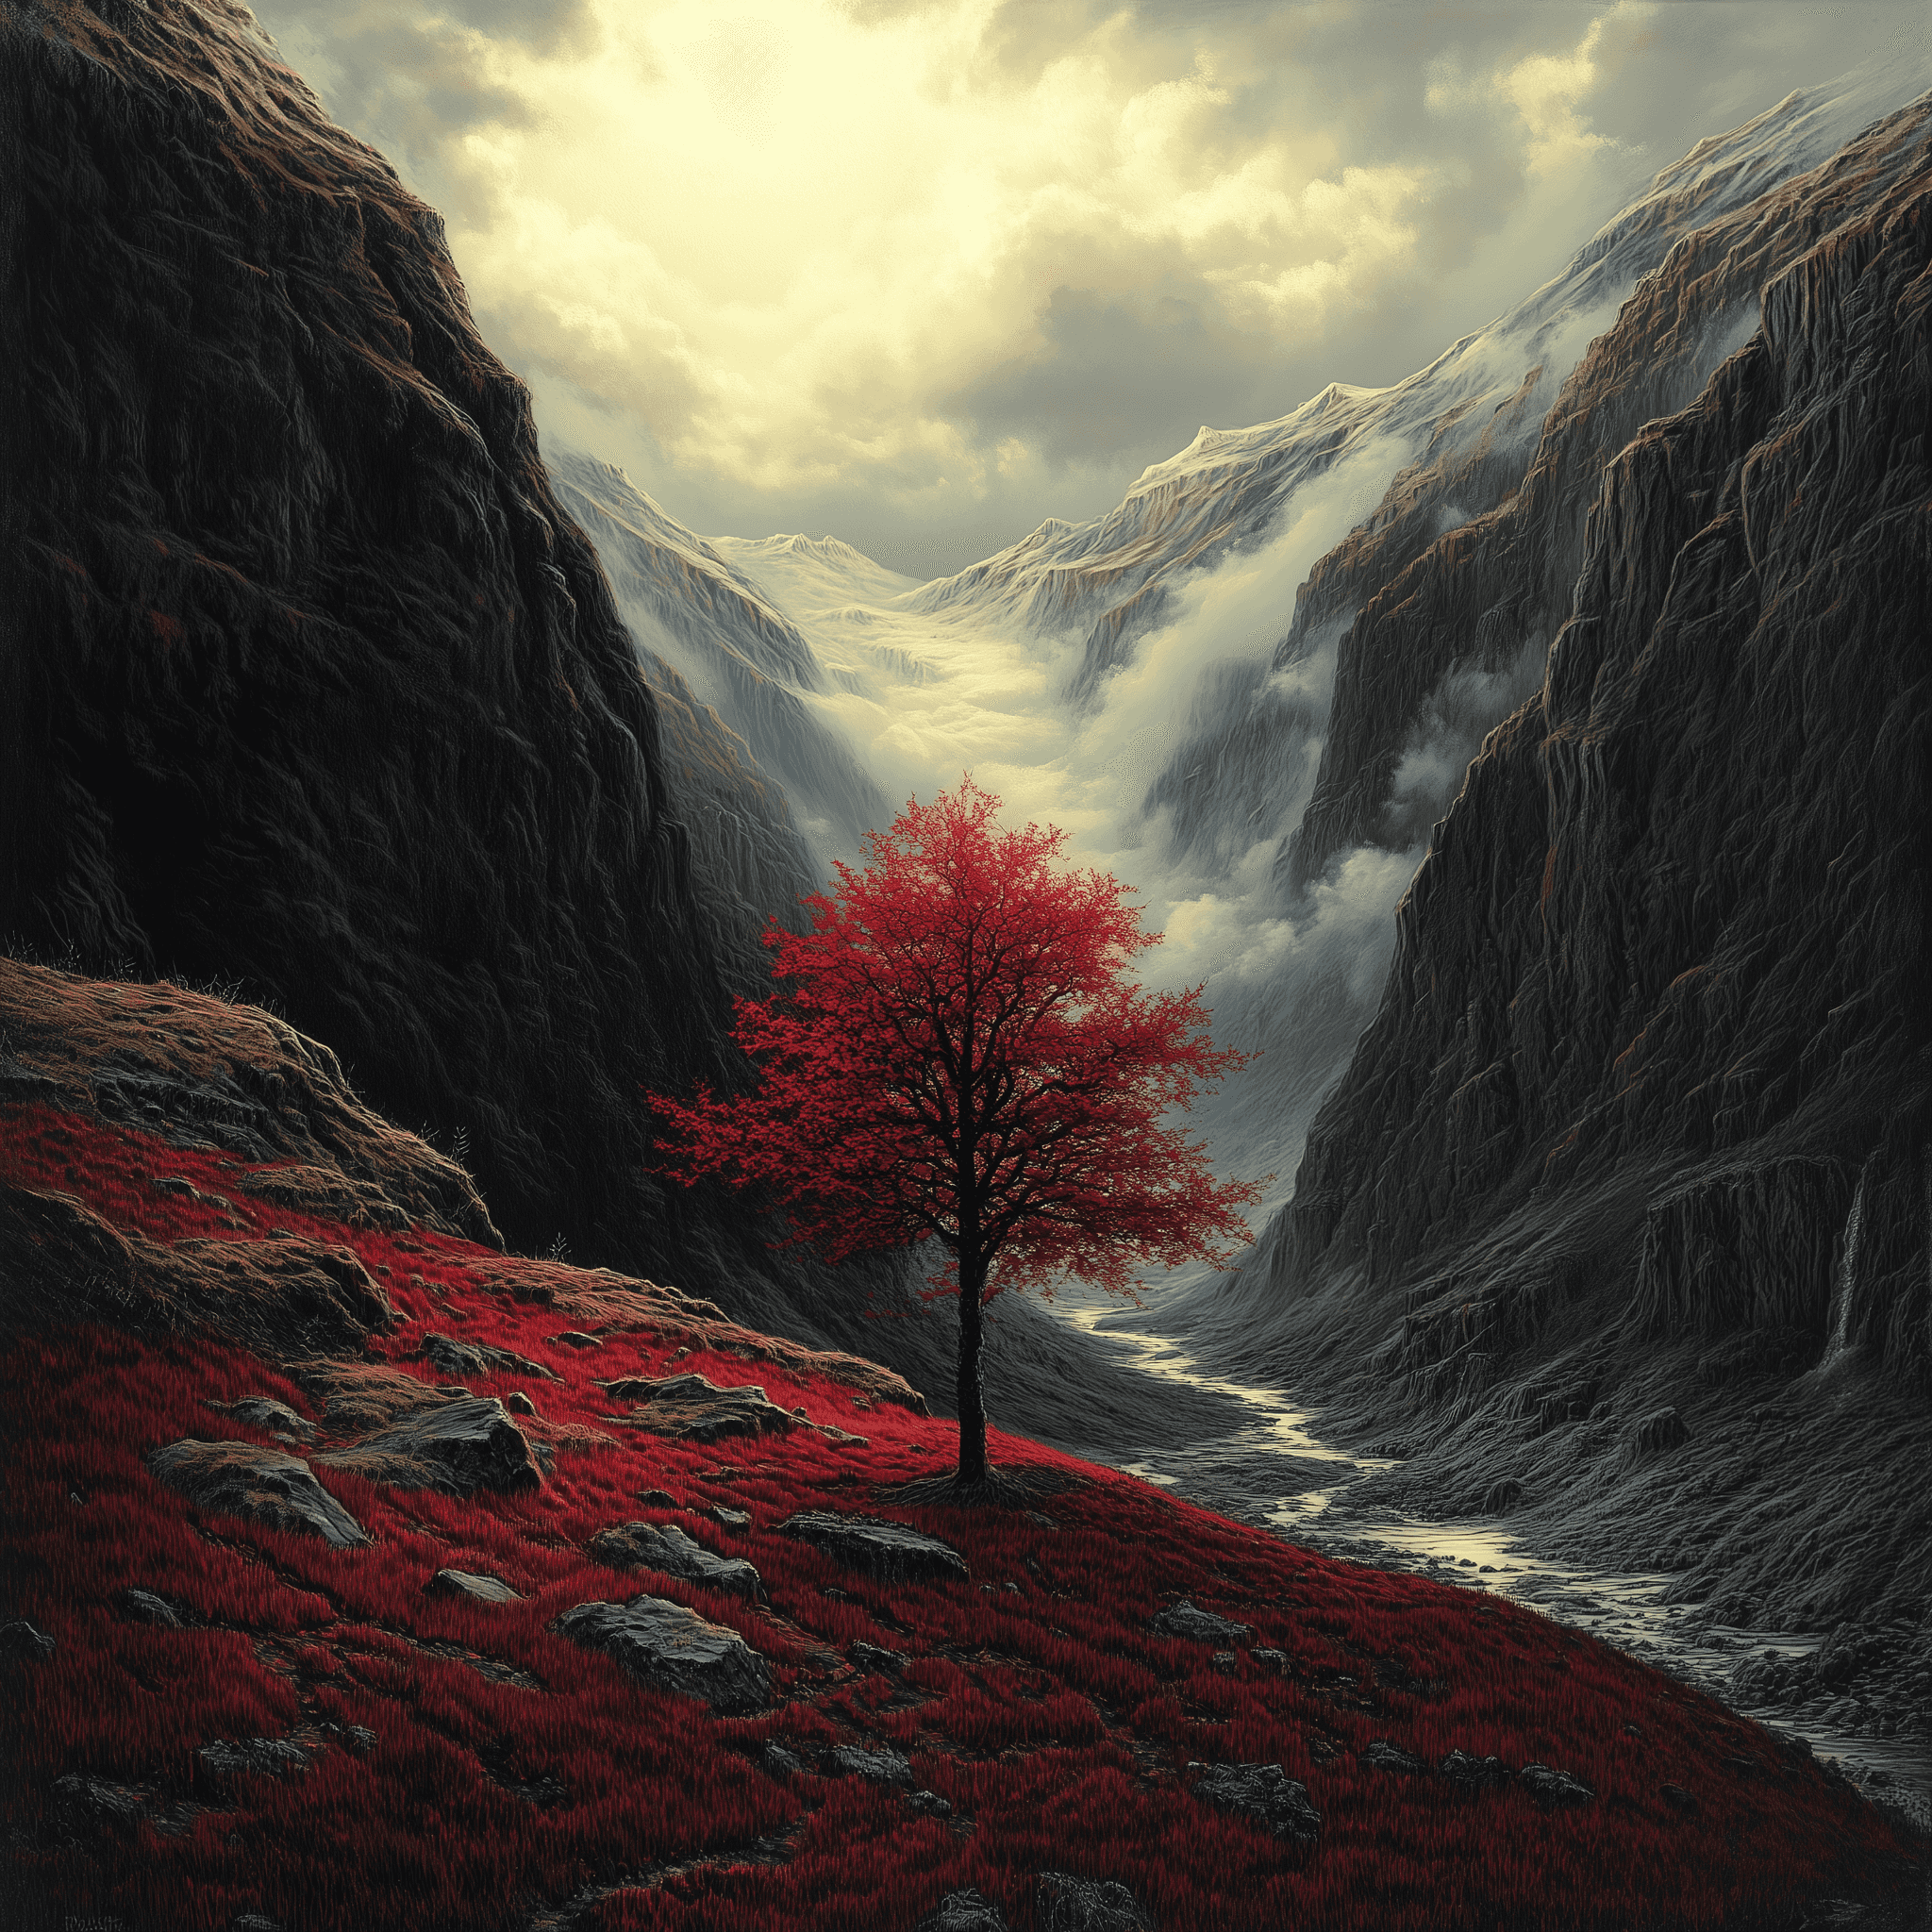
Figure: "A red tree in a valley. Hi res" - by Midjourney 6.1 ChatGPT Image Generation (GPT-4o)
Integrated into ChatGPT for detailed, realistic image generation from text prompts.
- Direct access via ChatGPT
- Handles complex prompts seamlessly

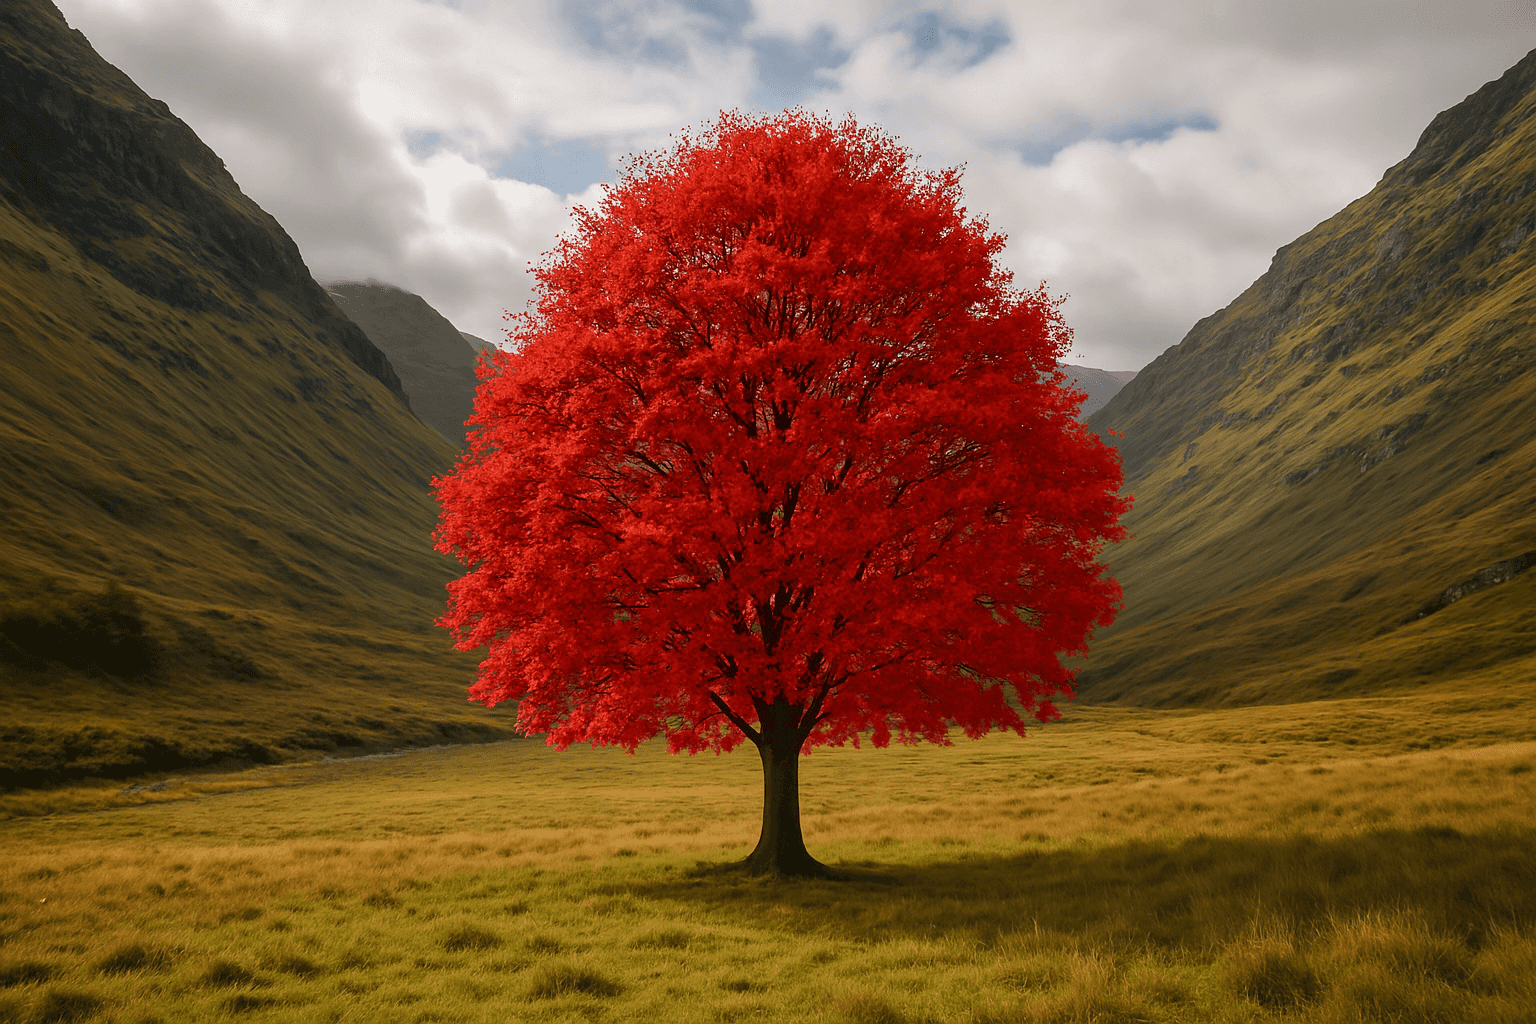
Figure: "A red tree in a valley. Hi res" - by ChatGPT4o Ideogram
Ideogram is a freemium image generation tool known for its excellent handling of text within images, a common weakness in other models.
- Supports various artistic and design styles, including 3D, anime, and realistic
- Ideal for creating posters, logos, and text-rich compositions
Available via web and mobile apps
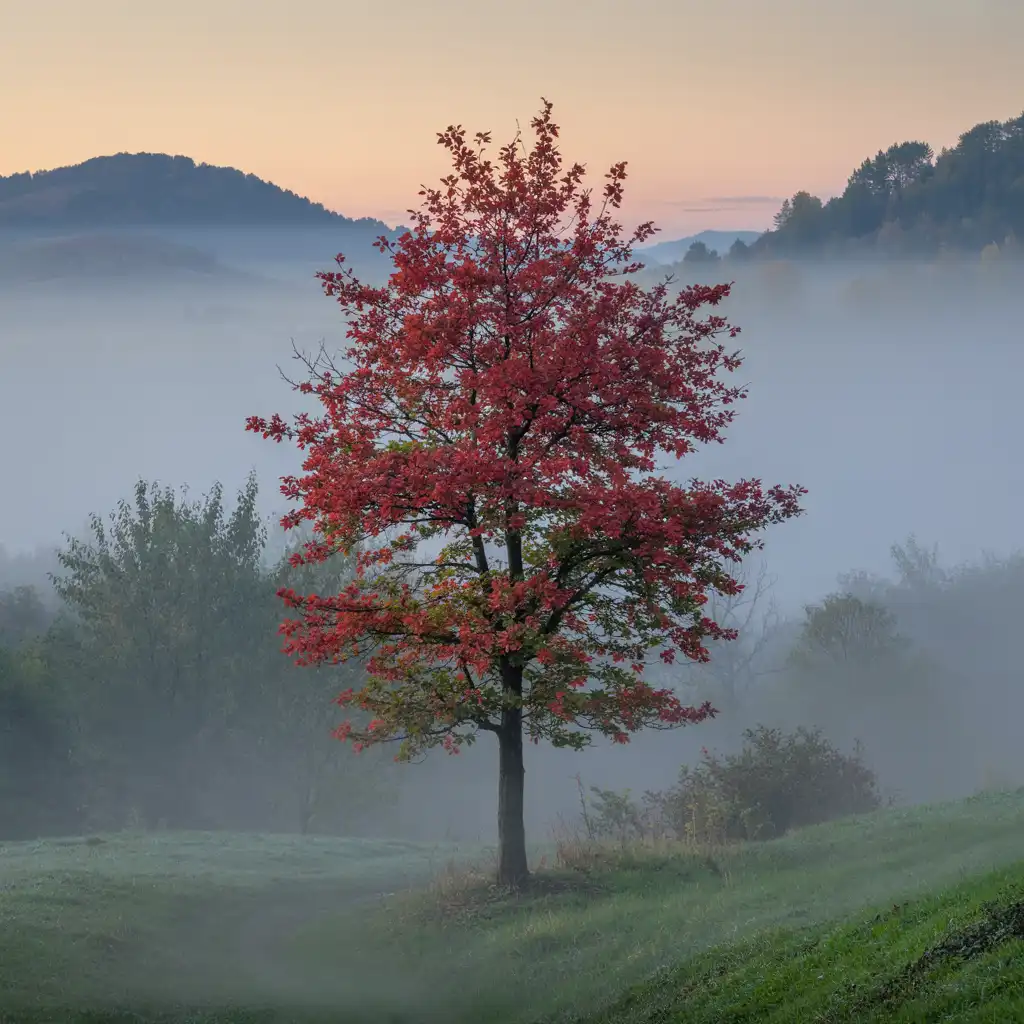
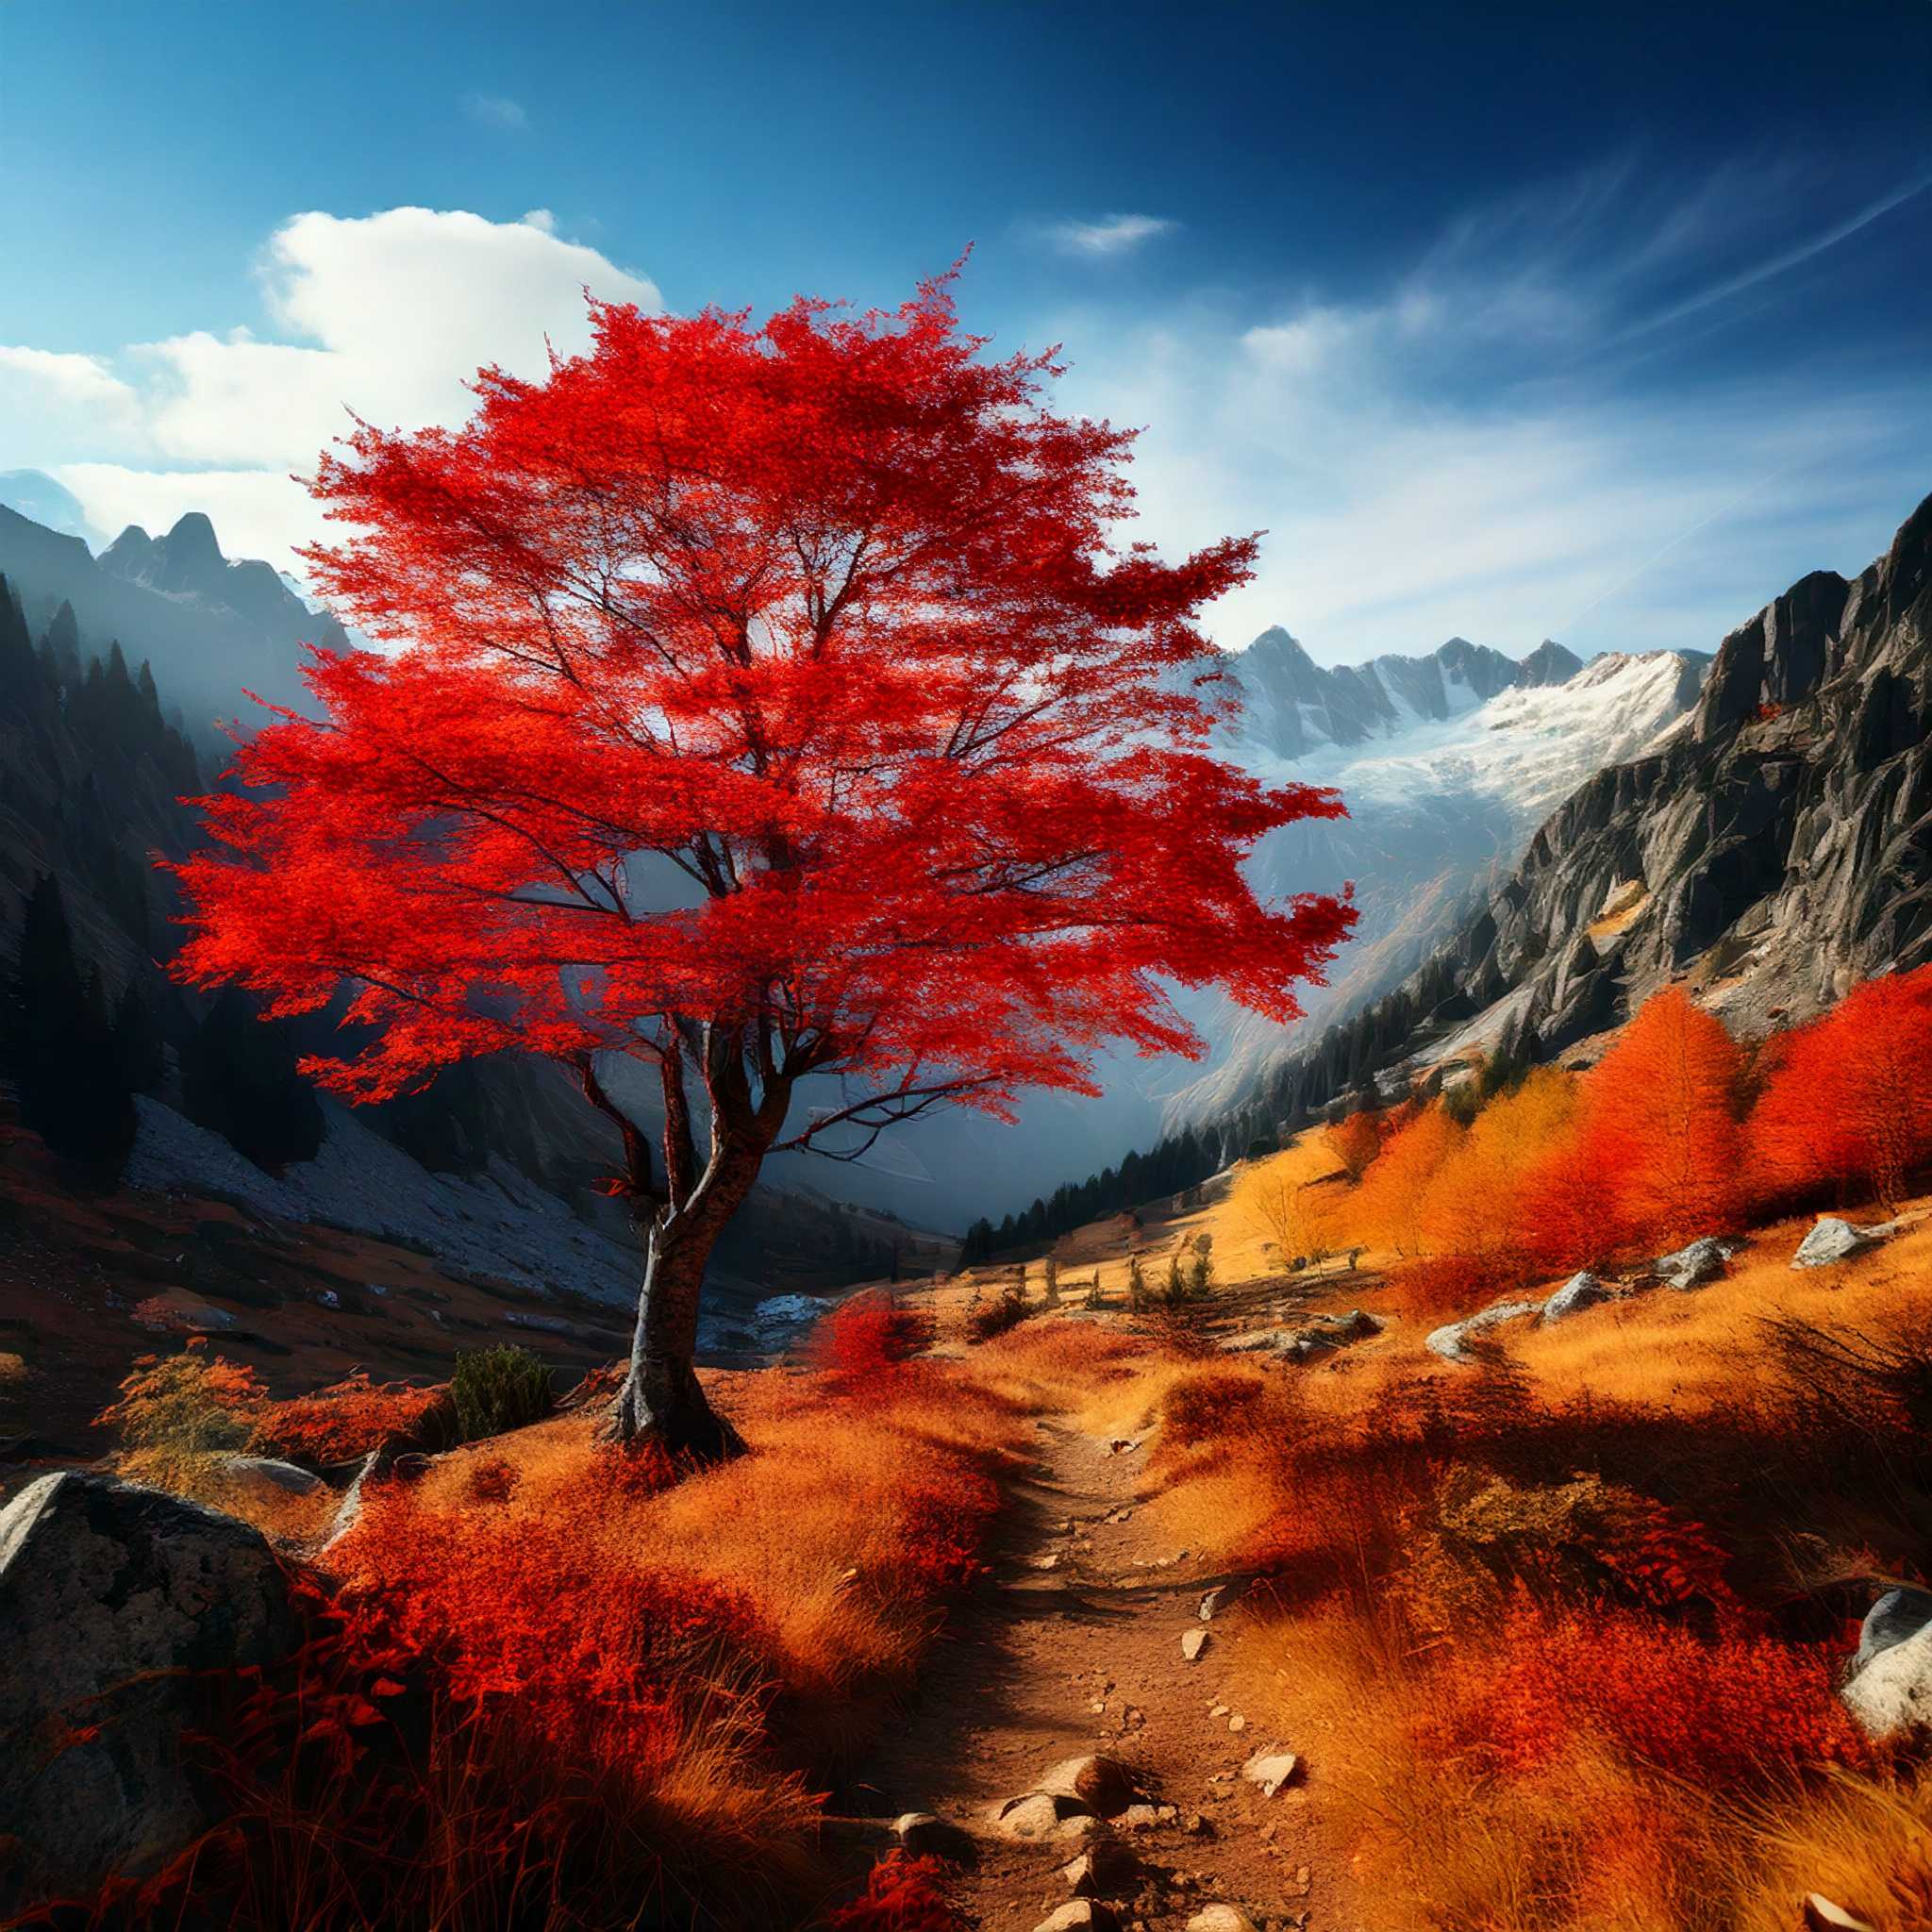
Figure: " A red tree in a valley. Hi res" - by Ideogram 3 Google Imagen
Offers exceptional photorealism and language comprehension.
- Accessible via Vertex AI or ImageFX
- Produces highly detailed, realistic images
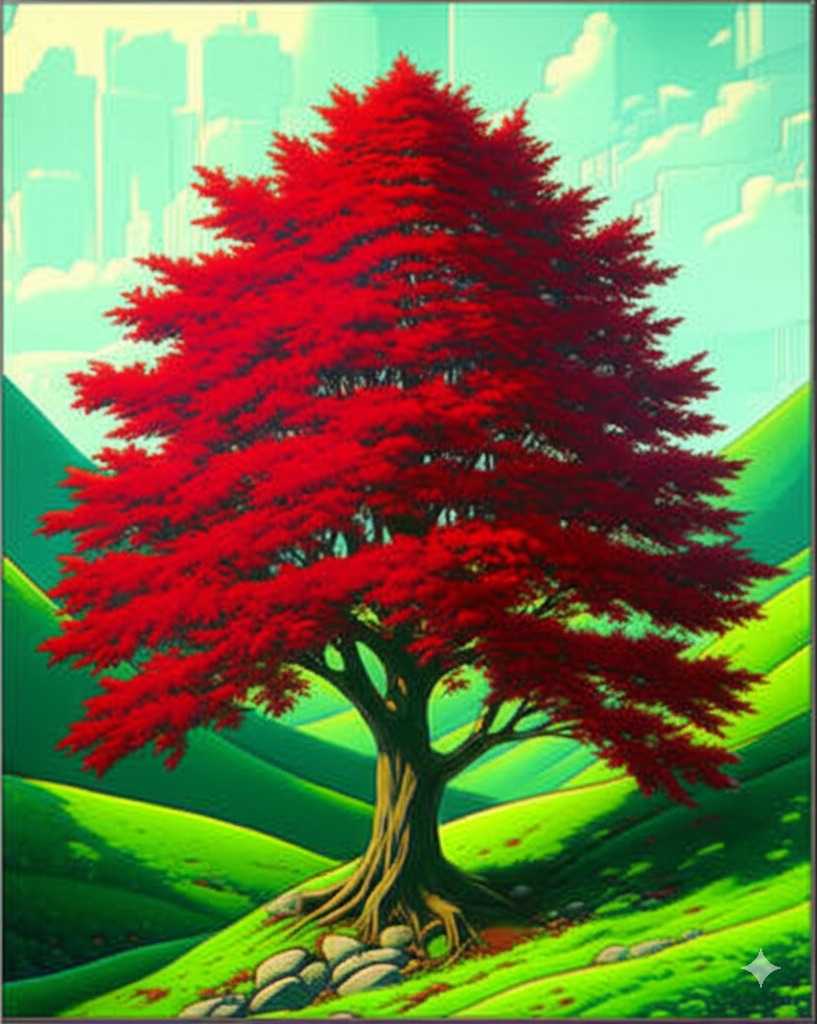
Figure: "A red tree in a valley. Hi res" - by Imagen 3 Reve
Reve is an emerging image generator designed to offer creativity and control, with a focus on aesthetic quality and prompt flexibility.
- Aimed at creators seeking artistic and dream-like visuals
- Supports stylised compositions and illustrative looks
- Gaining attention as a new player in the image generation space

Figure: "A red tree in a valley. Hi res" - by Reve Adobe Firefly
Known for detailed control over image generation and editing, ideal for customized outputs.
- Advanced editing and generation features
- Integrated into Adobe Creative Cloud
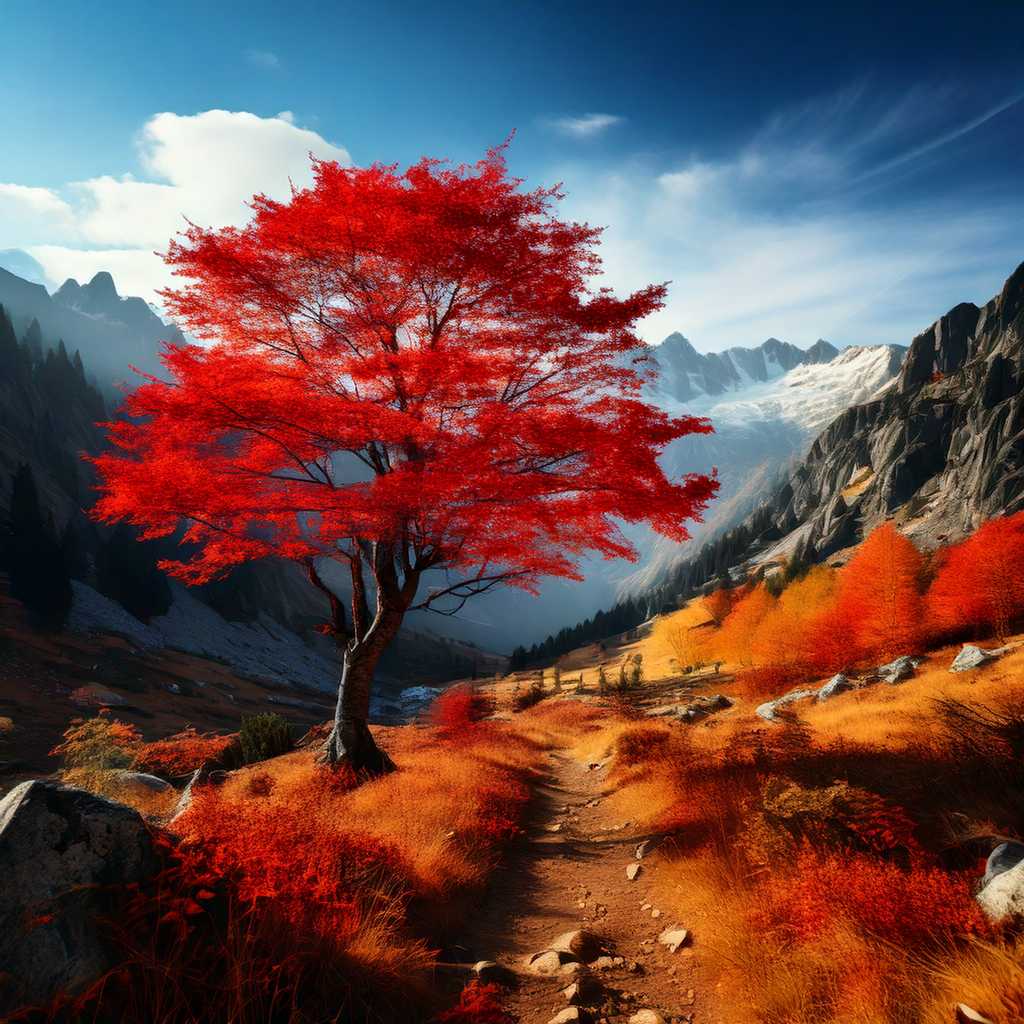
Figure: "A red tree in a valley. Hi res" - by Firefly Stable Diffusion (via DreamStudio)
Highly customizable, open source tool offering fine-tuned image generation.
- Free and available for local use
- Highly customizable with flexible output adjustments
- Supports inpainting and outpainting with Stable Diffusion XL (SDXL)

Figure: "A red tree in a valley. Hi res" - by StableDiffusion via DreamStudio Leonardo AI
Known for imaginative visuals and concept art. Free account available at Leonardo.ai.
- User-friendly website
- Highly customizable with built-in image editing and prompt generation
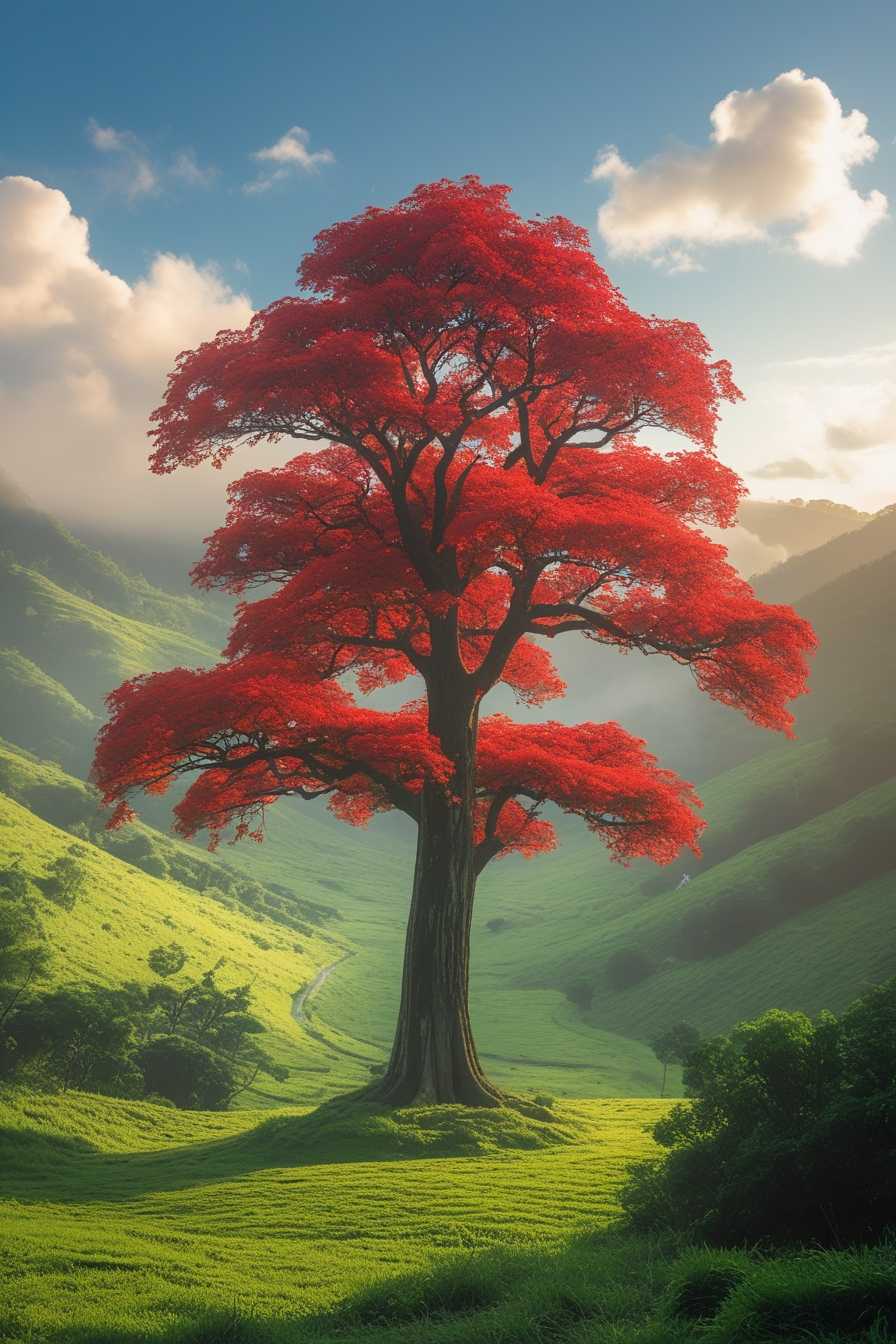
Figure: "A red tree in a valley. Hi res" - by Leonardo Phoenix Flux
Developed by Black Forest Labs, Flux generates high-quality images from text prompts.
- Multiple model variants (Schnell, Dev, Pro)
- Supports various artistic styles and precise color control
- Capable of rendering text within images
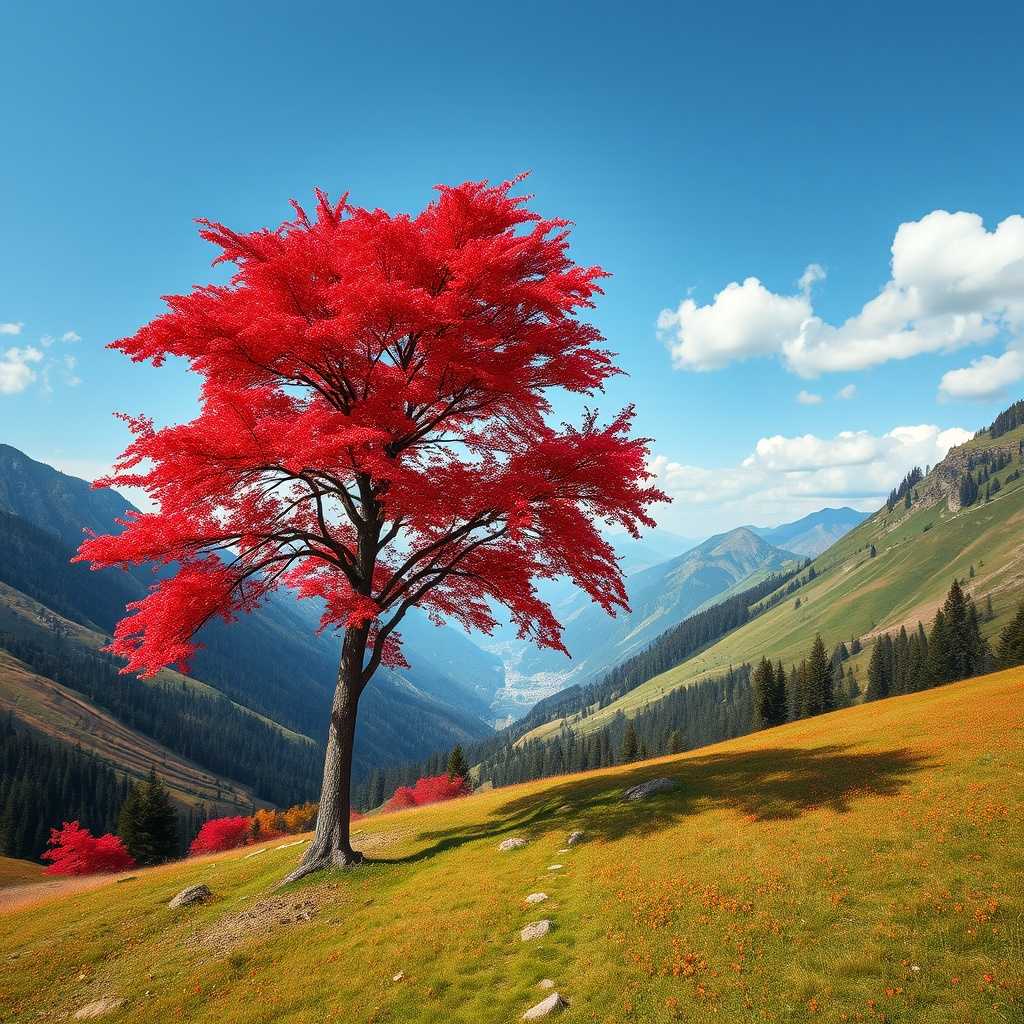
Figure: "A red tree in a valley. Hi res" - by Flux Adobe Photoshop’s AI-powered and prompt-based generative tool can turn a simple picture into anything you imagine.
Video: Generative Fill for Beginners (4 min)Generative Fill is easy to use
- Select an object or area with any selection tool (lasso, marquee, magic wand, etc)
- Enter a prompt into the contextual taskbar that appears after your selection
- Click generate!
- Use the arrows in the taskbar to see some alternate variations, or press generate again until you see a result you like.
Tips and tricks
- Leave the prompt blank and Generative Fill will use the area surrounding your selection to mask it away. Removing unwanted objects is that easy.
- Be intentional with the size and shape of the selections you make. The tool will use this as extra information to interpret your prompts.
- Generative Fill will create a new generative layer with the same name as your prompt. You can come back and alter the generated content at any time by selecting that layer.
Although there are still discussions around AI images and copyright, Generative Fill is powered by Adobe Firefly and designed for commercial use.
Prompts are the instructions that you input. They can be as simple or as complex as you like.
Video: Advanced Midjourney V5.1 Guide (11 min) - PromptingPrompting basics
A general prompt might be "an image of a sunset over the ocean," which tells the AI exactly what you're looking for.
Tip: When sharing an AI image, add the prompt to the image caption so others can see how you made it.
“A brown dog on a skateboard”
Figure: Good example - A basic prompt
A well-structured prompt often has more details, in the format “A {{ TYPE OF PICTURE }} of a {{ MAIN SUBJECT }}, {{ STYLE CUES }}”.
“A photograph of a robot, cartoon style”
Figure: Good example - A basic prompt with style cues.
You can add more even more detail to make a descriptive prompt by following this template:
{{ ADJECTIVE }}, {{ EMOTION }}, {{ SUBJECT }}, {{ STYLE }}, {{ COLOR }}
Figure: Good example - Use this prompt template!
Prompt length
Prompts that are too short do not give the AI enough information to create an image matching your idea. It is a good idea to be detailed with your prompts, but too much detail is equally likely to give the AI too many instructions, which "confuses" it and can reduce the acurracy.
"A landscape"
Figure: Bad example - A vague prompt like this gives an ambiguous image
"A snowy mountain landscape at sunset with warm hues in the style of a photograph"
Figure: Good example - A detailed and concise description, but not too long. This will provide the AI with specific elements to incorporate, resulting in an accurate image.
"A snowy mountain landscape at sunset... Majestic peaks rise high into the sky, their rugged outlines etched against the fading golden light. Adorned with a pristine layer of glistening snow, they stand as silent sentinels, towering over the vast expanse below. The snow-covered slopes cascade down in gentle curves, inviting adventurers and nature lovers alike. In the foreground, a small creek meanders through the snow-covered landscape, flowing steadily beneath a delicate layer of ice. Over the creek, a footbridge stretches, connecting the two banks. Two travelers cross the bridge, their footprints leaving a mark on the pristine snow. The frozen trees, adorned with icicles, stand like witnesses to the passage of time."
Figure: Bad example - This prompt is too long. It will probably just look like the one above!
Parameters allow you to control different aspects of the generated image via settings on the image generator. Most AI image generators have parameter options, and they can significantly affect the result.
- Resolution: This defines the quality of the generated image. Higher resolution values will result in higher-quality images.
- Randomness: This parameter influences the amount of random variation in the generated image. Higher randomness values may result in more unique or creative images, but they can also lead to images that deviate more from the initial prompt.
- Aspect Ratio: Aspect ratio dictates the proportions of the image. For instance, you might choose a square (1:1) aspect ratio for social media posts, a landscape (16:9) ratio for video thumbnails, or a portrait (3:4) ratio for smartphone screens.
- Style: Style refers to specifying a particular visual style for the image. This could be a certain artistic style (like "impressionistic" or "cubist"). The AI uses this information to guide the stylistic aspects of image generation.
- Uploading: Most AI image generators allow you to upload an existing image so that the AI will create different variations of it.
Traditionally, UI wireframes have been made with tools like Figma, Excalidraw, Balsamiq, or pen and paper. Generative AI tools now streamline the process. We can use Prompt Engineering to create a Proof of Concept (PoC) or translate a design to code with the click of a button!
Video: Build a fullstack app in 7 minutes with v0 (Figma to code)! (7 min)Here is a longer example of someone using v0.dev to generate a calculator UI and then trying to replicate the same UI by hand: V0 coded a calculator 30x faster than me (17 min)
Boilerplate
When a web developer is handed design images, it can be a drag to spend the next few hours (or days/weeks) building the baseline components, HTML, and CSS before getting to the fun stuff.
Thankfully, AI-assisted tools are beginning to help with the more mundane aspects of this process, and sites such as v0.dev can produce React components (with the code) you can drop into your project to give you a huge head start on the work!
Upload your designers' images and tweak the output with a few prompts to get ready-made components for your app. Just be careful - these tools will often take "creative liberties" with the designs, so keep an eye out.
Proof of concepts
Generative UI tools can be a great way to collaborate with stakeholders in realtime, as you can generate ideas and iterate over them using natural language prompts. This can give developers or designers a useful starting point and frame of reference to build a highly polished design.
If you're a dev that likes (or is forced) to moonlight as a designer these tools can be a great timesaver in creating professional looking web components in a short amount of time. These tools aren't a substitute for a layout created by a qualified designer but they can be great for generating boilerplate code or proof of concept designs that you can build on in the future.
Example
Here is what you can achieve using v0.dev and a few prompts:

Figure: A matrix-style blog site 🤖 AI prompts excamples:
- Create a form to input customer data like: first name, last name, DoB, email, phone, etc..
- Do it using material style component. With a primary color red
- Use this red instead : #CC4141, and add icons next to labels, like a phone icon next to the phone number, etc
Tools
- v0.dev
-
builder.io
- UIMagic (waitlist)
- Pineapple Builder
Sometimes you might be trying to create a specific type of image, and the AI keeps including pieces that you don't want. A straightforward way to get around this problem is by including what you DON'T want in your prompt.
What is negative prompting?
Negative prompting is specifying what you don't want in your image. It guides the AI away from certain features that you're not interested in. Some AI image generators (e.g. Midjourney and Dreamstudio) have this option as a parameter. In others (e.g. DALLE-2), you can include it in your prompt.
Imagine you are using Midjourney to generate a photo of an emplty highway in the mountains.
“A highway in the mountains”
Figure: Bad example - When you use this prompt, Midjourney keeps putting cars on the highway!
This is when it can be helpful to include a negative prompt. In Midjourney, this is done by using two dashes. (see Midjourney parameter list)
“A highway in the mountains --no cars”
Figure: Good example - The prompt with '--no cars' is more likely to eliminate cars in the picture.
AI tools like Rask, Voice.ai, and ElevenLabs are revolutionizing how we generate voices and translations. They can even create transcripts, making our lives a lot easier. But remember, with great power comes great responsibility!
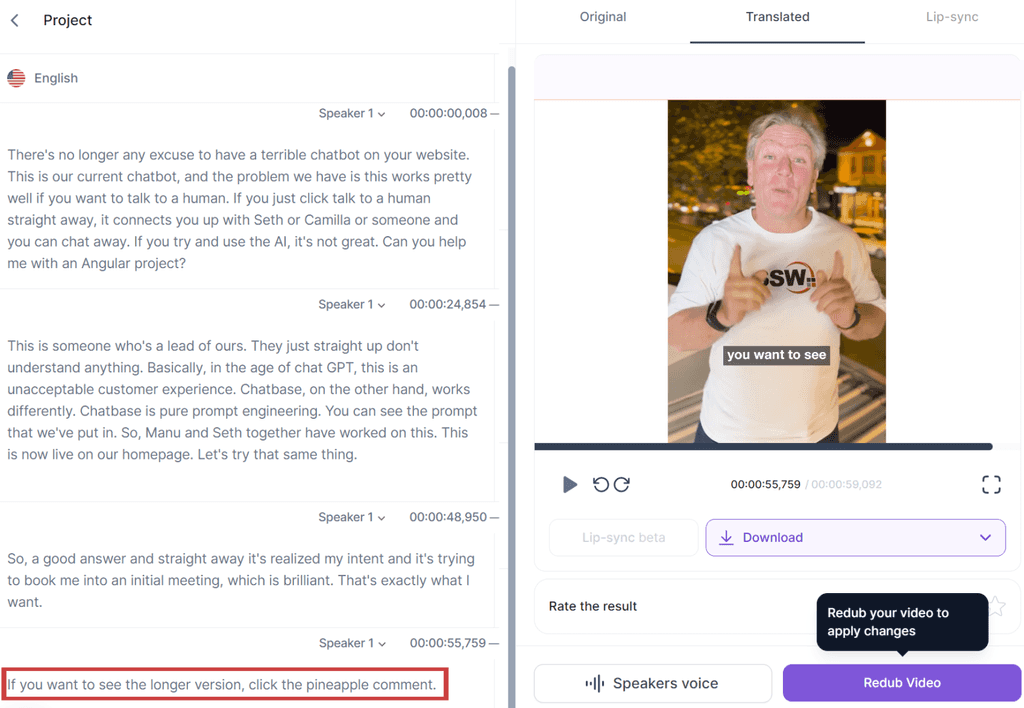
Figure: Bad example - Relying solely on AI without any oversight can lead to errors 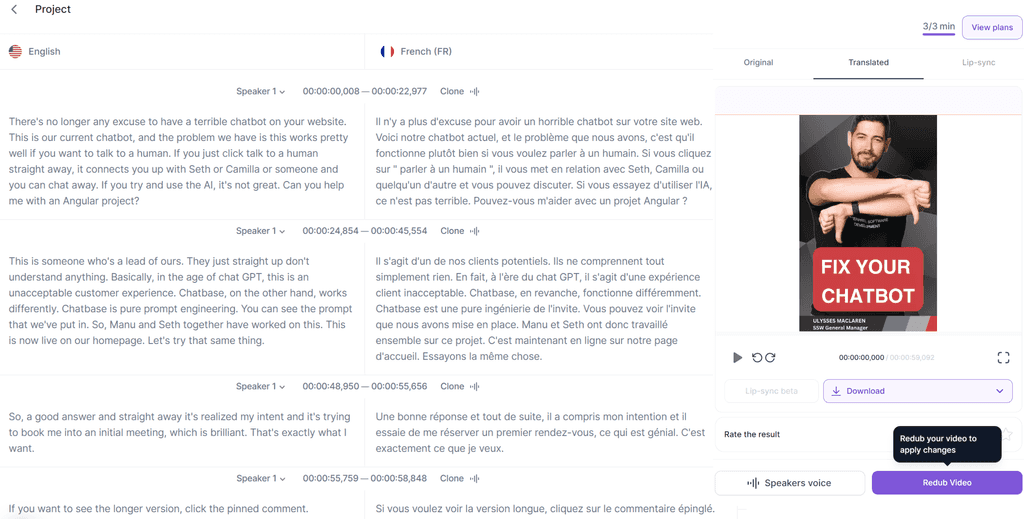
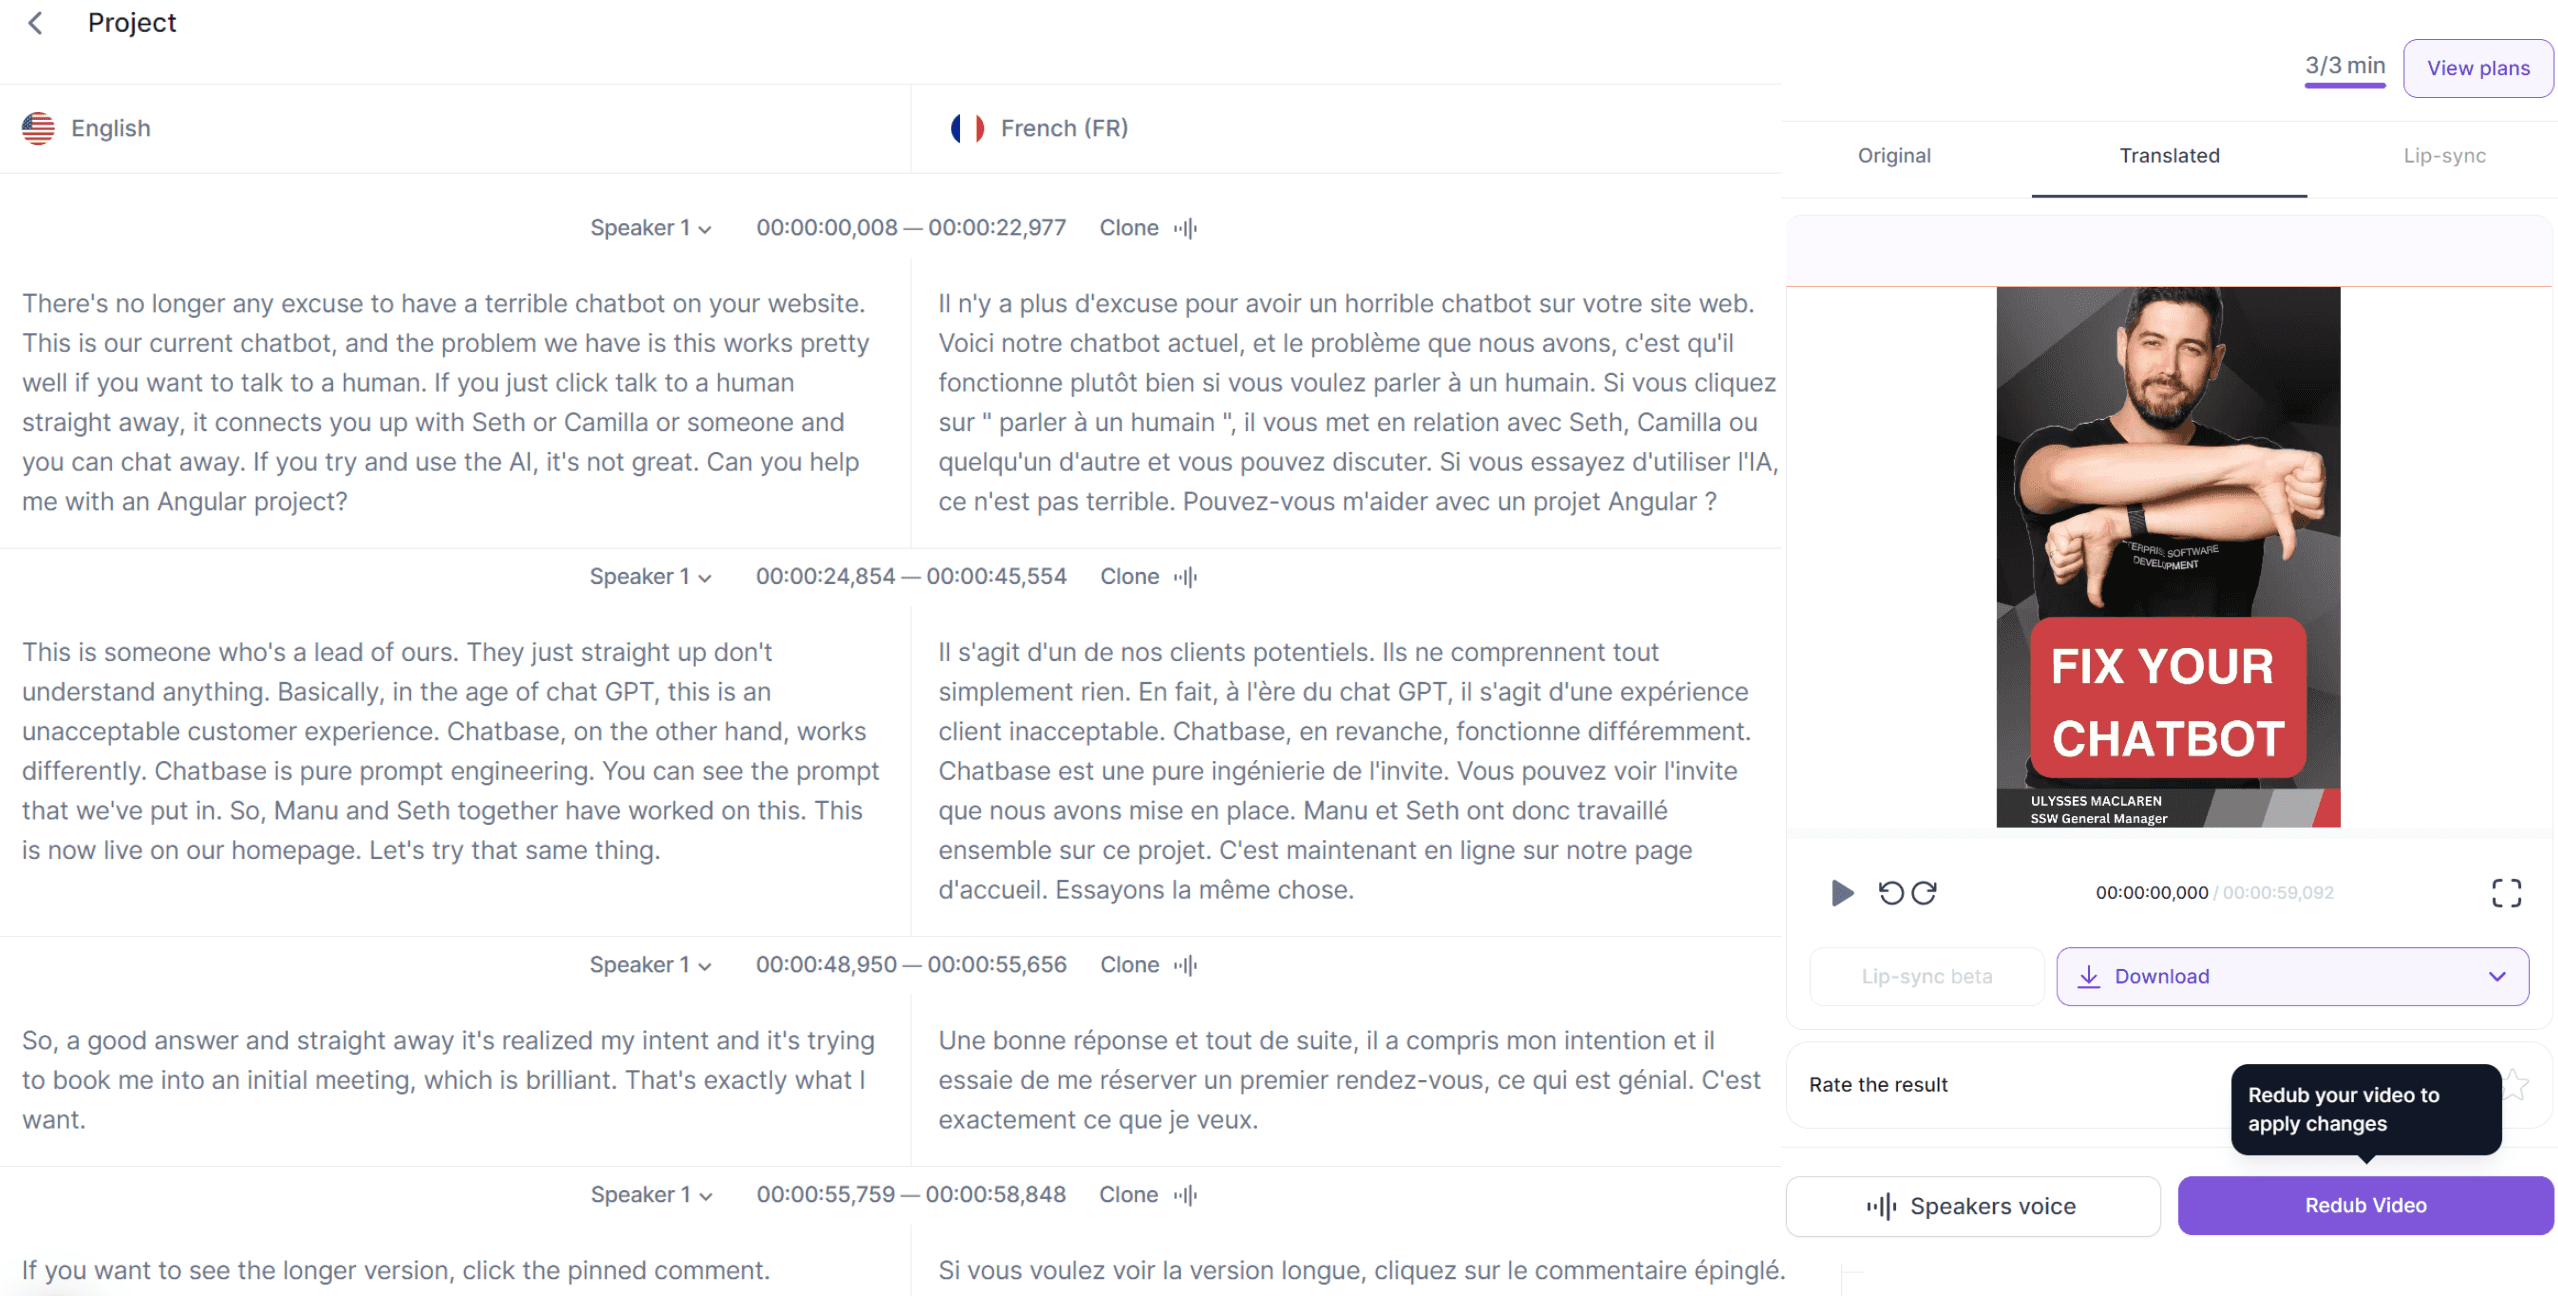
Figure: Good example - Using Rask to translate an English voiceover into French in the speakers own voice Video: Fix Your Website Chatbot! - English version (1 min)
Video: Fix Your Website Chatbot! - French translation (1 min)
The Need for Oversight 👀
While these tools are incredibly helpful, they're not perfect. It's important to double-check their output to ensure accuracy. After all, we wouldn't want any miscommunication, would we?
The Ever-Changing AI Landscape 🌅
The AI landscape is constantly changing and improving. Today's best tool might be tomorrow's old news. So, keep an open mind and be ready to adapt to the latest and greatest!
You've probably seen AI churn out gorgeous images from a sentence... then watched it ruin a photo when you asked for a tiny tweak.
Teams waste time regenerating whole scenes, your subject look-alike drifts between edits, and brand consistency suffers. Modern editing-first AI models fix this by making targeted, local edits while preserving everything else, so you can remove a bin, change the background, or adjust a shirt color without re-generating the whole shot.
Video: Google’s nano banana just killed Photoshop... let’s run it (3 min)When should you use AI to edit images?
Use AI editing when you need surgical changes and fast iteration:
- Remove or replace small elements (e.g. "remove the chair in the background")
- Background swaps and extensions (outpainting), canvas cleanup, or sky replacement
- Consistent variations for marketing (same product/person, different scenes)
- Style harmonization (color matching, lighting tweaks, subtle restyling)
- Text fixes in images (signs, labels) when allowed
Avoid or get explicit approval for:
- Sensitive content (medical, legal/forensic, news)
- Deceptive changes (e.g. misrepresenting events)
- Portrait retouching without consent or policy coverage
From text-to-image to intelligent editing
Early days (2022)
Text-to-image models like DALL·E 2, Imagen, and Midjourney popularized "prompt to picture" and introduced basic inpainting/outpainting. Great for creation, but edits often regenerated the whole image, causing drift and detail loss.

Figure: Bad example - Text to image models often struggle with accuracy, producing distorted anatomy and other artifacts when asked to edit an image, e.g. the terminator only has 3 fingers... Today's shift - Enter Nano Banana 🍌
Editing-first models like Google's gemini-2.5-flash-image-preview (aka Nano Banana) and Flux.1 Kontext take an image + instruction and applies localized edits. They preserve subjects and scene layout, follow prompts tightly, and support iterative workflows (step-by-step revisions without degradation). Like "Photoshop with natural-language brushes."

Figure: Good example - You can take an existing image and ask Nano Banana to create new images using it as a reference, then refine them conversationally by asking for changes What makes editing-first models different?
- Targeted local edits - They change only what you ask for and leave everything else untouched. This makes them practical for production assets where fidelity matters
- Consistency & identity preservation - They maintain the same person/product across edits (haircut, outfit, background changes) without subtle morphing
- Strong prompt adherence - They follow instructions literally (“make the shirt red” means only the shirt becomes red) and are less likely to hallucinate unrelated changes
- Iterative & interactive - You can chain edits (clean background → add shadow → tweak contrast) while keeping quality stable—mirroring designer workflows

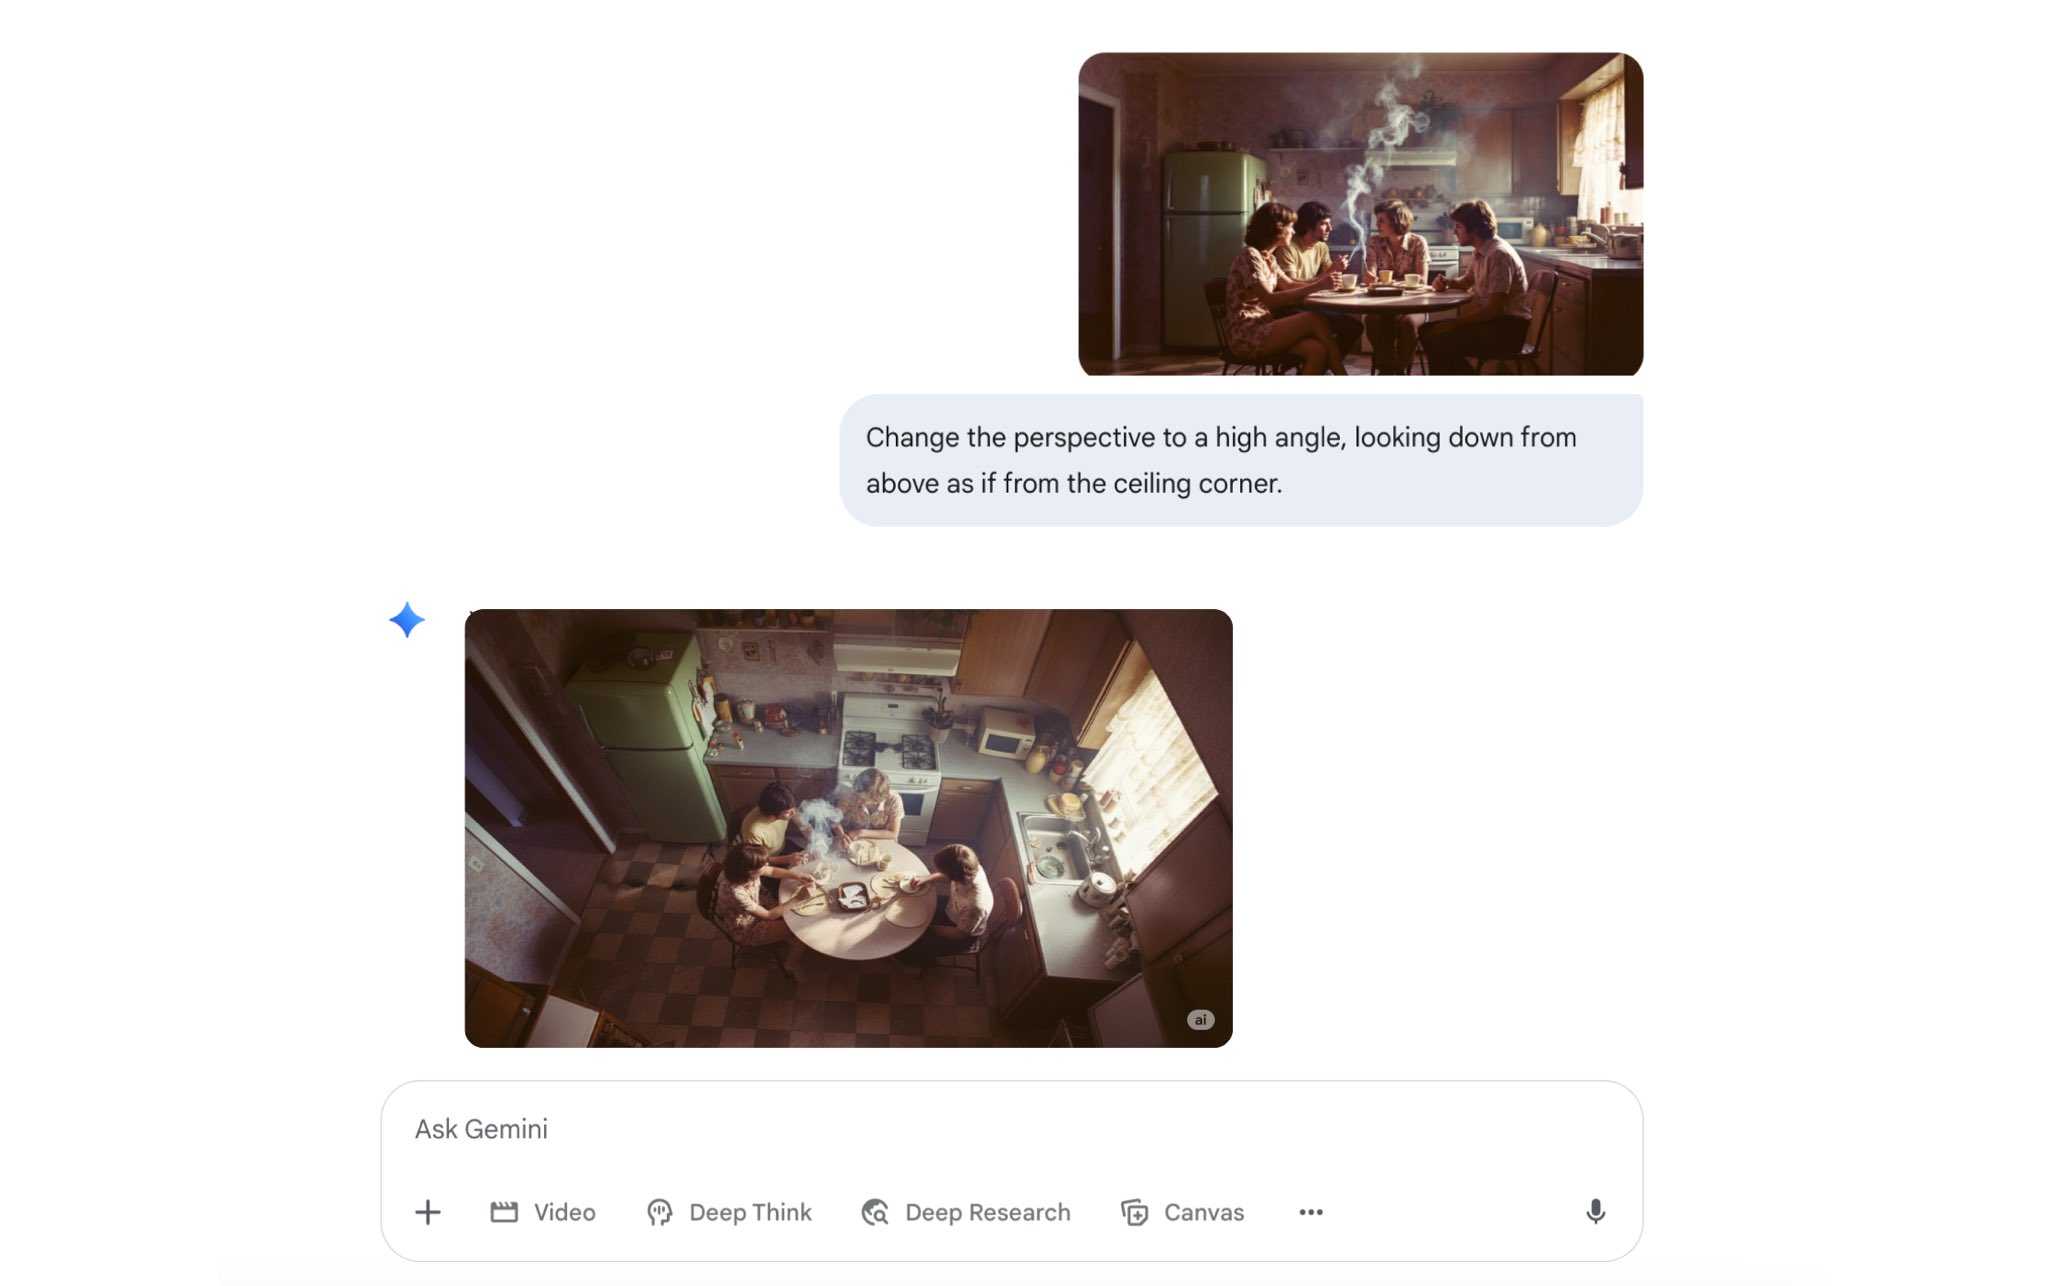
Figure: ✅ Good example - You can even ask it to change the perspective of an image 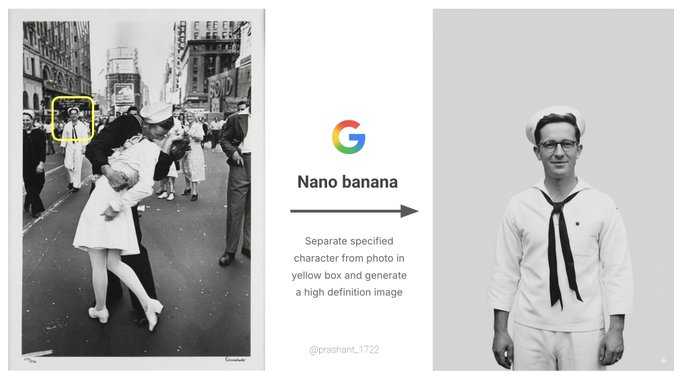
Figure: ✅ Good example - You can isolate a character from an image as seen in this example from Google Today’s shift - Midjourney v7
MidJourney was one of the first quality image generators, but the most recent version is a real step up! The latest version, Midjourney V7, has been designed to better understand text prompts and produce images that are noticeably higher quality. This, as Midjourney CEO David Holz explained on the company Discord, can be seen in textures, bodies, and hands, as well as in objects.
It is great for highly aesthetic, cinematic, and artistic output, making it ideal for detailed, professional-grade visuals. We recommend it for hero images, stylised key art with minimal edits.
V7 offers 2 modes: Turbo, which is faster but more expensive, and Relax, which is slower but more affordable.
There’s also a new Draft Mode that generates images around 10x faster and at roughly half the cost of standard mode. Draft images are lower quality by default, but you can upscale them if you’re happy with the result.

Figure: ✅ Good example - from Midjourney's v7 release on X, the images are incredibly realistic OpenAI Images (DALL·E 3 / GPT‑4o Images)
Best known for prompt fidelity, legible typography, and chat‑first iteration in ChatGPT, Open AI images makes AI-generated images really accessible.
OpenAI's latest model can be used as a 'chat-driven design assistant'. It's intended to create precise, usable images rather than just pretty art.
It’s tightly integrated into ChatGPT, so it remembers your conversation and follows detailed instructions. It is designed to handle text in images properly (great for posters, slides, UI mockups, and social tiles), it supports reference images so you can refine or restyle existing designs, and it’s strong at both photorealistic and illustrated styles, making it ideal for marketing assets, product and UI concepts, diagrams and explainers, and quick visual variations you can iterate on in a few conversational steps.
It does have its limitations; for example, if you were trying to create a poster for a horror-themed movie, you would likely be rejected by the automated safety system. To create the image below, many iterations were necessary to make it 'safe to render'.
Prompt example: "Tall, vertical gothic-inspired movie poster for a fantasy film set in the Victorian era, featuring three powerful mermaids rising from a dark, stormy ocean near a foggy Victorian harbor. Their long, shimmering mermaid tails are clearly visible beneath Victorian gowns made of black and deep-blue lace and velvet, with corset bodices, high collars, and flowing sleeves that drift as if underwater. Gas lamps, iron railings, and silhouettes of Victorian buildings appear in the background, partially obscured by mist. The lighting is dramatic but not horror: silver moonlight, deep shadows, and glowing teal highlights on the water. Mood is mysterious, elegant, and adventurous. Color palette of deep blues, greens, greys, and inky blacks with silver and teal accents. At the top, the title text in ornate gothic lettering: “Dark Mermaids” and at the bottom a subtle tagline, in smaller elegant serif type. Highly detailed, cinematic, poster art, no studio logos, no extra text."

Figure: Good example - An example of OpenAI's image generation Origin & trust (label your edits)
As AI editing becomes standard, origin is essential. SynthID is an industry approach that embeds an imperceptible, pixel-level watermark at generation/edit time (in addition to any visible “AI” label). It’s designed to survive common transforms (compression, mild crops/brightness changes) and can be verified by compatible detectors.
Best Practices for AI image use:
- Enable watermarking where your stack supports it (e.g. tools that offer SynthID-style invisible marks plus visible "AI-edited" labels)
- Store proof of detection alongside the final asset (export the verifier result or checksum)
- Disclose edits in captions/metadata ("Edited with AI; objects removed; colors adjusted")
- Know the limits: because very tiny edits may be too subtle to flag; keep manual logs regardless
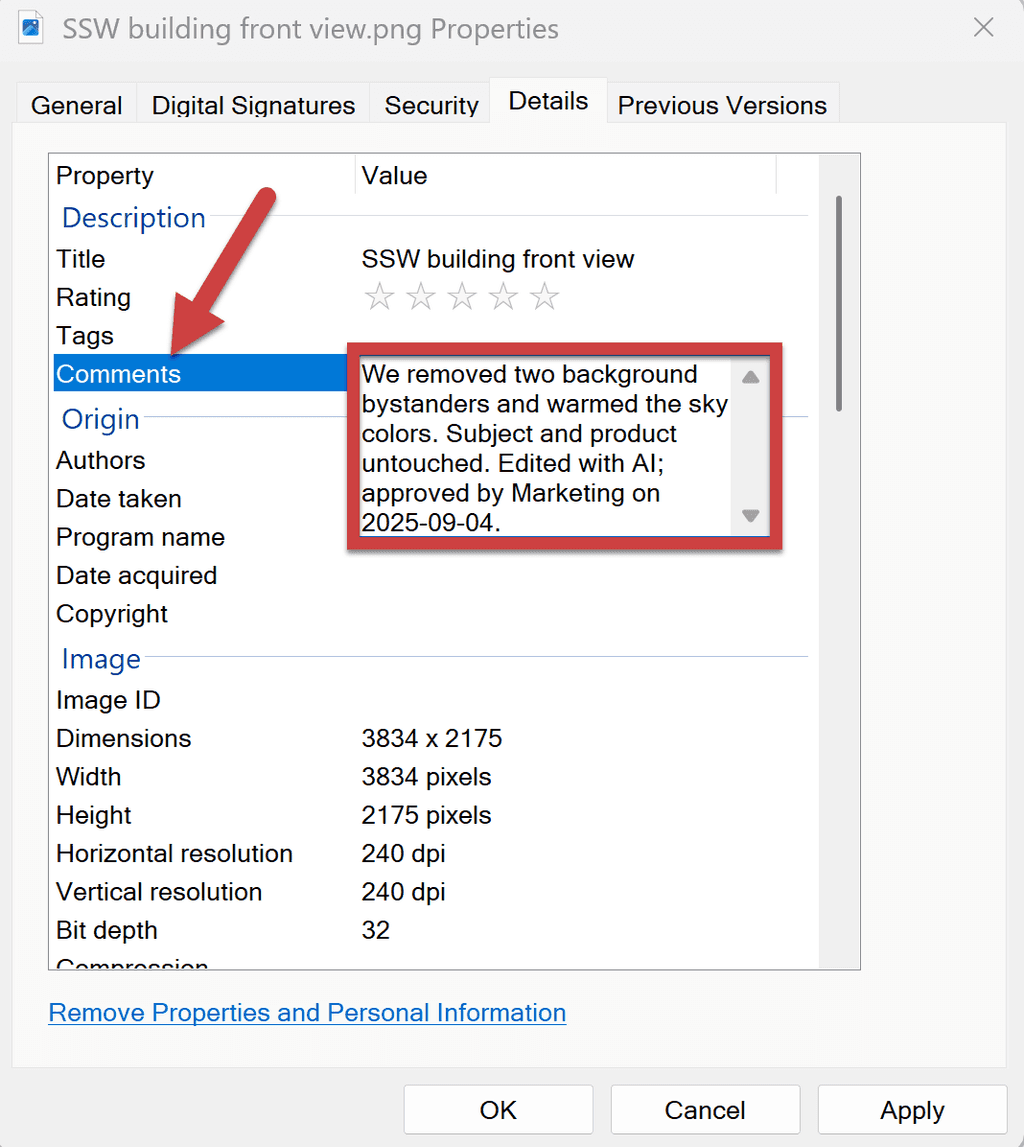
Figure: Good example - Clear disclosure aligned to asset management and brand guidelines that is added to the metadata Common pitfalls and fixes
Identity drift
The subject (face, object, or brand element) gradually morphs into something unrecognizable after repeated edits.
✅ The fix: Re-state constraints each turn ("keep the same face, same product texture"). If drift persists, roll back one step and re-edit in smaller increments.
Over-editing look
Edits pile up until the result looks artificial, plastic, or uncanny.
✅ The fix: Prefer subtle adjustments; specify "natural" or "minimal" in the prompt.
Perspective mismatches
Inserted or modified objects appear at the wrong scale, angle, or depth compared to the base image.
✅ The fix: Add guidance like "match camera angle and lens feel".
Lighting inconsistency
New elements don’t share the same light source, shadow direction, or color temperature, breaking realism.
✅ The fix: Include "soft shadow matching light direction" and "keep global color balance".
If you would like more information on AI image generators, check out Adam Cogan’s blog post:
AI Shorts - What SSW thinks about the latest Generative AI tools?
The SSW TV team has been exploring how AI is changing design workflows, boosting productivity, and raising the quality bar for everyone creating graphics today.
Nano Banana Pro
Video: The AI powerhouse lifting the quality bar for all graphics... Nano Banana Pro (2 min)