Rules to Better Office 365 - 6 Rules
Want to work smarter with Microsoft 365? Check SSW's Microsoft 365 consulting page.
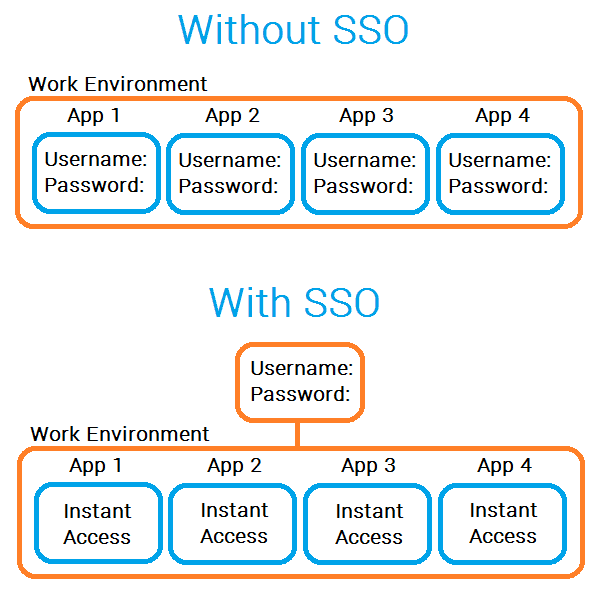
Using Active Directory Federation Services (ADFS) lets you use one account to log into multiple systems, through Single Sign-On (SSO).
ADFS is built upon SAML 2.0 protocol (Security Assertion Markup Language), allowing secure exchange of authentication data.
With ADFS, you can use only one account (generally created on your on-premises Active Directory (AD) server) to log into multiple systems e.g. Dynamics 365 CRM, Office 365 and many others.
This implementation gives you security over which users are acessing which application with which accounts, and also reduces the surface for attacks on having many accounts with many different passwords:
Figure: Good Example - Using one account on many systems
ADFS also gives you a solution in other corner cases:
- When you want to use Office 365 and not store your password on the cloud; 2. When you want the authentication to take place on-premises; 3. When you want to create a trust between SharePoint on-premises and Entra ID; 4. Amongst many others.
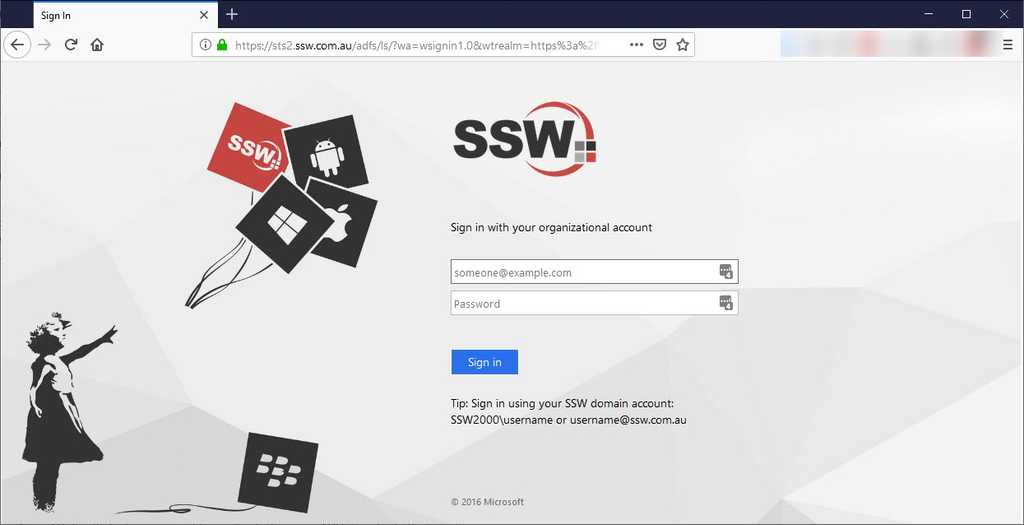
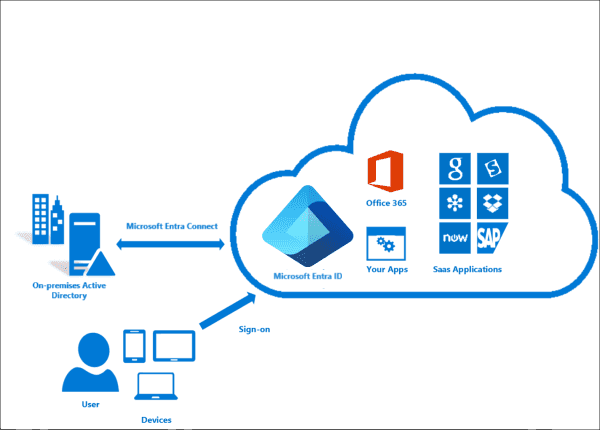
Figure: Good Example - Using SSO to log into CRM with your on-premises account
- When you want to use Office 365 and not store your password on the cloud; 2. When you want the authentication to take place on-premises; 3. When you want to create a trust between SharePoint on-premises and Entra ID; 4. Amongst many others.
Microsoft Entra ID - formerly Azure Active Directory, Password Hash Synchronization (PHS) is one of the methods you can use if you want to have your identities synced to the cloud, alongside Pass-through Authentication (PTA) and Federation with AD FS.If you have a hybrid identity in place with Entra ID, chances are you are already synchronizing password hashes to the cloud with Microsoft Entra Connect formerly Azure AD Connect.
Entra ID PHS synchronizes the password in on-premises Active Directory with Entra ID so you can use your on-premises password to login to cloud services, like Azure or Office 365. It also allows you to implement Seamless Sign-On for domain-joined machines, so users don't need to login twice when opening their emails in a browser, for example.
Entra ID PHS also allows you to have an absolute lean infrastructure on-premises, as the only needed moving part is Entra Connect to be installed in a server or Domain Controller. No agents or internet-facing machines necessary.
The web requests don't even come to your server, they are server by Microsoft's big pool of servers around the globe!
You can check out a deep dive of Entra ID PHS in official Microsoft documentation at What is password hash synchronization with Microsoft Entra ID?
The Dynamics 365 app for Microsoft Teams lets you share records with colleagues without leaving the app. Instead of sharing non-descriptive URLs, use the integration to provide more context.
There are two ways to share a Dynamics 365 record in Teams:
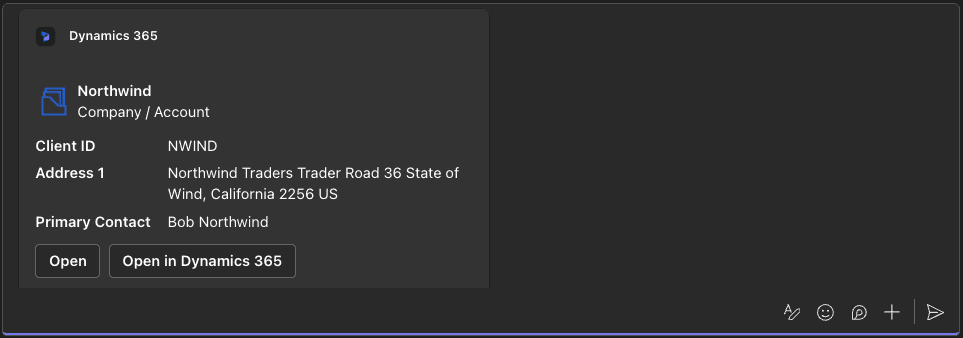
1. Share in a chat
You can quickly share a record in a conversation.
Click the + button in the text box | Dynamics 365 | choose a record | Send.
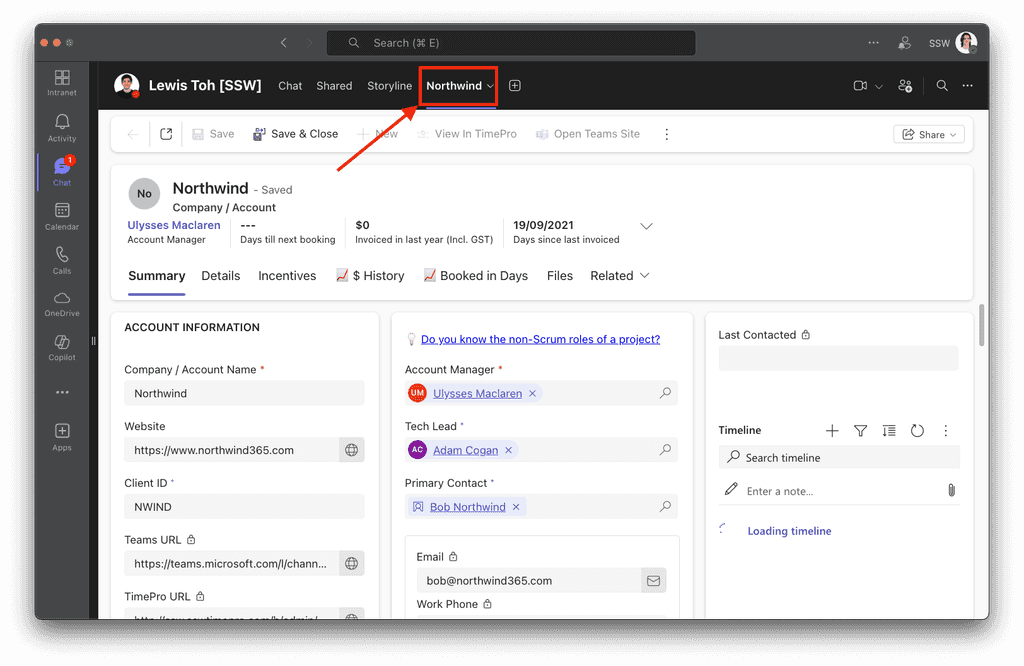
2. Add as a tab
If your team needs frequent access to a record, you can add it as a tab.
Click the + button in the top bar | Dynamics 365 | choose the record | Save.
The default message size limit in Exchange Online is 25MB. Even though email attachments are not the best way to share a large file, sometimes it is the only option - and these days, 25MB is quite small. This default limit should be increased; it is easy to do so from the Exchange admin center or Exchange Management Shell.
It is important to remember that the maximum email attachment size will also depend on the person receiving the email - their email service will need to accept the larger size. For example, Gmail's default limit is also 25MB.
Changing the default in Exchange admin center
- Go to Exchange admin center | Recipients | Mailboxes | Set default message size restrictions
- Enter the maximum size you would like to set in KB for both sending and receiving, and click Save. We have it set to 35MB (35,840KB).
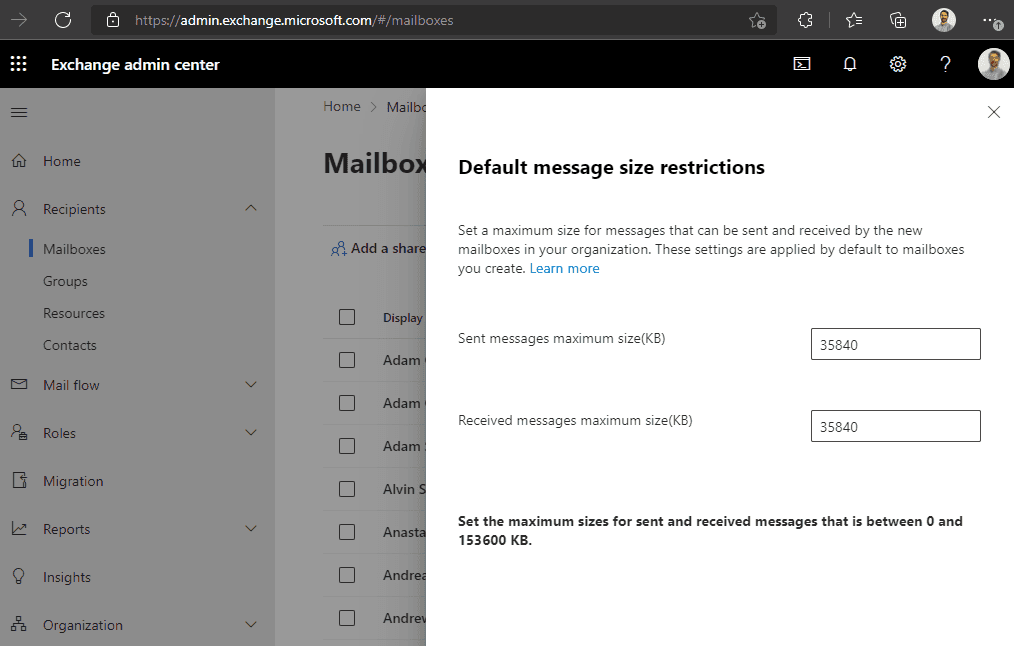
Figure: Default message size restrictions in Exchange admin center Note that this will only apply to new mailboxes. To change the restrictions for existing mailboxes, from the same page you can select one, several or all existing mailboxes, and click Message size restrictions. As above, enter the desired maximums and click Save.
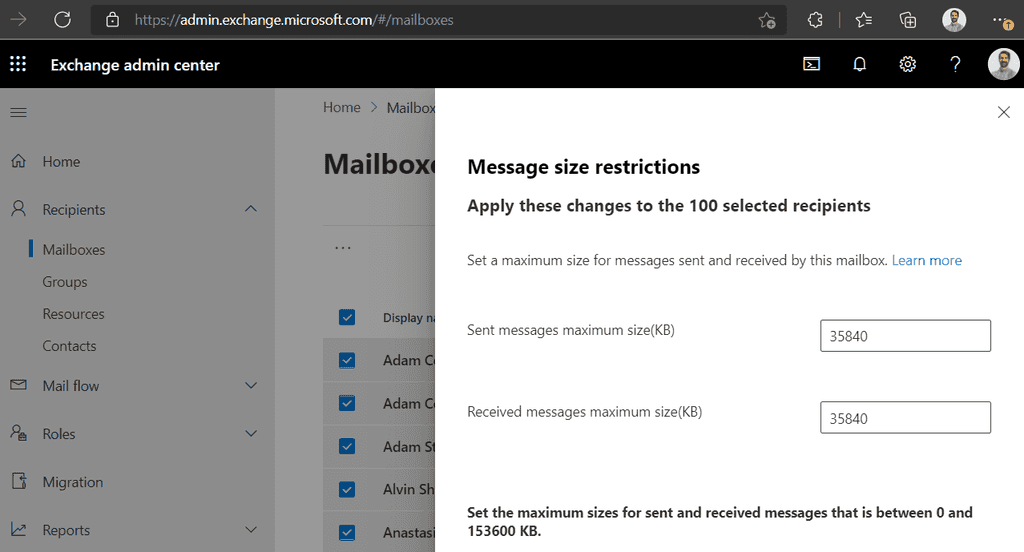
Figure: Existing mailbox message size restrictions in Exchange admin center Changing message limits in Exchange Management Shell
Of course, this can also be done with the Exchange Management Shell, for example:
Set-Mailbox -Identity "Adam Cogan" -MaxSendSize 35mb -MaxReceiveSize 35mb
Links
Exchange Online limits - Service Descriptions | Microsoft Docs
Configure message size limits for a mailbox | Microsoft Docs
Microsoft provides a collaboration tool called Microsoft 365 email groups on the cloud, which allows users to send emails to a group of people using a single email address. These groups can be created and managed from any location with an internet connection and can include both internal and external recipients. Microsoft 365 email groups on the cloud offer a wide range of collaboration features, making them an effective tool for streamlining communication and improving productivity.
On-premises groups vs Microsoft 365 groups
It is important to understand the differences between on-premises groups and Microsoft 365 groups.
On-premises groups
These groups are created and managed within an organization's local network, using on-premises infrastructure such as Active Directory. These groups typically have limited collaboration features and are primarily used for email distribution and security management. If you have to manage the groups, users, or laptops on-premises that are domain-joined it is easier to create a security group in AD.
NOTE: AD groups sync to Microsoft 365 (cloud), but Microsoft 365 groups don't sync back to AD, unless you enable [Group Writeback](https://learn.microsoft.com/en-us/entra/identity/hybrid/connect/how-to-connect-group-writeback-enable?WT.mcid=M365-MVP-33518)._
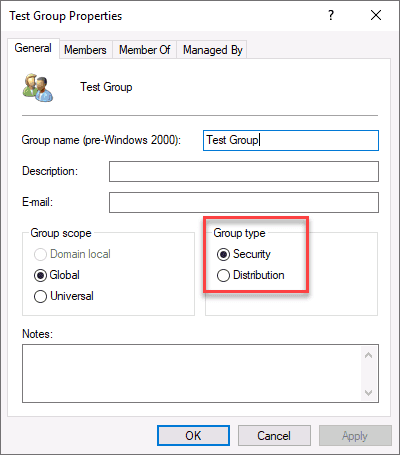
Figure: Choosing a group type in On-Premises Active Directory Groups in Microsoft 365 (Cloud)
In Microsoft 365, there are 6 different types of groups you can create - so it is important to know how to decide which group you want.
The groups available in Microsoft 365 are:
#1 Microsoft 365 groups
#2 Distribution groups
#3 Security groups
#4 Mail-enabled security groups
#5 Shared mailboxes
#6 Dynamic distribution groups
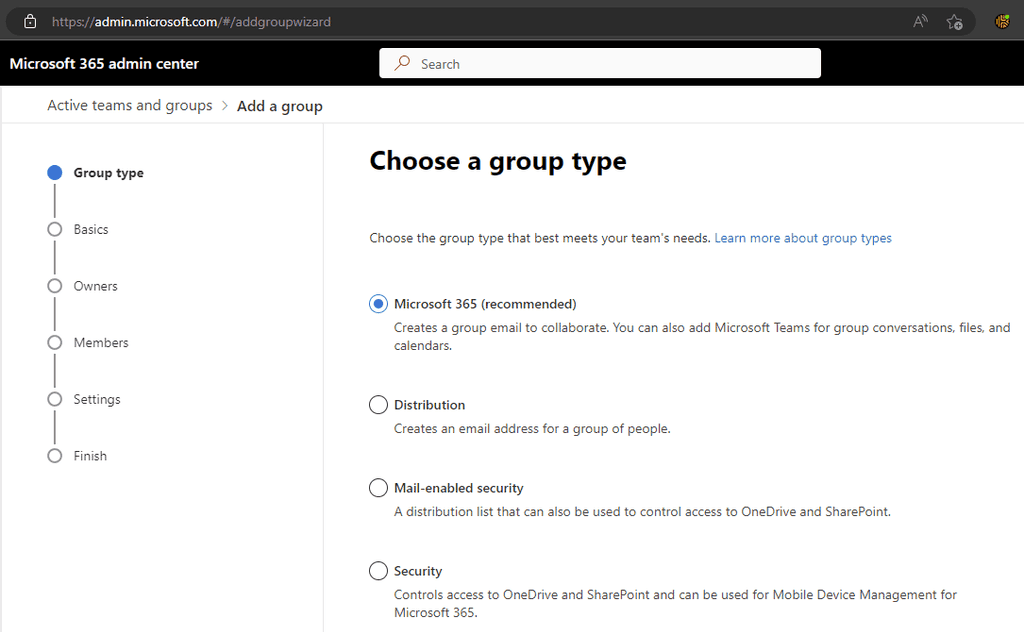
Figure: Choosing a group type in Microsoft 365 #1 Microsoft 365 groups
Microsoft 365 groups are for collaboration between members of the group. When you create a Microsoft 365 group, you get a number of shared resources - including an inbox, a calendar, and a shared workspace for files. You can create a Microsoft 365 Group with or without a Team attached to it - or you can add a Team later.
Microsoft 365 Groups are recommended by Microsoft, and they are often the best choice if you're not sure which group type to choose. Choose these groups if the users wish to choose whether they want to receive the email or not (subscribe).
#2 Distribution groups
Distribution groups are the way to go if you just want to be able to email a number of people at the same time. They lack the collaboration features of a Microsoft 365 group, but sometimes you don't need these extra bits.
It's also worth noting that Distribution groups can be upgraded to Microsoft 365 Groups, so you can change your mind later. Choose these groups if the users need to always receive these emails (important alerts).
#3 Security groups
Security groups do not provide email, or any sort of collaborative tools. They are used to grant access to resources, such as SharePoint or Azure resources. This makes managing access easier, as you don't have to add individual accounts - and when you remove someone from the group, their access is removed from everywhere that group had access.
Naming security groups is particularly important, so that you know what it is and what it is used for. These should be prefixed with SEC_ and should clearly show what the group is used for, for example SEC_VPNUsers.
#4 Mail-enabled security groups
Mail-enabled security groups are - you guessed it - security groups with mail enabled. They are useful if you want to grant access to a resource and email the people with that access.
#5 Shared mailboxes
Shared mailboxes are used when multiple people need to access the same mailbox. They are useful when there is a shared role, for example an info@ email address that multiple people manage. They also include a calendar that can be used by everyone with access to the mailbox.
Shared mailboxes are also useful as they give you a mailbox without taking up one of your Exchange online licences.
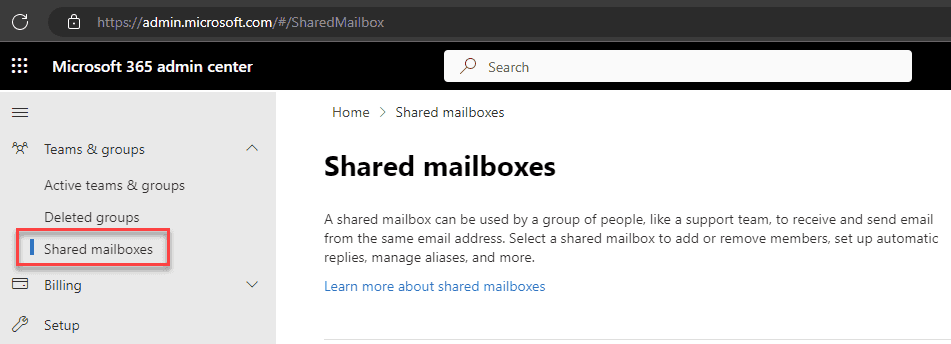
Figure: Shared mailboxes are created in their own section under the Teams & groups heading #6 Dynamic distribution groups
Dynamic distribution groups are created in the Exchange admin center.
Unlike regular distribution groups that contain a defined set of members, the membership list for dynamic distribution groups is calculated each time a message is sent to the group, based on the filters and conditions that you define. When an email message is sent to a dynamic distribution group, it's delivered to all recipients in the organization that match the criteria defined for that group.
You can read more about groups in Microsoft 365 in Microsoft's documentation.
In Microsoft 365, user mailboxes are limited to 50GB or 100GB, depending on the licence you have. For users with lots of emails, you need a solution to keep mailboxes under the limit, without losing data or access to emails.
There are 3 ways to "archive" emails in Outlook/Exchange, however there's only one true archive option that should be used - Archive Mailboxes (also called Online Archive, or In-Place Archiving).
This video explains the 3 "archiving" options in Outlook (skip to 4:43 for Archive Mailboxes).
Video: Are you using the Right "Archive" in Outlook? (7 min)In Summary:
❌ Archive folder - just another folder in your mailbox
❌ Auto-Archive - stored on your computer, not available online (you will lose data!)
✅ Archive Mailboxes - the right solution!- Archive Mailboxes give you 50GB or 1.5TB(!) of extra storage, depending on your licence.
- They are stored in the cloud - no lost data
- They are accessible in Outlook on all devices
Enable Archive Mailboxes
- Go to the Exchange admin center | Mailboxes
- Select a user
- Go to Others | Manage mailbox archive
- Change Mailbox archive status to Enabled
- (Optional) Add a name - if no name is added, it will default to Online Archive
- Click Save
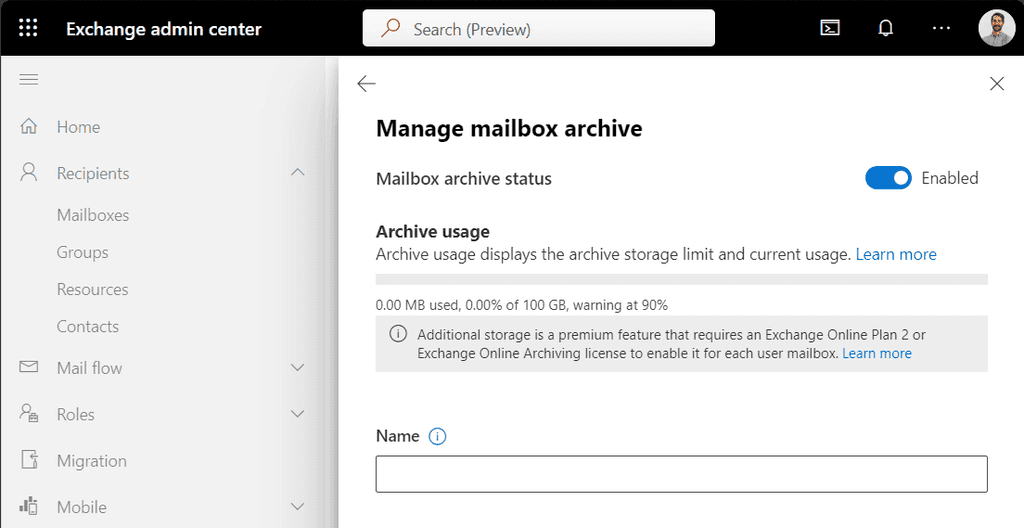
Figure: Exchange admin center | Manage mailbox archive Users will see their new Online Archive as a separate mailbox in Outlook

Figure: Outlook | Online Archive mailbox Archive Policies
By default, emails will be moved to the archive mailbox after 2 years. Users can select a different archiving policy per folder by going to the Outlook folder Properties | Policy.

Figure: Default Online Archive policy options Admins can edit the default policy, or add new policy options in Microsoft Purview | Data lifecycle management | Exchange (legacy)
- Use the MRM Retention Tags tab to create archive time-frame options, e.g. archive after 3 years
- Use the MRM Retention Policies tab to apply default and/or optional policies to users
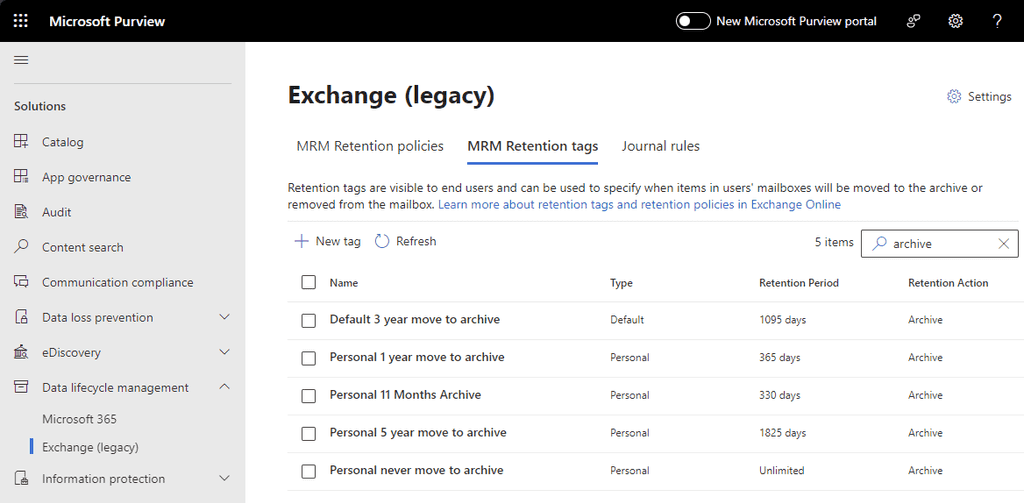
Figure: Microsoft Purview | MRM Retention tags For more information see Microsoft's documentation: https://learn.microsoft.com/en-us/purview/archive-mailboxes?WT.mc_id=M365-MVP-33518
