Rules to Better API Management - 3 Rules
Enhance your API management strategies with essential rules that focus on utilizing the right tools, creating effective mockups, and branding your API portal. These guidelines will help streamline your API processes and improve overall user experience.
When building APIs one of the challenges is in how to document the API for other developers to consume.
Using a tool that automates this is extremely valuable as it helps avoid the biggest bugbear of developers, stale documentation. This resulted in a number of standards being developed for specifying APIs. Swagger and OpenAPI being being the most common, but there are a few others.
Azure API Management
The best tool for use in medium to large organizations is Azure API Management (APIm for short). It has all the features other API Management tools and wraps everything up in a very nice UI.
By supporting Code First APIs, APIm can generate the Swagger documentation from your API code. For the developers consuming your API this is really fantastic!
APIm allows you to centralize all your APIs and provide a consistent front-end interface for developers. You also get to securely provide all your APIs behind a single static IP address.
You can use APIm to secure your APIs, improve API discoverablility, transform existing services and even mock services for testing.
Pros:
- Very nice UI compared to many alternatives
- Import API definitions from Swagger, OpenAPI, WSDL, etc
- Centralized API management
-
API policy management (aka request processing pipeline)
- mutate incoming and outgoing requests
- XML to JSON and vice verca
- Add/Remove/Modify request headers
- Redirects
- Caching
- Rate limiting
- API Versioning
- Response Mocking
- Security features
-
Developer Portal
- API Documentation
- Branded APIs
-
Product customization
- expose parts of any API as individual products
- Monetization (sell your API)
- Custom Identity Provider
- Free Developer Tier
- Comprehensive SLAs
Cons:
- Pricing is complex - Standard to Premium scales exponentially
- Lots of advanced features, requires a lot of learning
Watch Adam Cogan and William Liebenberg explain more about Azure API Management.
Figure: Good Example (more comprehensive)
For smaller organizations one of the http://swagger.io products may suit better. They are free to start with until you start looking for more advanced features. The feature set even on the paid tiers is still significantly more limited than Azure API Management, however the cost is also much lower.
Figure: Good Example (for small teams or projects)
Designing your API up front can be very useful where you have a significant amount of backend development to complete before there is sufficient functionality for front end development to easily commence.
Rather than waiting for the backend to be complete, the APIs can be agreed on up front. Tools like Azure API Management then allow you to mock up the APIs with sample data, allowing the front end development to commence much sooner.
The key benefit of using mocked APIs is being able to present the frontend to stakeholders for feedback really early.
First, watch the first 5 minutes of this video for a general introduction:
Watch Adam Cogan and William Liebenberg discuss the benefits:
Steps to create and test a mocked API endpoint
To complete the following steps, you need to create an instance of Azure API Management in your subscription.
TIP: If you have Azure Credits, the Developer (NO SLA) edition is the cheapest option to test most of the features offered by API Management.
Step 1 - Create Blank API
- Select Blank API
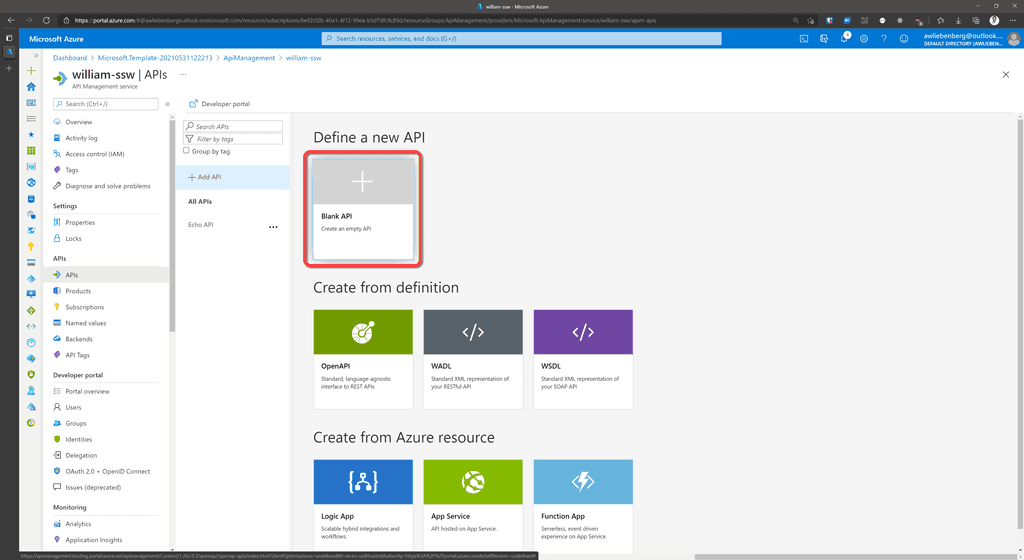
Figure: Create a blank API Step 2 - Describe your API
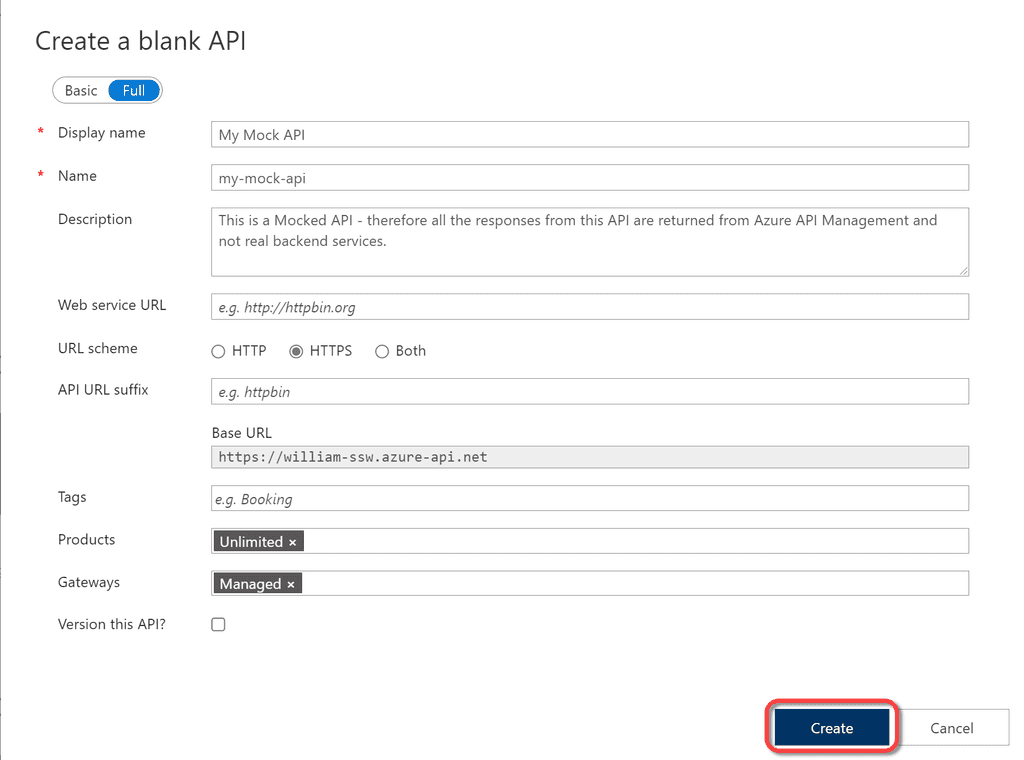
Figure: Describe your API - Click Create
Step 3 - Add an Operation
- Select your API from the API list
- Click Add operation
- Specify the Display name, Name and URL of your operation
- Display name is a UI friendly display name that shows up in the Operations list
- Name is the programatic name of the operation that can be referenced programatically in policies
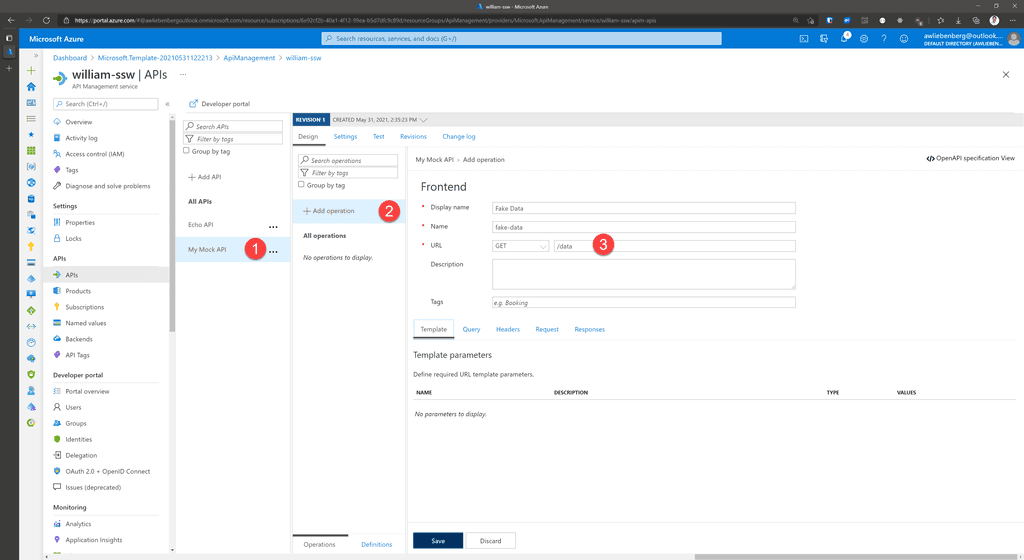
Figure: Adding a new Operation Step 4 - Add response
- Click Add response
- Select the appropriate response code (e.g 200 OK)
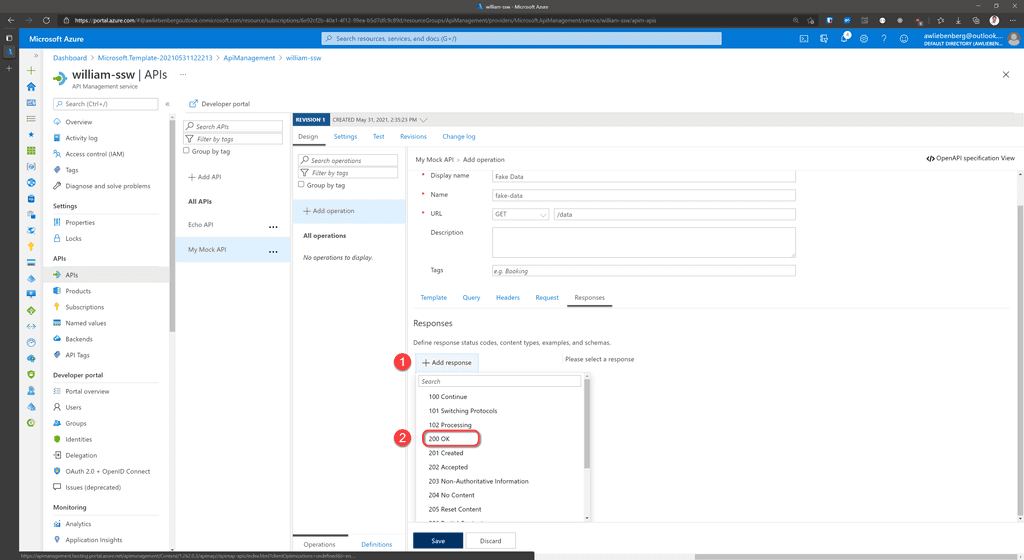
Figure: Add a response Step 5 - Add representation
- Specify the Content Type as
application/json - Specify the Sample as
{ "data": "fake" } - Click Save
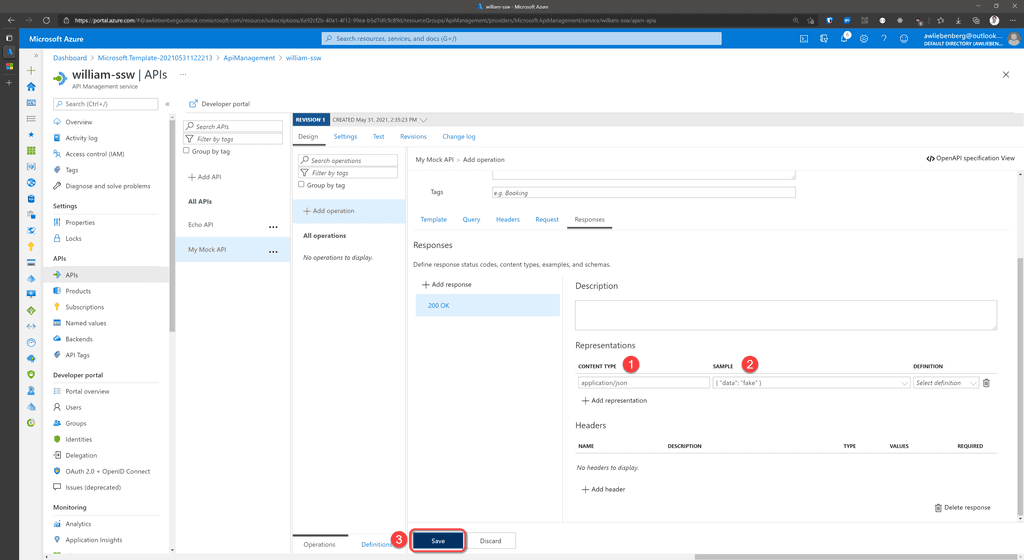
Figure: Add a representation for your response with fake data 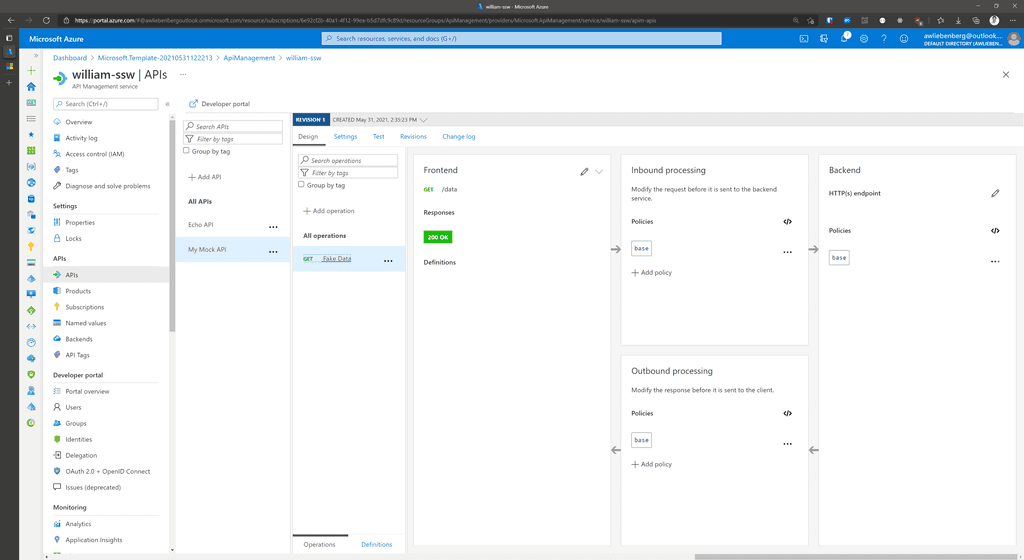
Figure: Operation added successfully Step 6 - Add Mock Response Policy
- Click Add policy
- Select Mock responses
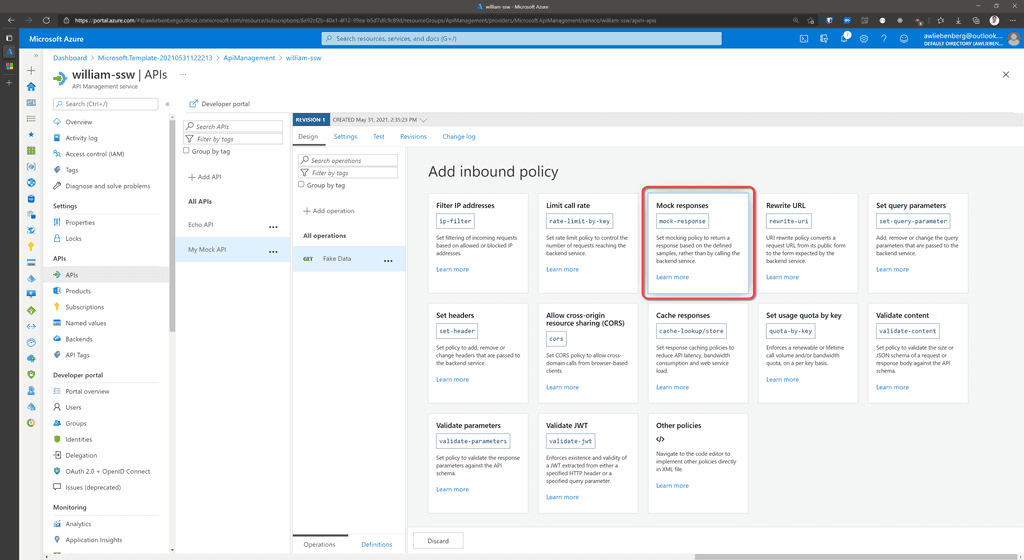
Figure: Add the Mock Response policy Step 7 - Choose response
- Choose the response representation to return as a Mock (e.g.
200 OK, application/json) - Click Save
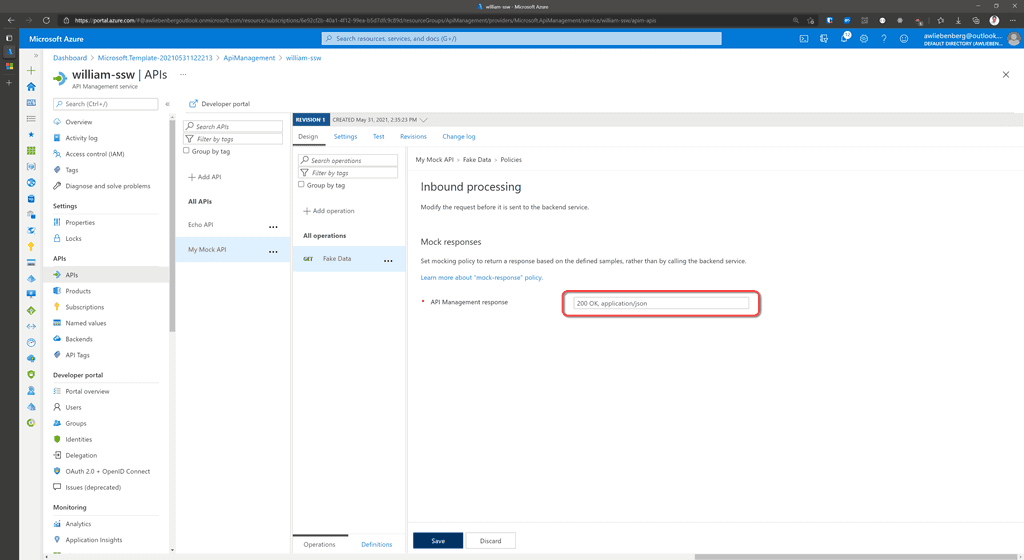
Figure: Choose the response representation Step 8 - Test your Mocked API
- Make sure your API is selected
- Click the Test tab
- Click the FakeData operation
- Note the "Mocking is enabled" notice
- Click Send
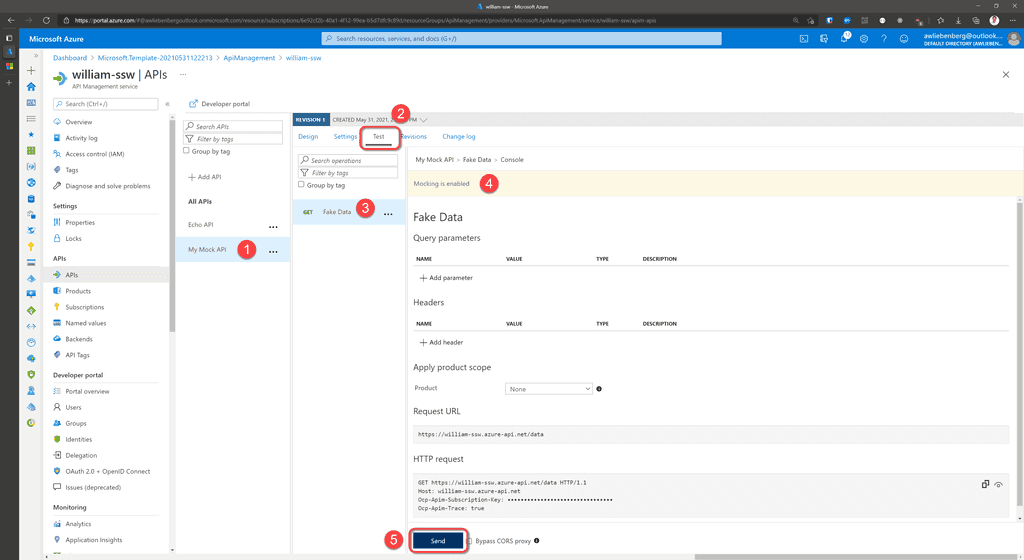
Figure: Testing the mocked api operation Step 9 - Inspect Mocked API response
- Notice the 200 OK status code
- Notice the fake data response in the message body
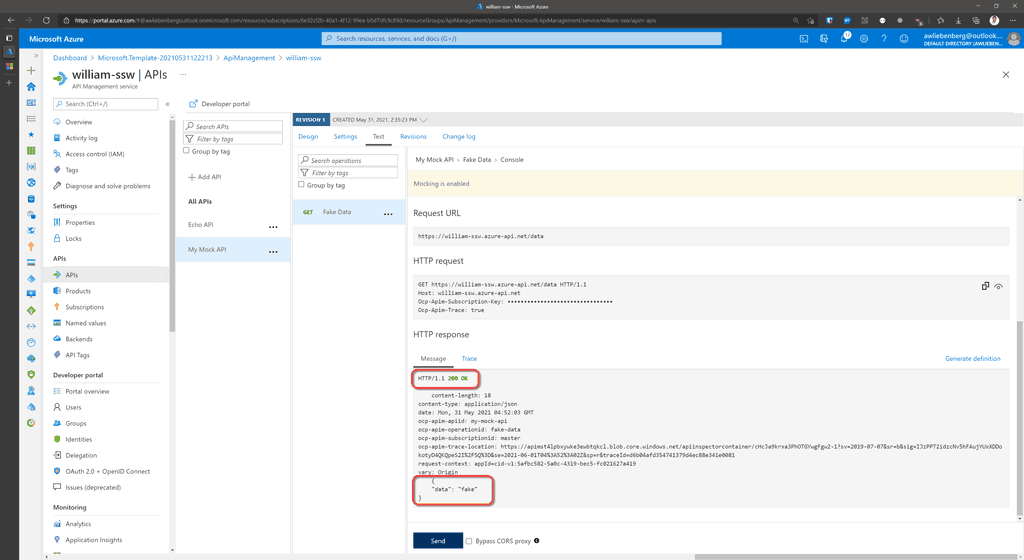
Figure: Response from the mocked operation Step 10 - Call your API using a REST Client
- Add a new
GETrequest to your REST Client - Specify the API Uri such as
https://william-ssw.azure-api.net/data -
Add the subscription header
Ocp-Apim-Subscription-Keyand value- you can copy the value directly from the operation HTTP Request section
- or, from the API Management service | Subscriptions blade
- SEND your request
- Verify the
200 OKresponse and the mocked data
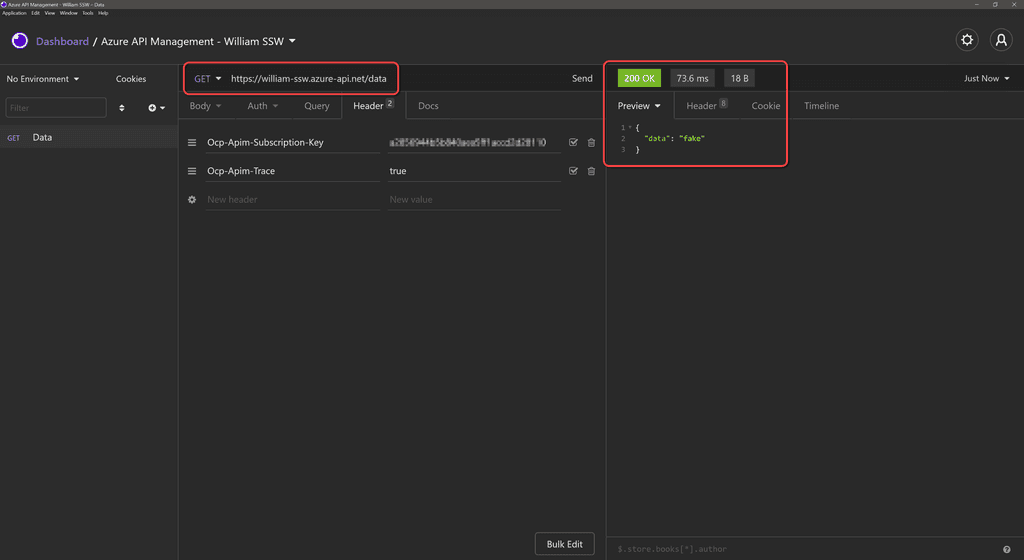
Figure: Calling our Data API from a REST Client Conclusion
Mocking API responses is awesome! You are able to quickly add mocked responses for all your API endpoints without even having a real backend implementation, and your front-end application can make REAL API calls.
Azure API Management provides a Developer Portal where the automated API documentation can be provided using your own corporate branding.
If you are looking to sell access to your APIs, this is a fantastic feature because you can combine your corporate identity into the user interface that your customers will be seeing.
The Developer Portal is open-source and available on GitHub and you can even host it yourself.
Microsoft already provides a very nice tutorial for how to customize your API Management Developer Portal.
Watch Adam Cogan and William Liebenberg discuss the benefits.