Rules to Better DevOps using GitHub (Actions) - 11 Rules
If you still need help, visit our DevOps consulting page and book in a consultant.
Learn more about Scrum with GitHub.
The goal of DevOps is to improve collaboration and communication between software development and IT operations teams, in order to deliver high-quality software products quickly and efficiently.
DevOps aims to automate the software development and delivery process, by implementing practices such as continuous integration, continuous delivery, and continuous deployment. This helps to reduce the time it takes to develop and release software, while also improving the quality and reliability of the final product.
You should know what's going on with your errors and usage.
The goal should be:
A client calls and says: "I'm having problems with your software."
Your answer: "Yes I know. Each morning we check the health of the app and we already saw a new exception. So I already have an engineer working on it."
Take this survey to find out your DevOps index.
Before you begin your journey into DevOps, you should assess yourself and see where your project is at and where you can improve.
For any software team, understanding your current DevOps maturity is essential to delivering high-quality products faster and more reliably. By measuring the right areas, teams can pinpoint strengths, uncover gaps, and create a clear roadmap for improvement.
Access your team's DevOps maturity
This comprehensive DevOps evaluation covers these critical domains:
1. Team Onboarding & Collaboration
Efficient onboarding and seamless collaboration set the foundation for high-performing teams. Key aspects to track include onboarding time for new members, quality of documentation, communication tools in use, team size, meeting cadence, and the presence of cross-functional skills.
2. Deployments
Deployment practices are a strong indicator of delivery capability. Teams should monitor their most recent deployment date, deployment frequency, downtime during releases, incident resolution times, the number of environments, and overall deployment cycle time.
3. Coding Practices
High-quality code starts with disciplined development habits. This includes the use of source control, effective branching strategies, peer code reviews, well-defined pull-request workflows, and regular updates of dependencies.
4. Development Process
A clear and consistent process helps teams deliver predictably. Evaluate the development methodology in use—whether Agile, Scrum, Kanban, or hybrid—and how well the team identifies and manages technical debt.
5. Automation
Automation reduces manual effort and minimizes errors. Track automation in infrastructure provisioning, build pipelines, deployment workflows, and UI testing to ensure repeatable, scalable delivery.
6. Telemetry
Continuous monitoring is essential for proactive improvement. Measure how effectively your team tracks errors, monitors performance, and analyzes usage to inform both technical and business decisions.
By assessing these through a Software Audit, teams will gain a detailed picture of their DevOps maturity, allowing them to take targeted actions that lead to faster releases, fewer issues, and better collaboration across the board.
Once you’ve identified the manual processes in Stage 1, you can start looking at automation. The two best tools for build and release automation are Github and Azure DevOps.
See Rules to Better Continuous Deployments with TFS.
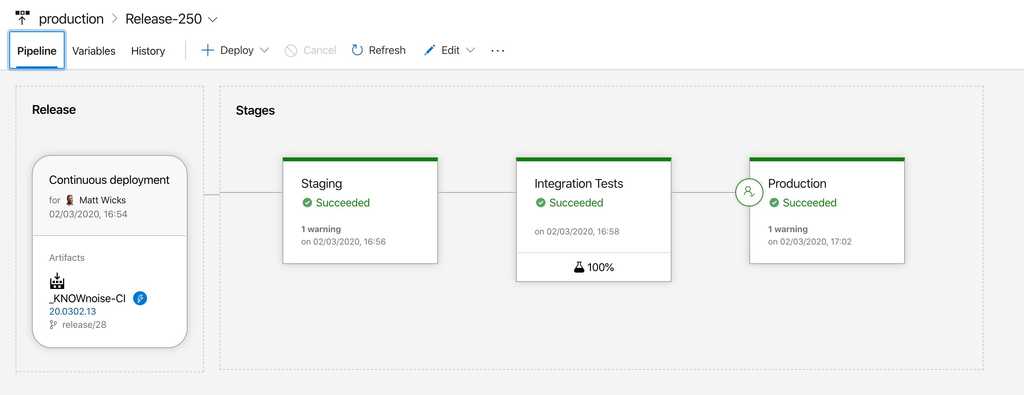
Figure: In Azure DevOps you can automate application deployment to a staging environment and automatically run tests before deploying to production 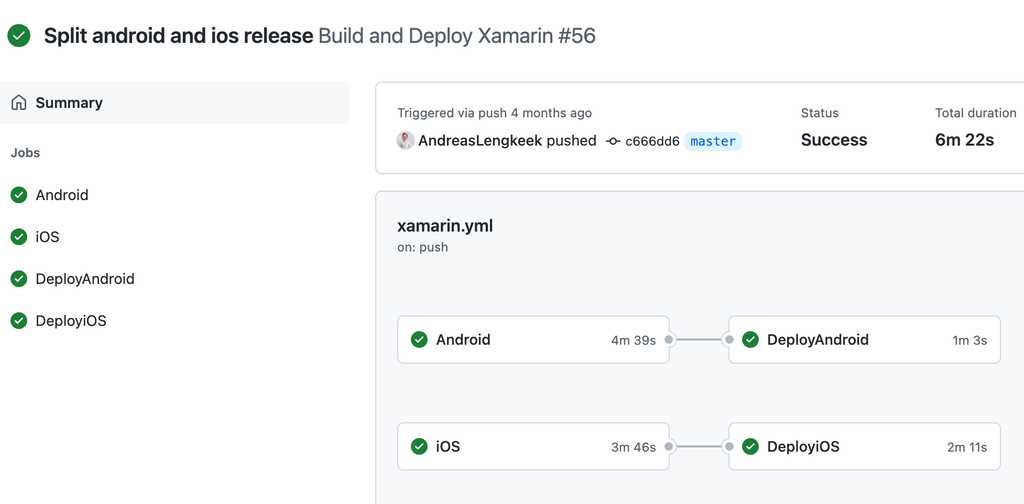
Figure: In GitHub actions you can automate application deployment to a multiple environments and automatically run tests before deploying to production Now that your team is spending less time deploying the application, you’ve got more time to improve other aspects of the application, but first you need to know what to improve.
Here are a few easy things to gather metrics on:
Application Logging (Exceptions)
See how many errors are being produced, aim to reduce this as the produce matures:
- Do you use the best exception handling library?
- Application Insights
- RayGun.io
- Visual Studio App Center(for mobile)
But it's not only exceptions you should be looking at but also how your users are using the application, so you can see where you should invest your time:
- Application Insights
- Google Analytics
- RayGun.io (Pulse)
Application Metrics
Application/Server performance – track how your code is running in production, that way you can tell if you need to provision more servers or increase hardware specs to keep up with demand
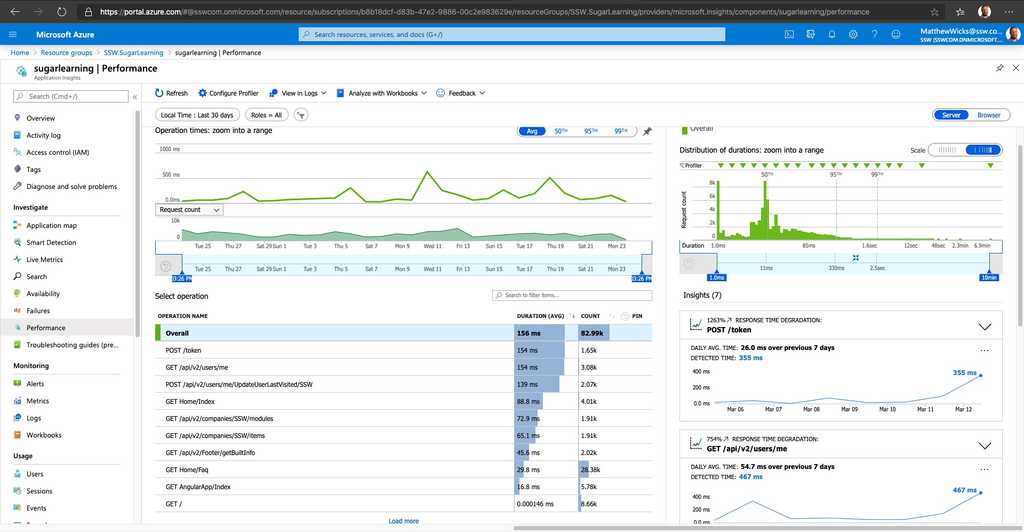
Figure: Application Insights gives you information about how things are running and whether there are detected abnormalities in the telemetry 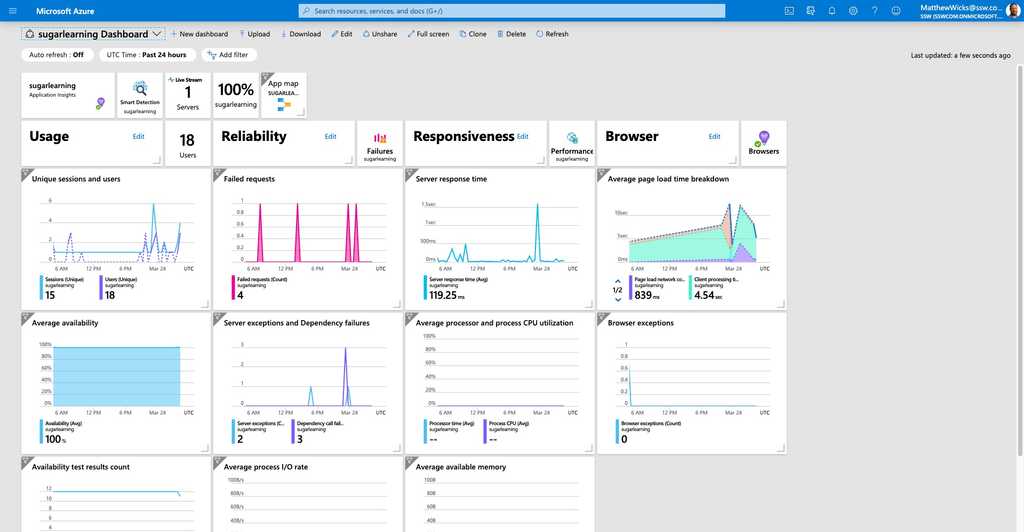
Figure: Azure can render the Application Insights data on a nice dashboard so you can get a high level view of your application 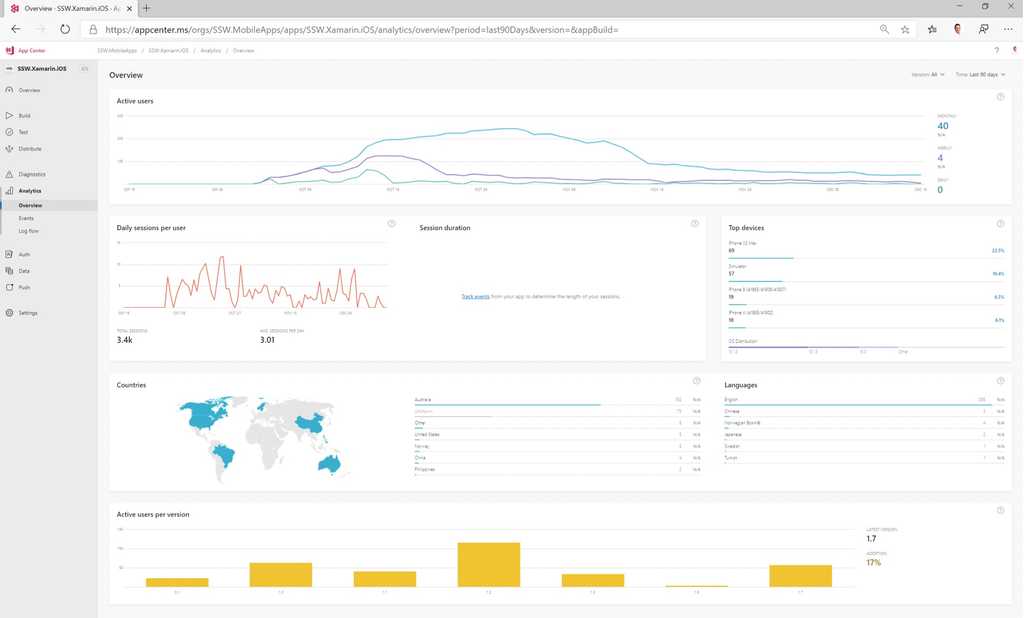
Figure: App Center can let you monitor app install stats, usage and errors from phones just like an app running in Azure Process Metrics
Collecting stats about the application isn't enough, you also need to be able to measure the time spent in the processes used to develop and maintain the application. You should keep an eye on and measure:
- Sprint Velocity
- Time spent in testing
- Time spent deploying
- Time spent getting a new developer up to speed
- Time spent in Scrum ceremonies
- Time taken for a bug to be fixed and deployed to production
Code Metrics
The last set of metrics you should be looking at revolves around the code and how maintainable it is. You can use tools like:
- Code Analysis
- SonarQube
Now that you’ve got the numbers, you can then make decisions on what needs improvement and go through the DevOps cycle again.
Here are some examples:
-
For exceptions, review your exception log (ELMAH, RayGun, HockeyApp)
- Add the important ones onto your backlog for prioritization
- Add an ignore to the exceptions you don't care about to reduce the noise (e.g. 404 errors)
- You can do this as the exceptions appear, or prior to doing your Sprint Review as part of the backlog grooming
- You don't have to get the exception log down to 0, just action the important ones and aim to reduce the noise so that the log is still useful
- For code quality, add getting Code Auditor and ReSharper to 0 on files you’ve changed to your Definition of Done
- For code quality, add SonarQube and identify your technical debt and track it
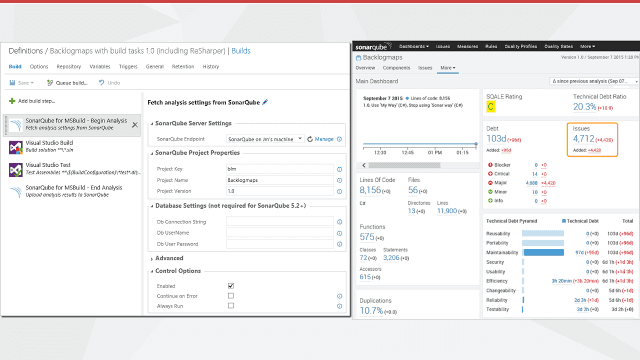
- For application/server performance, add automated load tests, add code to auto scale up on Azure
- For application usage, concentrate on features that get used the most and improve and streamline those features
-
DevOps learning resources
- DevOps introduction: The Complete DevOps Roadmap 2024
- Azure DevOps: Azure DevOps Labs
- Event: GitHub Universe
- Book: The Phoenix Project
- Read: Site Reliability Engineering (SRE)
Great general advice
- Blog: Microsoft DevOps Journey
- Watch: The DevOps Journey So Far (great overview of the scope of DevOps)
Important tech to skill up in
Reviewing projects
When reviewing projects make sure to ask these questions.
- Onboarding - How quick is f5?
- Deploying - How quick is deployment?
- Daily Health - Are the errors visible?
- Documentation – Check wiki to see documented process
- Deploying - Don’t duplicate builds/steps etc
See survey on DevOps – Stage 1: Do you know what things to measure?
Despite tooling coming a long way to prevent it, accidentally committing a config file with some secrets in it is far too easy to do.
Up to 2022, GitHub had detected more than 700,000 secrets across thousands of private repositories using secret scanning for GitHub Advanced Security:
Video: Github Secrets Leak Prevention (3 min)Once this occurs, amongst other things, you need to:
- assume breach
- rotate secrets
- update affected applications
- notify affected parties
This is a lot of stressful work!
On GitHub, what actions do we need to take to make it better?
GitHub Secret Scanning is a freemium feature for public repositories (not configurable). Otherwise, you need to be a GitHub Enterprise Cloud customer with Advanced Security to utilize it.
How does GitHub know it has found a secret?
Partners can automatically register their secret patterns and get notified automatically when GitHub detect secret with that pattern in a repo. Once notified, the partner can invalidate the secret. For example, if GitHub found a Octopus Deploy API Key in a repo; it would call a webhook to tell Octopus to invalidate it. There is a long list of supported partners at GitHub - Secret Scanning Partners
Setting up on a public repo (free)
Nothing to configure! GitHub will always send alerts to partners for detected secrets in public repositories.
Setting up on GitHub Enterprise (with Advanced Security)
Follow the steps on GitHub - Configuring secret scanning for your repositories.
As a bonus, you can shift this left a bit and block developers from pushing code to the repo if GitHub finds a secret in the push. This has the benefit of not requiring secret rotation (as no one else was able to pull the branch). See GitHub - Protecting pushes with secret scanning.
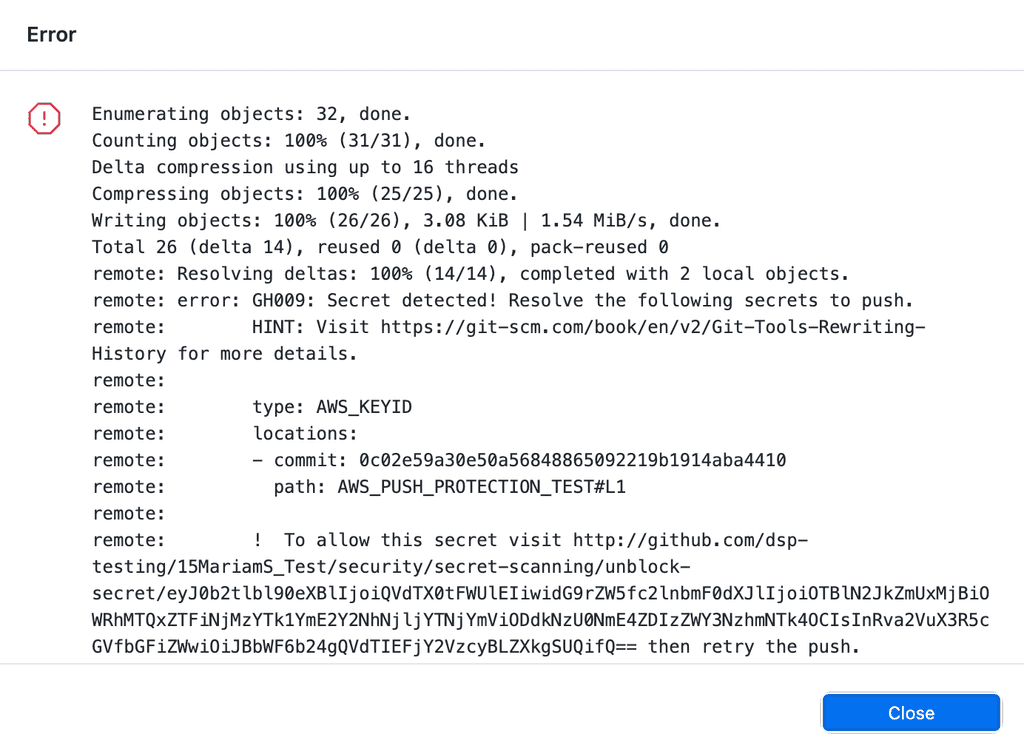
Figure: GitHub found an AWS secret on this push and blocked it 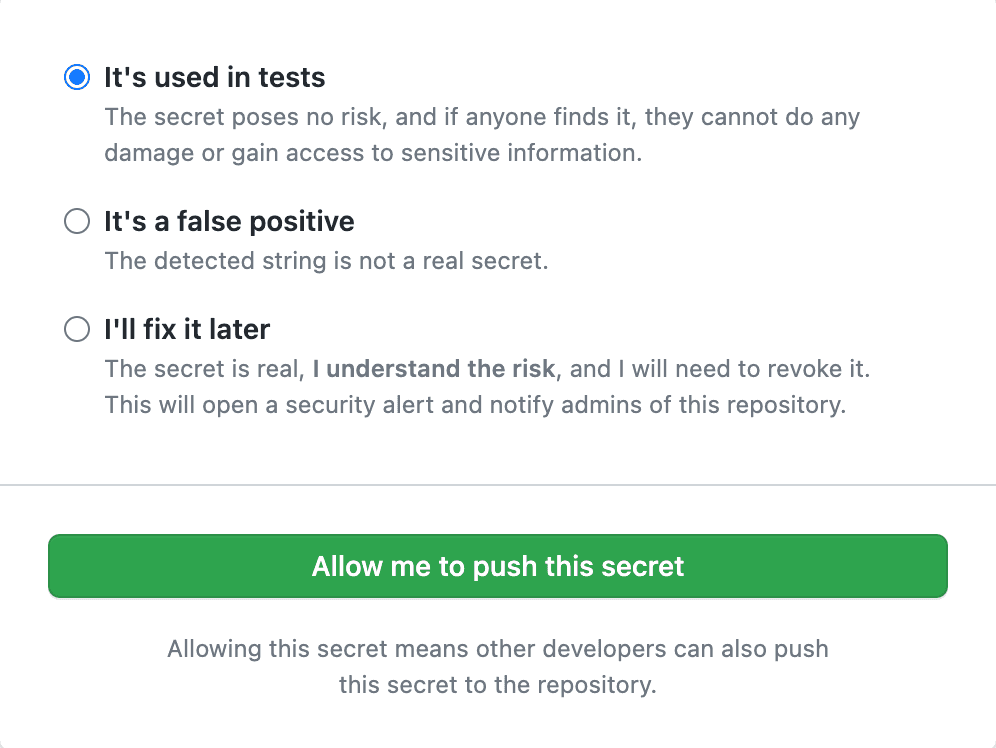
Figure: Sometimes there are false positives or test data, developers aren't blocked from doing their work. They just need to go out of their way to make sure it isn't a real secret If you have secrets patterns that aren't natively supported - you can use regexes to define these custom patterns for GitHub to look out for. See GitHub - Define custom patterns
Managing secrets is hard. It's not just about storing them securely, but also ensuring that the right people and systems have access to them in a controlled manner, with an auditable trail, while minimizing friction for the processes that legitimately need them, like DevOps pipelines. You wouldn't leave your front door key under the mat, but at the same time you don't want it to take 7 minutes and approval from 4 people to unlock your front door.
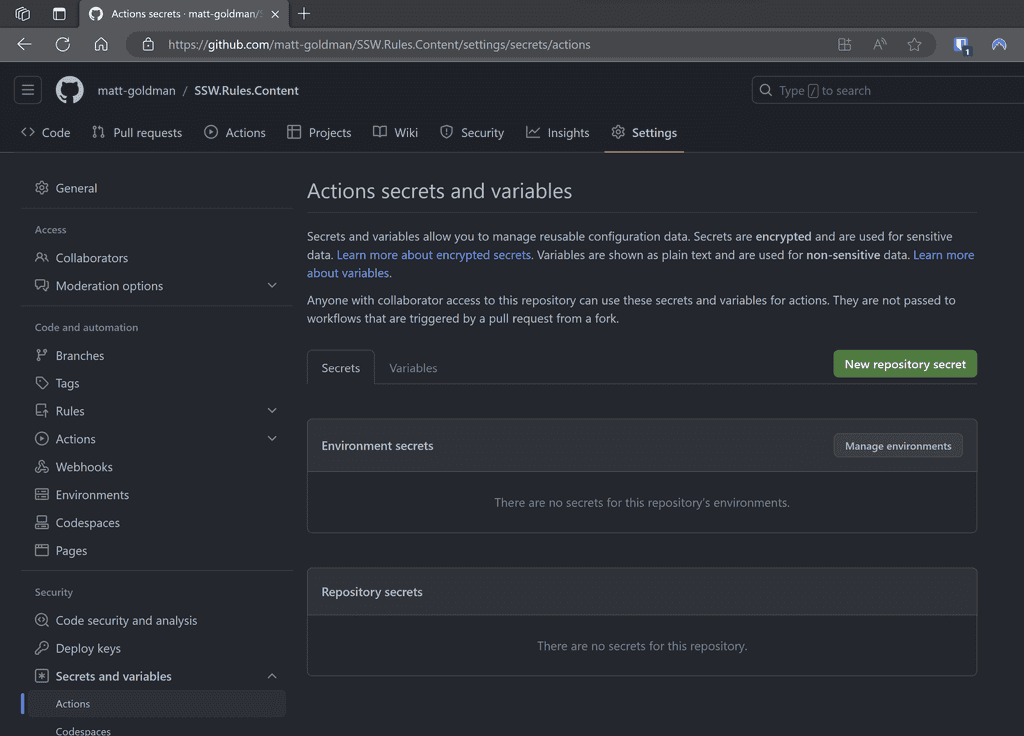
In a development ecosystem, secrets are the lifeblood that makes many processes tick smoothly – but they're also a potential point of vulnerability. When multiple repositories and workflows require access to shared secrets, like an Azure Service Principal or credentials for a service account, the management overhead increases. Imagine the pain of secrets expiring or changing: the need to update each and every repository that uses them emerges. Beyond the inconvenience, doing this manually for each repository is not only tedious but fraught with risks. An erroneous secret entry might break a CI/CD pipeline or, even worse, pose a security risk. Let's explore ways to handle secrets more efficiently and securely.
Scenario: Every time a new repository is set up, developers manually add secrets to it.
Problems:
❌ High maintenance if secrets need to be changed or rotated.
❌ Greater risk of inconsistencies between repos.
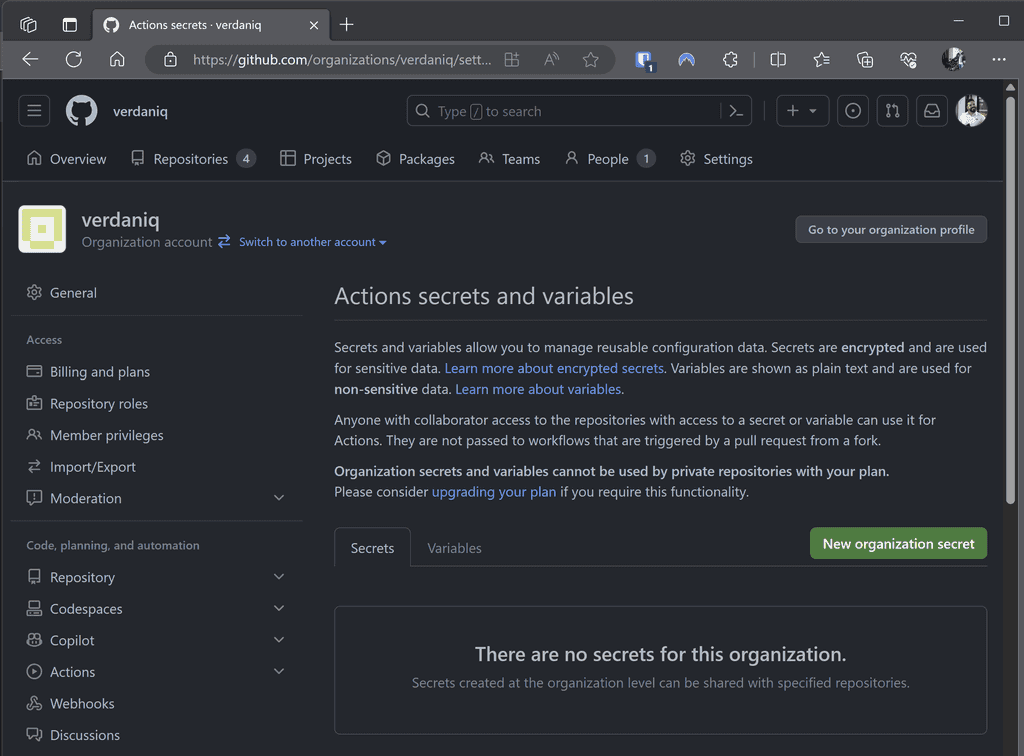
❌ Increased vulnerability surface area – each repo is a potential leak point.Scenario: Instead of per repo, secrets are added at the GitHub organization level.
Advantages:
✅ Easier management as secrets are centralized.
✅ Reduced chances of inconsistencies.
✅ Less manual work for individual repos.❌ Still a concern - While more efficient, secrets still reside within the CI/CD tool and can be exposed if the platform is compromised.
Scenario: Secrets are stored in Azure Key Vault and accessed by various workflows as needed.
name: Deploy API

on:
  push:
    branches:
      - main

jobs:
  deploy:
    runs-on: ubuntu-latest

    steps:
      # Check out your code
      - name: Checkout code
        uses: actions/checkout@v2

      # Login to Azure
      - name: Login to Azure
        uses: azure/login@v1
        with:
          creds: ${{ secrets.AZURE_CREDENTIALS }} # Note you need this credential in GitHub

      # Fetch the API key from Azure Key Vault
      - name: Get API key from Azure Key Vault
        run: |
          az keyvault secret show --name SSW_REWARDS_API_KEY --vault-name kv-rewards --query value -o tsv > api_key.txt
        id: fetch-key

      # Use the API key in a subsequent step
      - name: Deploy with API Key
        run: |
          API_KEY=$(cat api_key.txt)
          # Your deployment commands using the API_KEY

      # (Optional) Logout from Azure
      - name: Logout from Azure
        run: az logout
Listing: Secrets stored in a dedicated Key Vault in Azure and used by workflows across the organization
Advantages:
✅ Stronger security - Azure Key Vault provides enhanced encryption and access control.
✅ Centralized management - Rotate, update, or revoke secrets without touching individual repos or workflows.
✅ Auditing - Track who accesses what and when.❌ Still a concern - Dependencies on external systems can introduce complexities and may require specific expertise to manage.
Scenario: Secrets are stored in an enterprise-grade secrets manager, which integrates directly with CI/CD platforms.
Figure: An enterprise password/secrets manager like Keeper with the Secrets Manager add-on and integration with GA or AzDo Advantages:
✅ Top-tier Security - Dedicated systems like Keeper are designed with advanced security features.
✅ Streamlined Management - Centralize not just CI/CD secrets, but potentially all organizational secrets.
✅ Granular Control - Control who can access what, with full audit trails.
✅ Integrations - Seamless integration with CI/CD platforms reduces friction and the potential for errors.Conclusion:
Leveraging specialized tools reduces manual overhead, boosts security, and ensures a smooth CI/CD process.
Note that in all of these cases, you still need at least one secret stored with your pipeline, whether that's a service principal to log in to Azure to retrieve secrets from Key Vault, or Keeper Secrets Configuration (or equivalent) to access your enterprise secrets manager. Note that if you require different permissions for different workflows or repositories, you may end up with as many secrets in your pipeline tool as if you had the target secrets themselves there.
This may seem counter-productive, but in most cases this is still a better way to manage your secrets, as you still have enterprise controlled access and governance, and a single source of truth.
Remember, the ideal approach may vary based on the size of the organization, the nature of the projects, and specific security requirements. But centralizing and bolstering security around secrets is always a prudent approach.
When working with GitHub Actions, there are instances where we need to pull a secret value from a CLI tool and use it within our workflow.
However, this practice can inadvertently expose the secret in the GitHub Actions logs if not handled securely. To prevent such exposure, it is crucial to redact the secret from the logs using the add-mask workflow command provided by GitHub.
This command ensures that the secret value is replaced with asterisks (****) in the logs, thereby preventing any unintended disclosure of the secret.
Example:
Consider the scenario where we need to retrieve a secret from Azure Key Vault (there is no pre-built action to do this from Microsoft) and use it in our GitHub Actions workflow. In the following bad example, the secret is exposed in the logs:
- name: keyVault - Secrets shell: pwsh id: KeyVaultSecrets run: | $GoogleRecaptchaSiteKey = (az keyvault secret show --name Google-Recaptcha-Site-KEY --vault-name ${{ env.KEY_VAULT}} --query value -o tsv) echo "GoogleRecaptchaSiteKey=$GoogleRecaptchaSiteKey" >> $env:GITHUB_OUTPUT- name: keyVault - Secrets shell: pwsh id: KeyVaultSecrets run: | $GoogleRecaptchaSiteKey = (az keyvault secret show --name Google-Recaptcha-Site-KEY --vault-name ${{ env.KEY_VAULT}} --query value -o tsv) echo "::add-mask::$GoogleRecaptchaSiteKey" echo "GoogleRecaptchaSiteKey=$GoogleRecaptchaSiteKey" >> $env:GITHUB_OUTPUTFor further details on masking secrets in logs, refer to the GitHub documentation.
This method ensures that while you can still use the secret within your workflow, it remains masked in the logs, mitigating the risk of accidental secret exposure.
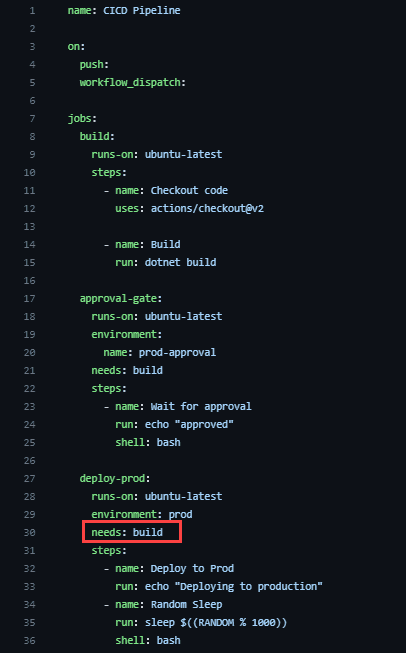
When making significant changes to your pipeline, it's crucial to test them in a separate repository first. This approach ensures that the main repository remains unaffected by potential errors or disruptions during the testing phase. Most importantly, it guarantees that unintended deployments, especially to production, are avoided.
Examining a mistake directly in the GitHub YAML file can be error-prone and might not provide a clear understanding of the issue.
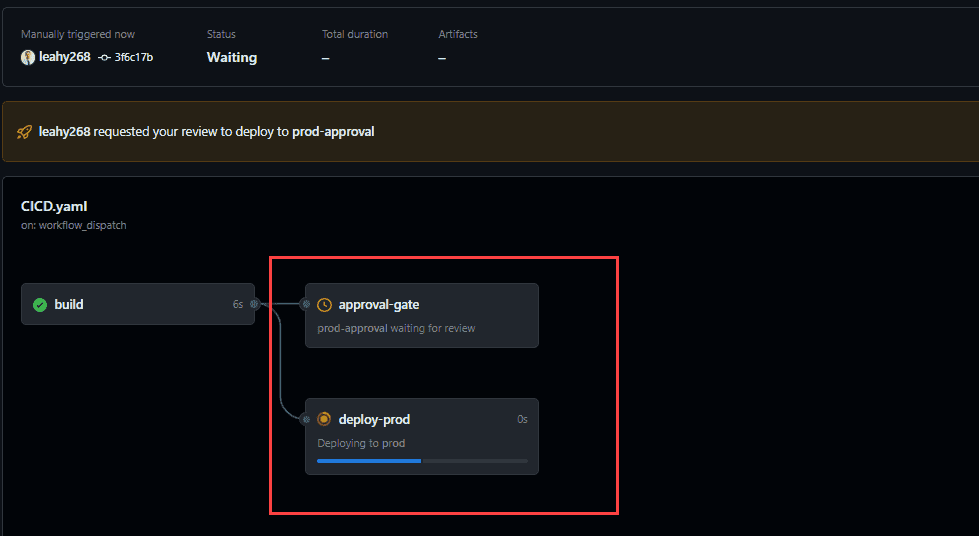
To safely test a pipeline, particularly one that deploys to production, it's imperative to use a separate repository. In this environment, actual deployment steps can be substituted with placeholders, such as
echo "deploying", ensuring a thorough test without real-world consequences. If such a test were conducted on the main repository, it could inadvertently trigger a deployment to production.By executing the pipeline and examining its graphical representation, errors or inefficiencies become more apparent. This visual insight aids in swiftly pinpointing and comprehending any issues.
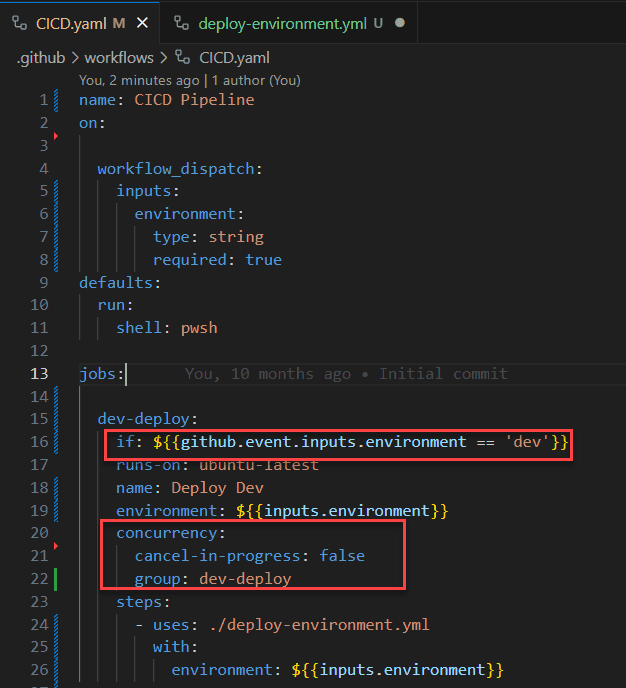
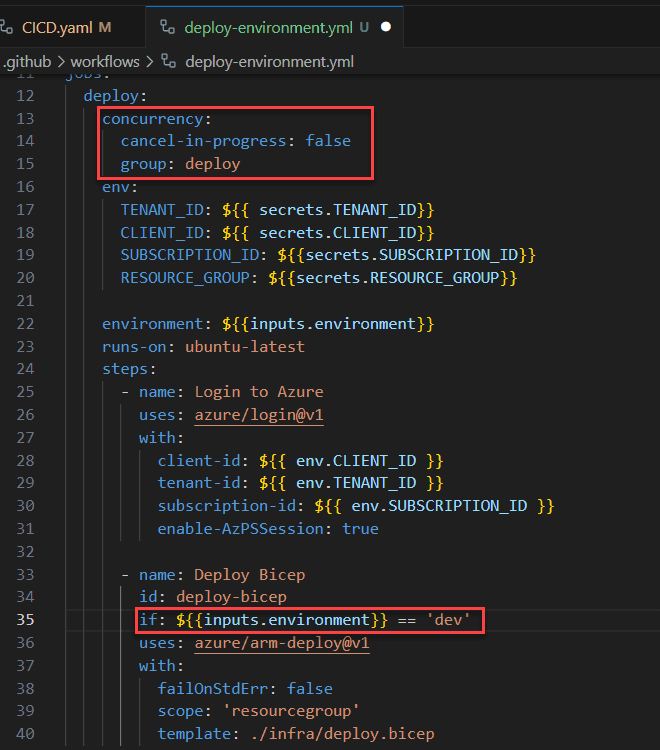
When designing CI/CD workflows, it's essential to maintain clarity and simplicity. This ensures that your pipelines are easy to understand, modify, and troubleshoot.
Scattering conditional actions and concurrency controls across multiple sub-pipelines or jobs can lead to confusion. Tracking the flow becomes challenging, and potential bottlenecks or errors might be overlooked.
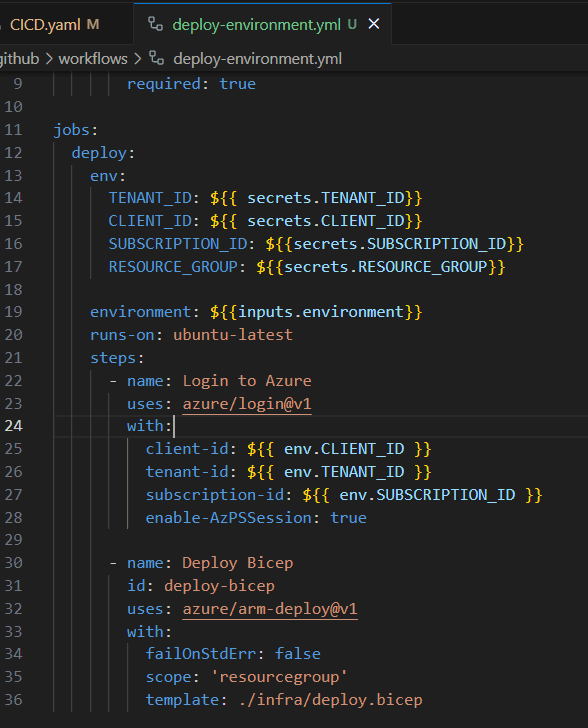
Adding further conditionals or concurrency controls to the workflows adds no value. The workflow still only runs in the "dev" environment and operates within its own concurrency group. However, when changes are made to the more visible workflow (CICD.yaml), it's less obvious that changes are needed in the called workflow.
Centralize all conditional actions and concurrency controls in the main pipeline. This approach provides a clear overview of the workflow, making it easier to manage and optimize the pipeline's performance.
Of course, there are occasional circumstances where a called workflow must contain a conditional. However, these instances should be limited and documented thoroughly to ensure clarity and maintainability.
By adhering to this rule, you ensure that your CI/CD workflows remain streamlined, efficient, and easy to manage.
