Rules to Better Microsoft Teams - 41 Rules
Microsoft Teams offers a great solution to collaboration using the Office 365 platform. Get ready for a productivity boost, better focus on your work, and increased transparency.
Need help with implementing Microsoft Teams? Check SSW's Teams consulting page.
Microsoft Teams is a great tool for a group of people to collaborate, communicate and share their files.
Teams makes it easy to:
- Centralize communication
- Send emails to Team members easily and quickly by providing a global email address for the Team
- Move away from email attachments and centralize documents
Take charge of communication in your Team and get started with Microsoft Teams. This video will guide you through your first few steps with Teams using the simple example of a building at 81 Military Road:
Once invited to a Team, follow these steps:
- Go to your inbox and find the invitation email
- Click on "Open Microsoft Teams"
- Sign-in Note: you can use the Desktop, Web or Mobile apps to access Teams
- Navigate your Teams & Channels! 👌✔
Microsoft Teams also integrates with hundreds of Microsoft and third party products, such as Trello, OneNote, Planner, etc.
Effective communication with your clients on Microsoft Teams builds credibility, trust and ensures they receive the deserved attention.

Figure: Keeping Teams at the centre of client communication Talking to clients on Teams
Microsoft Teams is an excellent channel for communicating with clients, especially at the early stage of client development, like after the initial meeting. It encourages the client to reach out and ask you anything about the business, like an upcoming Spec Review. It also gives you an easy way to be able to get hold of them to chase potential work. This impresses the client and can strengthen your relationship.
In other words, Microsoft Teams = buddies :-)
Open vs closed tenants
An open Microsoft 365 (tenant) means any external email address can communicate with you via Teams. However, some organizations have a closed tenant, meaning you can only communicate via Teams with their organization’s consent.
Getting started
Once you’ve arranged an Initial Meeting or before a Spec Review, follow these steps to begin communicating with your client on Teams.
- Open Microsoft Teams
- Open a ‘New Chat’ or press (Ctrl + N)
- Enter the client’s email address
- Create the chat
Figure: Client with open tenant If the client has an open tenant, you should send a welcome message in Teams
Hey thanks for the meeting. Feel free to ping me on Teams or by email any time if you have any questions 😀
Figure: Send an email to your client confirming you will contact them through Teams
If the client has a closed tenant, you should send a closed tenant request email
Figure: Client with a closed tenant To: {{ CLIENT }} Subject: Communication via Microsoft Teams Dear {{ CLIENT }}
As discussed earlier, we should use Microsoft Teams to chat because it ensures quick responses to your queries.
No development question is too big or too small so don’t hesitate to reach out.
Because your Microsoft 365 tenant is ‘closed’, we’ll need your IT team to add my email address to your server. Read this Microsoft Support 'how to' for more information on the topic.
Please copy them your IT into this email chain so I can request access.
Thanks, {{ YOUR NAME }}
Figure: Send an email to your client requesting access to their organization's tenant
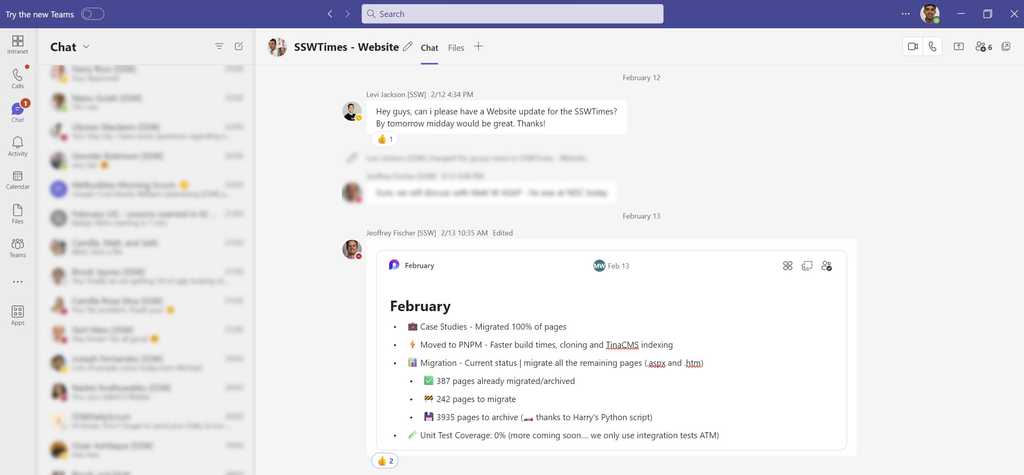
It's usually easier for users to remember where given information is when it is associated with an image/icon. This is especially true for non-technical people or those who are not very familiar with digital workspaces.
Tip: Always remember to add a space between the emoji and text, for better readability.
Easily understood actions
An easy way to respond to a message on Teams is to use an emoji to say you have seen the message and "understood" its purpose, or to show that you have taken action. You can also update those emojis afterwards to show your progression from "understood", "in action", or "done". That way, when the sender checks back, they won't chase you thinking you haven't seen it.
You can use:
✅ for "Done, this task is complete"
👍🏻 for "I agree"
👎🏻 for "I disagree"
❌ for "No, don't do that"
👀 for "I've seen it, in progress"Microsoft Teams channel names
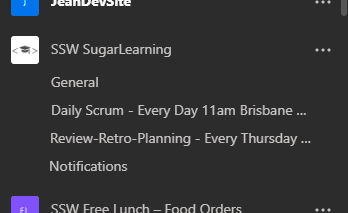
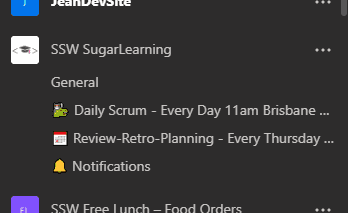
An easy and fun way to alleviate this issue and boost user adoption to Microsoft Teams is to use emojis in your channel names.
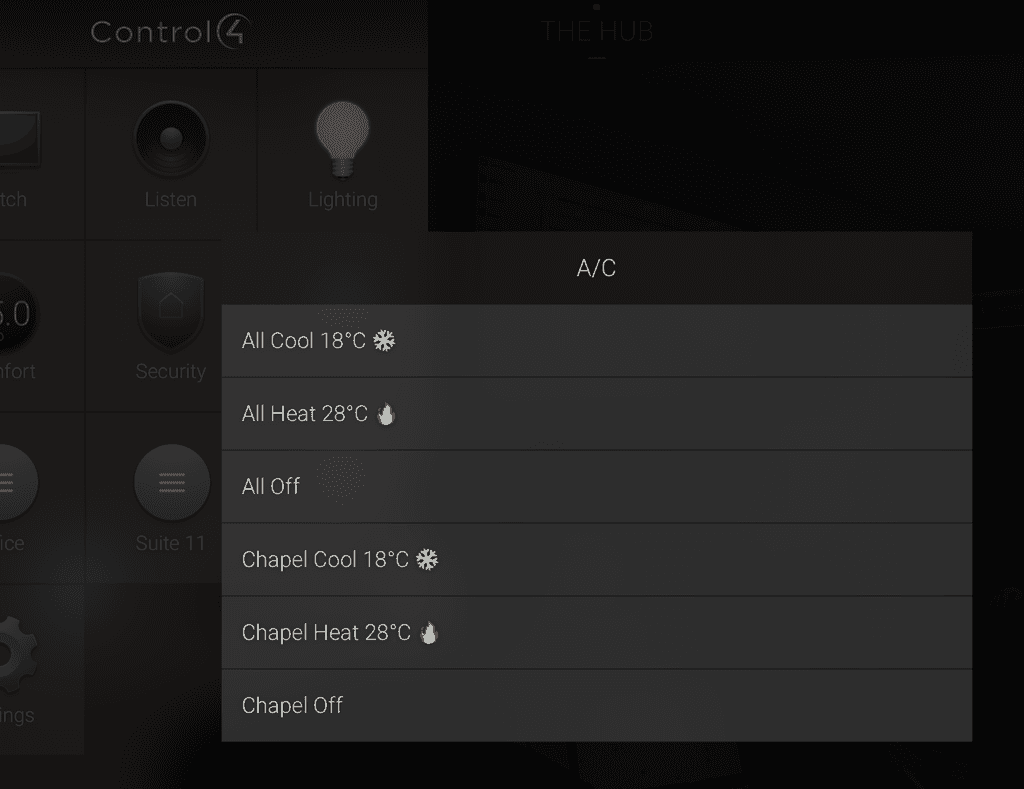
Control4
Appointments
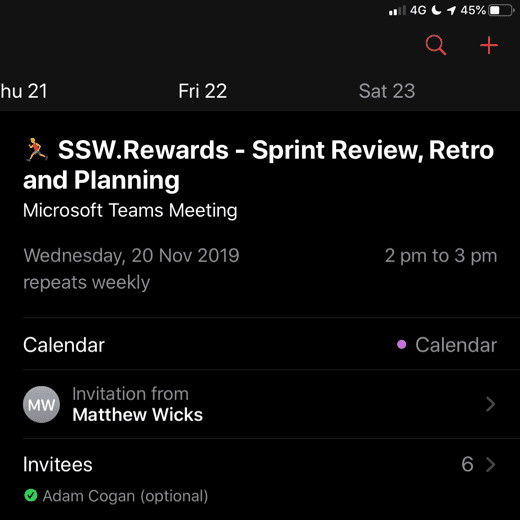
Figure: Good example - Some appointments can benefit from an emoji too, like using a 🏃♂️ for a Sprint meeting Lists
- Fast to load (lightweight as no image)
- UI - Consistent look
- Maintenance of needing to upload to server
Bad example - Regular list items
✅ Fast to load (lightweight as no image)
✅ UI - Consistent look
❌ Maintenance of needing to upload to serverGood example - Emojis give context to each item
Note: When having lists that use emojis, be aware that if they are longer than 3 items with the same emoji, you should follow DRY - avoid repeated elements.
AI content
Use the 🤖 emoji at the end of your message/email when you were helped by AI.
Teams is a powerful way to chat, collaborate, and video call with your project team. As soon as you start a new project, create a group chat with all the team members (potentially including the client if appropriate).
Although you will also have a dedicated Team (as per SSW.Rules | Do you know how to create a Team?), which is great for storing documents and files, as well as persisting notifications, you’re better to communicate in a chat rather than a channel.
✅ Pros
- You will be actively notified of new messages
- The conversation flows more naturally (rather than threaded)
- You can quickly call the whole team into a video call
❌ Cons
- People cannot add themselves to a chat so will need someone on the team to add them
- In larger teams, the lack of conversation threading may become an issue
💡 Tip: You often need to add someone to a chat, and sometimes it's a good idea to share all history with them to provide context. However, sometimes the contents of a chat can be sensitive and shouldn't be shared. In this cases you should think carefully before adding someone to a chat, and doubly so before sharing history with them.
To make these sensitive chats easier to identify, rename them something appropriate (that doesn't give away the sensitivity in case you're sharing your screen), and use a padlock emoji (🔒) at the start of the chat name as a mental shortcut to indicate not to share it.
Group calls are made for important discussions to be had, and distractions can derail them. Ever been in a group call where someone just vanishes? It's confusing and can mess up the flow of conversation.
Taking a short break
If you have to take a break, avoid interruptinons and keep things moving by simply messaging 'BRB' and 'I'm Back' in the chat.
Leaving the group call without letting anyone know.
Figure: Bad example - Makes everyone pause and ask where you went
Interrupting the flow of conversation to verbally tell everyone you have to leave.
Figure: OK example - It's good to communicate, but still stops the chat for a bit
Messaging in the group chat "brb in X mins" ... and then "I’m back" when you return.
Figure: Good example - The call can continue smoothly and the team will know when you're back
Leaving the call
If you need to leave the conversation, simply message that you have to go with the reason and without interrupting. Aim to give a few minutes notice.
Messaging in the group chat "Sorry, I have to go guys - Dinner time" and leave straight away
Figure: OK example - The call can continue smoothly and no one will be guessing where you went
Messaging in the group chat "Dinner time - Will have to go in 5 minutes"
Figure: Good example - The call can continue smoothly and people still have a chance to talk to you if they need
This way the conversation doesn't need to pause if you are taking a break; and no one has to stop and wonder where you went.
See this cool suggestion to make BRB a built-in feature on Microsoft Teams.
Using the "Meet Now" button in Microsoft Teams can be an efficient way to start a quick meeting with your team. However, it's important to know when to use it to avoid disrupting your colleagues. Triggering an unplanned call can catch people off guard and disrupt their workflow, leading to frustration and decreased productivity.
With YakShaver, you can start recording a "shave" after selecting "Meet Now," without needing to call anyone in.
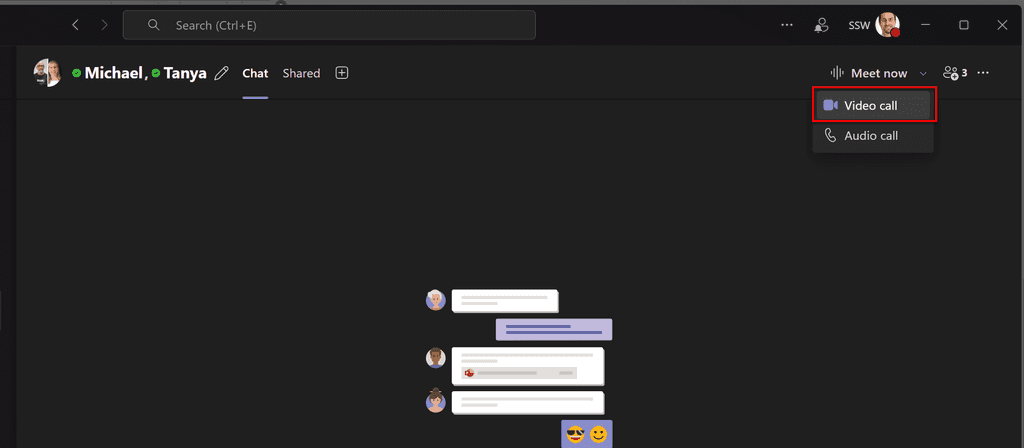
Figure: Bad example - Triggering a group call without warning or context can be jarring and disrespectful to others' schedules and interupts everyone 
Figure: Good example - The user sends the group a message and then presses the "Meet Now" button which doesn't interupt the entire group When to use "Meet Now"
- Quick collaboration - You need an immediate response or decision from a few people who are available
- Unplanned discussions - A short, impromptu discussion that cannot be resolved via chat
- Co-working sessions - When working together on a document or project and all team members are ready to engage
Best practices for using "Meet Now"
- Send a heads-up message - Use a chat message to confirm if a quick call is appropriate
- Set expectations - Clarify the purpose and duration of the call in advance
- Use scheduling for larger groups - For large groups or in-depth discussions, use the "Schedule a Meeting" feature instead
By following these guidelines, you can make better use of the "Meet Now" button, ensuring your meetings are productive and respectful of everyone's time.
Sending appointments from Teams feels less natural than from Outlook but there are some great benefits:
- Appointment - You don’t need to remember everyone’s name - The whole team is invited
- Appointment - In the appointment, it auto-generates a link so that everyone goes to the right place to attend
- Visibility - It shows up in Teams Calendar
- Visibility - It appears in the Teams chat (for the channel that was invited)
- Visibility – When the appointment is beginning the app pops up with a button to “Join”
- History - If you decide to record the meeting, the link to the recording shows up in the chat history as well
Important: Although the meeting app works great to organize Teamwork such as Scrum meetings or other client meetings, it is not very suitable for more global events such as a retreat or a conference. At SSW we use Microsoft Outlook appointments in those instances.
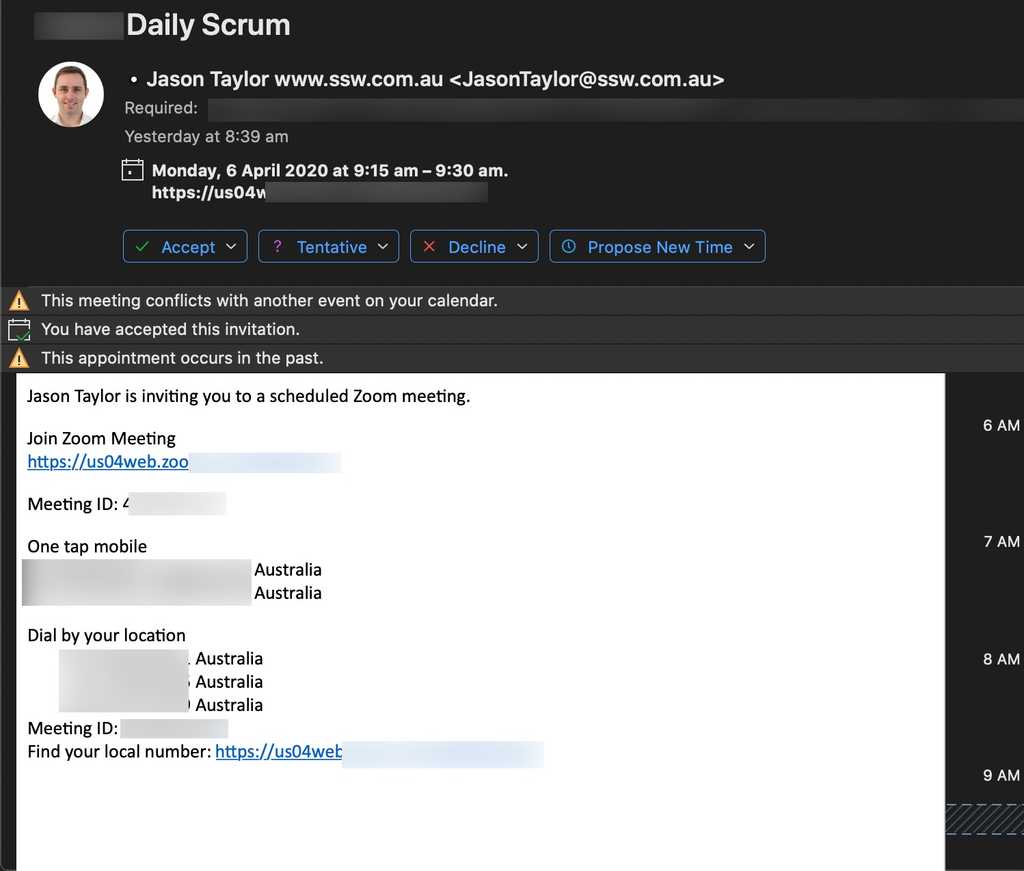
Figure: Bad Example - This appointment was created using Outlook using Zoom - the team members needed to be added to the appointment individually and there are too many options on how to join the meeting. 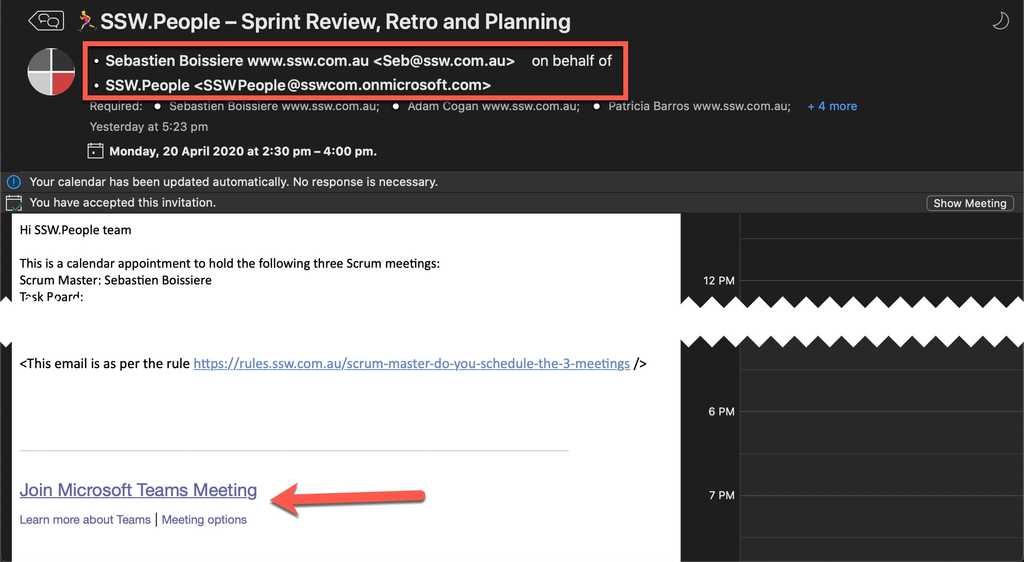
Figure: Good Example - I know this appointment was created in Microsoft Teams since it was created on behalf of the team (see sender) and at the bottom it has a link so that people can click and join the correct meeting (even without Teams installed) How to make a Teams Meeting
To setup a Teams meeting, simply navigate to "Calendar" and then either "Meet Now" or "New Meeting".
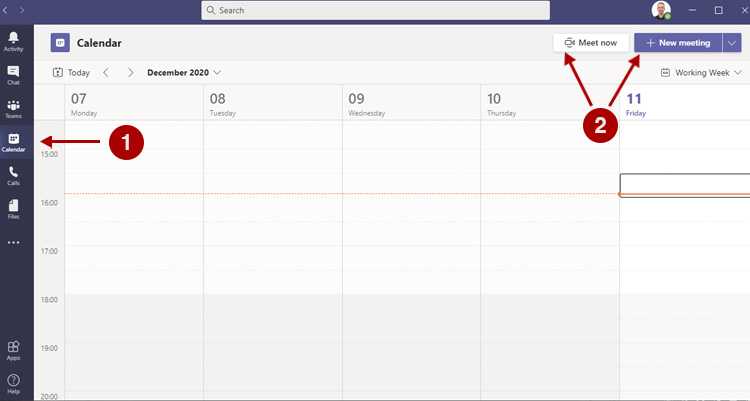
Figure: Creating a new meeting 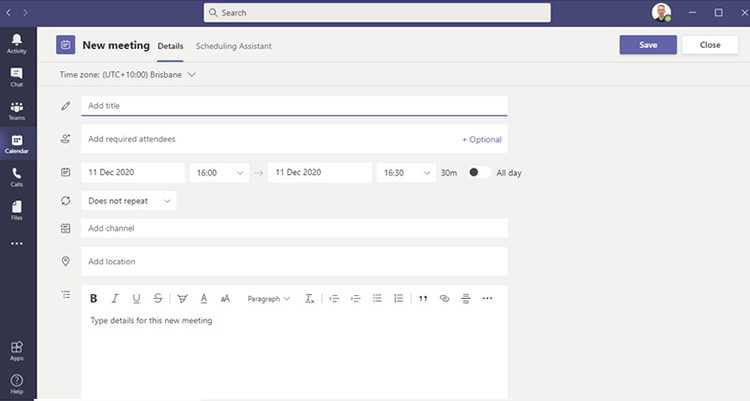
Figure: Meeting options You can select a Channel to meet in and by doing so, members of the Team in which this channel lives will see a Channel activity that you can click to directly jump in the meeting.
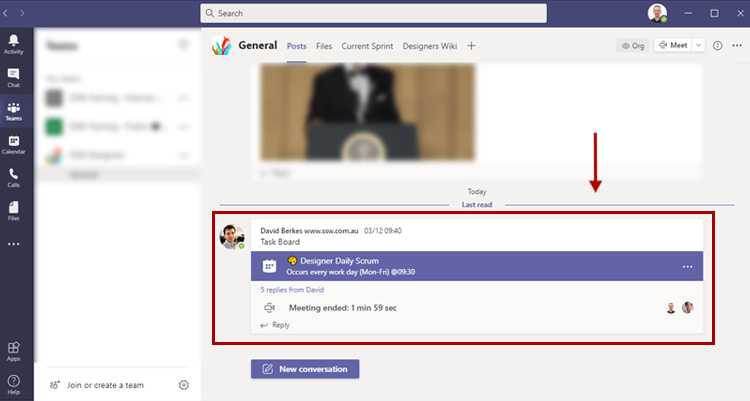
Figure: meeting channel activity Microsoft Teams will also send out an email invitation email for the meeting - this is especially useful when inviting people outside your organization.
When a developer joins a team, they need to find important meetings like the Daily Scrum and the Sprint Review. Unfortunately, these meetings are often organized by a team member and there is no way to find them.
Ideally, a new team member would jump into Microsoft Teams and find the team they are joining. Then they would see all the important meetings from within the team and join them as needed.
From then on, they would be able to see those appointments in Microsoft Outlook and edit them as needed.
In the past, the best way to do this was to create a SharePoint page with a Group Calendar web part, and then add this as a tab in Teams. Microsoft Teams have since released Channel Calendars, which are better because they are built in.
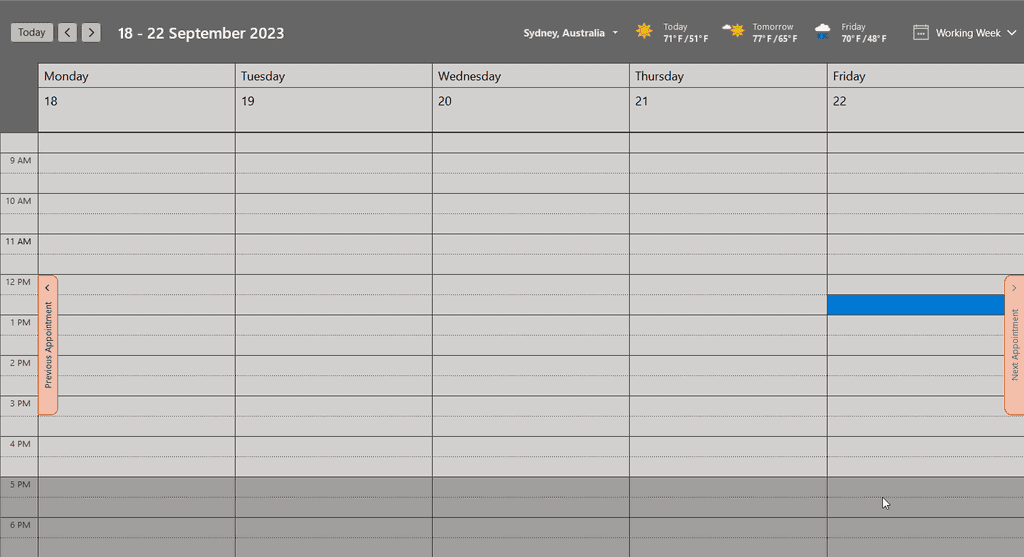
Figure: Bad example - A team member searching for the Daily Scrum cannot find it if it is scheduled like a normal meeting 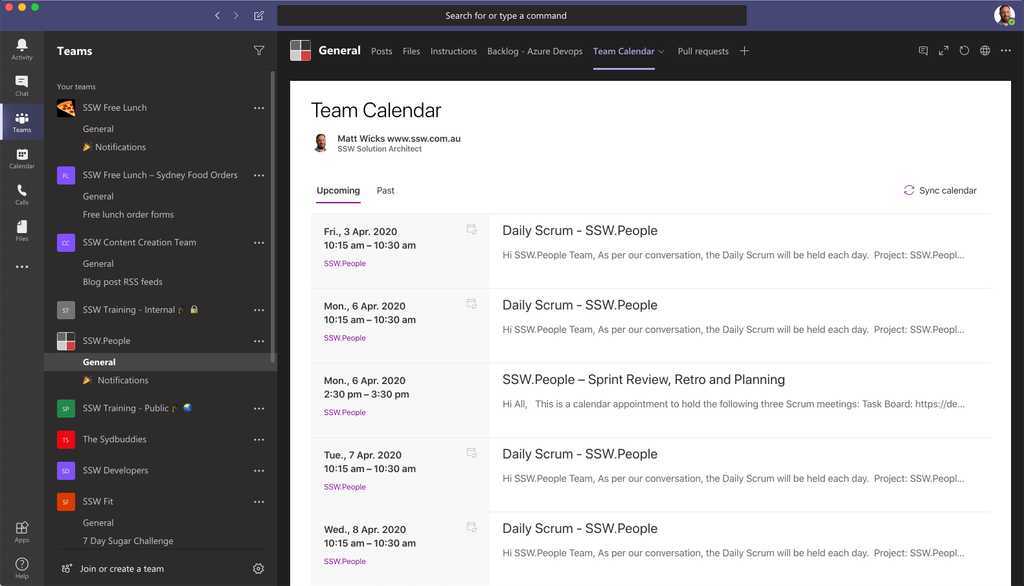
Figure: OK example - In the past, a SharePoint page was the best way to make meetings visible to the team Video: An awesome introduction to Channel Calendars in Teams (7 min)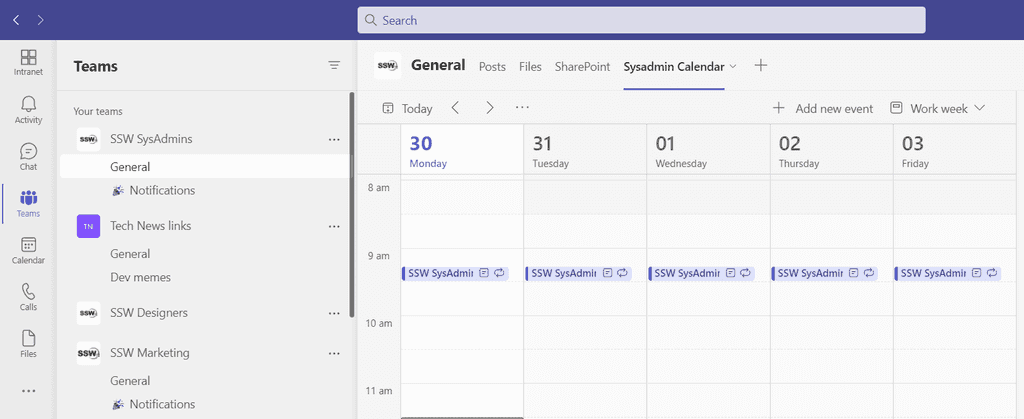
Figure: Good example - A Microsoft Teams Channel Calendar allows team members to see the Team's meetings before being invited Setup - Make the calendar visible to the team
Before anyone can view and edit the appointment, it needs to be set up correctly to allow editing.
There are 2 steps:
A. Add a Channel Calendar
B. Make the Channel Calendar visible in Microsoft Outlook
A. Add a Channel Calendar
- Go to the Team | General channel (or another channel, if you prefer)
- Click the + at the top to add a tab
- Search for "Channel Calendar" and click on it
- Give the tab a name (e.g. SysAdmins Calendar)
- Click "Add"
- All done, now the team can see all meetings relating to the team
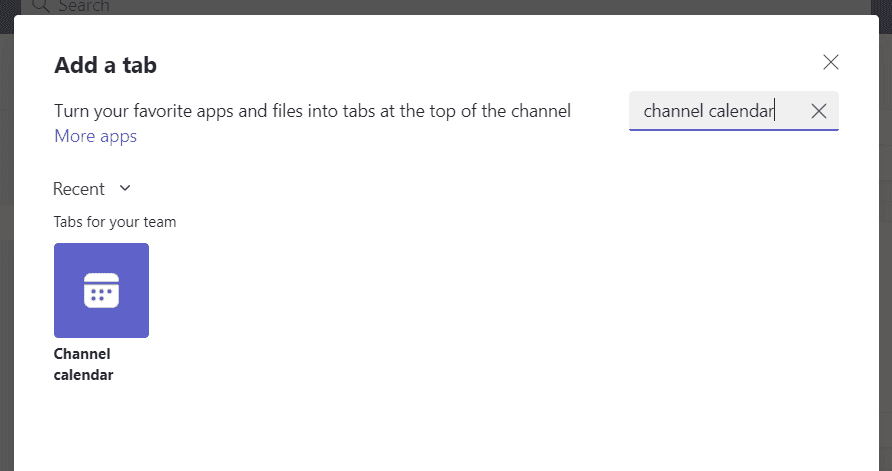
Figure: Adding a Channel Calendar Suggestion to Microsoft: This is an unnecessary extra hoop to jump through. If you create an appointment from a Team, then this tab should be automatically created.
B. Make the Channel Calendar visible in Microsoft Outlook
Channel Calendar meetings need to be editable by anyone in the Team and the only way to enable that is via a group calendar in Microsoft Outlook.
By default, group calendars do not show up in Microsoft Outlook, so they need to be made visible to the team with a PowerShell command:
Set-UnifiedGroup -identity {{ GROUP NAME }} -HiddenFromExchangeClientsEnabled:$FalseNote: This command will also make the teams' group email address show in the global address list (GAL).
More info on removing a Meeting in a Teams Channel when the organizer is gone.
This can also be done from the Microsoft Admin Center:
- Go to
https://portal.office.com/adminportal - Go to Teams & Groups | Active teams & groups
- Search for the Teams group | Settings | Uncheck "Don't show team email address in Outlook"
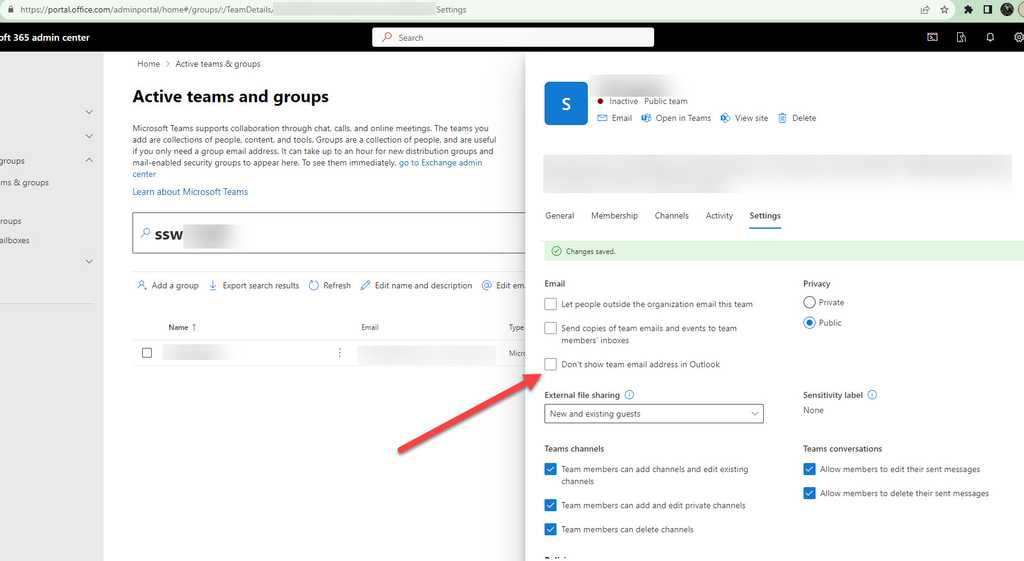
Figure: Admin portal - Show Teams email adress in Outlook 
Figure: Microsoft Outlook group calendars allow meetings to be edited Manage Appointments - Team members create, join, edit, and leave meetings themselves
Now that the team calendars are properly configured, it is easy to:
A. Create a meeting
B. Join a meeting
C. Edit a meeting
D. Leave a meeting
A. Create a meeting
Creating a meeting should always be done from Microsoft Teams because Microsoft Outlook doesn't support setting the channel. To create a meeting:
- Follow the rule on how to create recurring team meetings for a channel
- Add this text at the bottom - This will direct people to this rule when they go to edit it.
< Need to edit this meeting? See how to create recurring team meetings for a channel Team: {{ TEAM NAME }} />
B. Join a meeting
To join a meeting do the following:
- Navigate to Microsoft Teams | Team | Channel Calendar
- Click on the meeting you want to join and expand it
- Select "Add to calendar"
- Done! You are now one of the meeting attendees.
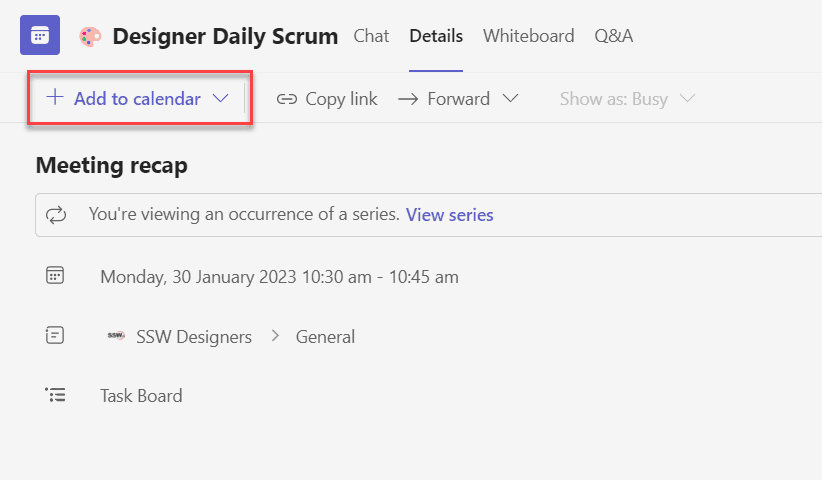
Figure: In Microsoft Teams add the event to your calendar C. Edit a meeting
To update a meeting, you must change the details from the Microsoft Outlook group calendar:
- Go to Microsoft Outlook | Calendars | All Group Calendars
- Open the relevant calendar (same as the team name)
- Open the appointment and select The entire series
- Make changes as needed

Figure: In Microsoft Outlook edit the appointment using the group calendar D. Leave a meeting
Many people decline a meeting when they no longer want to attend. However, this method is problematic because you will still be an Optional attendee, and receive updates to the appointment.
To leave a meeting properly:
- Go to Microsoft Outlook | Calendars | All Group Calendars
- Open the relevant calendar (same as the team name)
- Open the appointment and select The entire series
- Remove yourself as a participant
- Double-check that no other mailboxes have been added which include you e.g. the Team mailbox
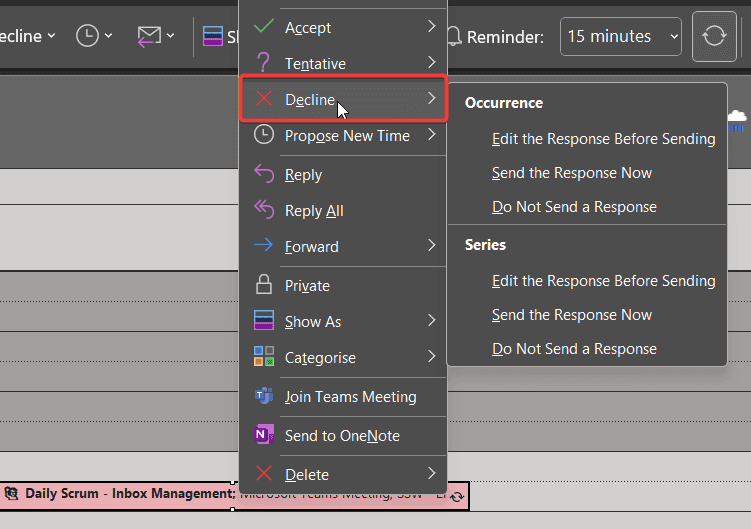
Figure: Bad example - Hitting decline on a Microsoft Outlook calendar item only removes you from the meeting temporarily Of course, another option - if appropriate - is to remove yourself from the Team completely.
To keep your Teams clean automatically, use Entra Access Reviews.
Teams Meeting chats are only visible to people who were invited to the meeting. If someone joins late or isn’t invited, they won’t see the previous conversation.
If others need to be part of the discussion or you want to continue the conversation after the meeting ends, create a group chat instead.
Use group chats - instead of meeting chats - when you want to:
- Allow anyone you choose to see the chat (including the full message history), regardless of meeting attendance
- Make reaction polls, where you may want to gather extra opinions or continue the discussion later
- Stay accessible in the chats list on the left side of Teams app
Tip: Start a group chat before the meeting and paste the meeting link inside. That way, everyone stays on the same page and the conversation continues seamlessly.
Waiting for participants to join a meeting can be awkward and make people feel disengaged. It's crucial for the meeting leader to maintain a positive and energetic atmosphere during this time to set the tone for the rest of the meeting.
https://www.tiktok.com/@mrrobertmayhew/video/7416717135965146401
- Avoid sitting silently or showing frustration about the wait
- Do not dive into the main agenda without the key participants present
- Avoid using filler time to discuss irrelevant or heavy topics that could disengage participants
- Do not use this time just to look at yourself in the camera view
Here are some tips to ensure meetings start with energy and engagement while waiting for attendees:
1. Have Filler Conversations
Engage with those who have already joined by discussing light topics, recent wins, or non-work-related subjects. This helps break the ice and keeps the atmosphere lively.
2. Acknowledge New Participants
When someone new joins, pause the current conversation to acknowledge them. It’s a simple yet effective way to make everyone feel included.
Example:
- In chat, type: “Waiting for Bob”
- Say: “Welcome Mary, just waiting for Bob. We are currently talking about the status of the backlog while waiting.”
3. Avoid Jumping into the Agenda
Starting the agenda too early can cause confusion for latecomers. Instead, use this time for informal discussions or to recap previous topics lightly.
4. Use Humor or Share Light Stories
A good laugh can make people more comfortable and open to participation. Share an interesting story or a fun fact to ease the waiting time.
5. Encourage Participation
Ask questions that prompt responses from those present. This can be something simple like “How was your weekend?” or “What’s one thing you’re excited about this week?”
- “Waiting for Bob. We are discussing the team's progress while we wait.”
- “Welcome Mary, just waiting for Bob. We are chatting about weekend plans while waiting.”
Figure: Good example - Acknowledging new participants and keeping the conversation light and engaging
By following these tips, you can ensure that meetings start on a positive note, making everyone feel valued and engaged right from the beginning.
Everyone in your organisation should be able to see meetings that are relevant to their team (e.g. Daily Scrums). Recurring meetings must be setup correctly so that they are associated with a team channel. This process lets others in your organisation see the meetings associated with that channel.
- Navigate to Microsoft Teams | Calendar | New Meeting
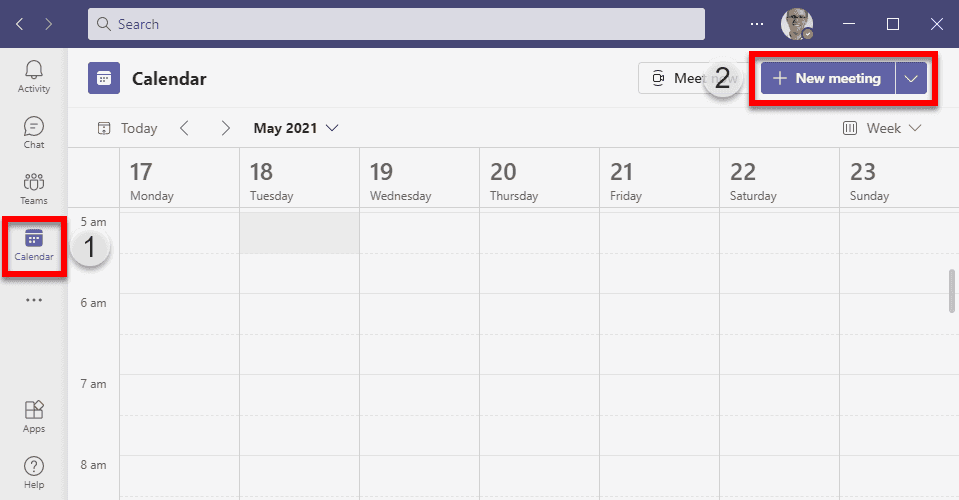
Figure: Navigate to Microsoft Teams | Calendar | New Meeting - Enter the details of the meeting, make sure to add a channel to associate with it!
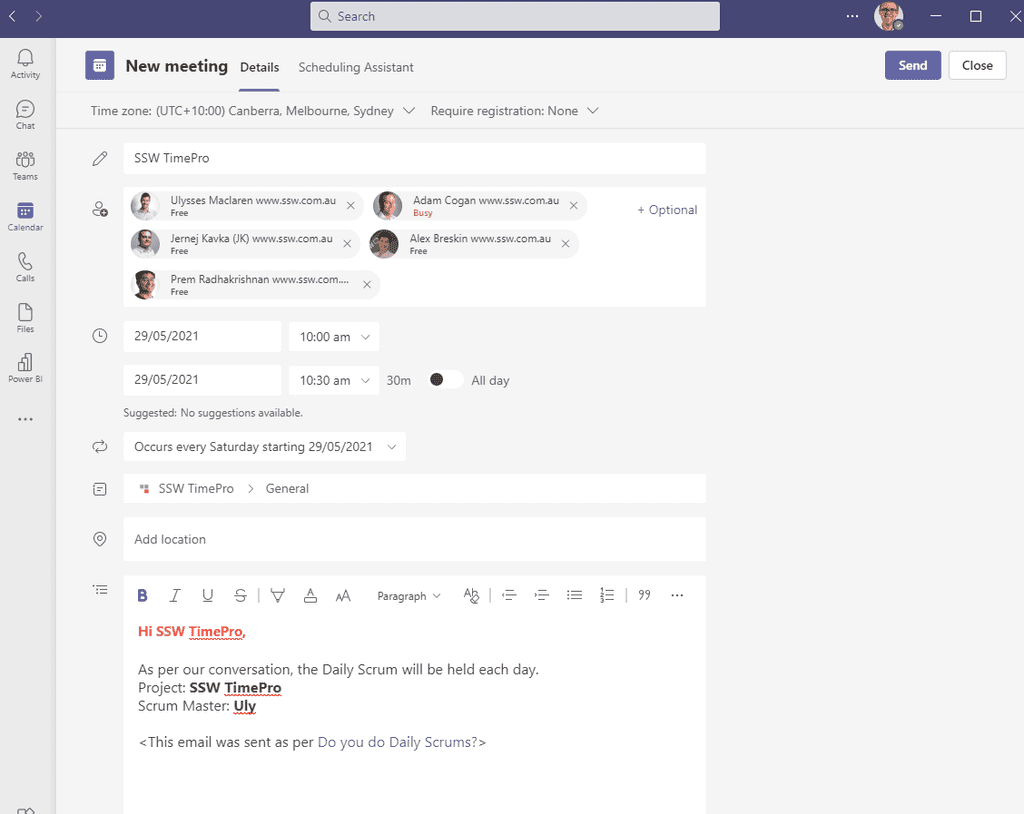
Figure: Enter the details of the meeting, make sure to add a channel to associate with it! - Hit save and you are done, your meeting is all setup.
Members of the Team can edit the meeting (time, date, attendees, etc.) in Outlook - which is really useful, since the meeting does not get "orphaned" if the organizer leaves the company.
Go to Outlook | Calendar | All Group Calendars | {{ group }} and open the meeting from there.
The status message is often not used but can be quite helpful. People can instantly see what you are up to when they chat with you.
It tells people 3 things:
- What project you’re working on
- The people that you need to speak to (they will get the notifications)
- The location of where you are
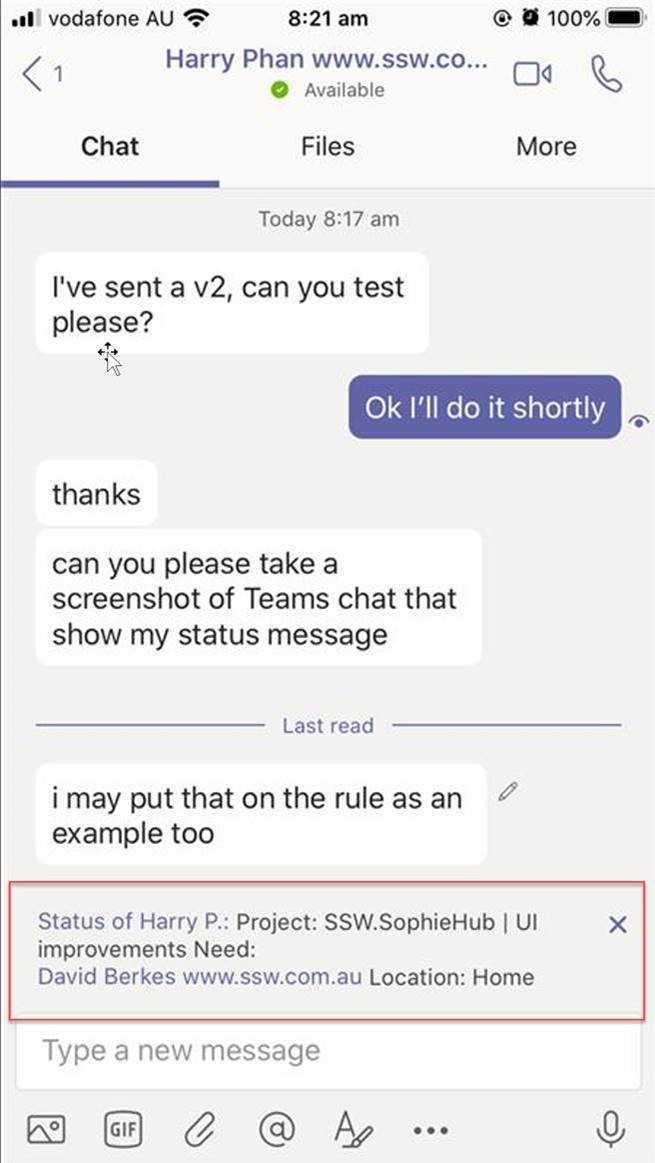
Figure: When people chat with you, they can see what you’re up to More information
To update the status message, follow these steps:
- On the top right, click on your photo
- Click on the pencil icon to edit the status message
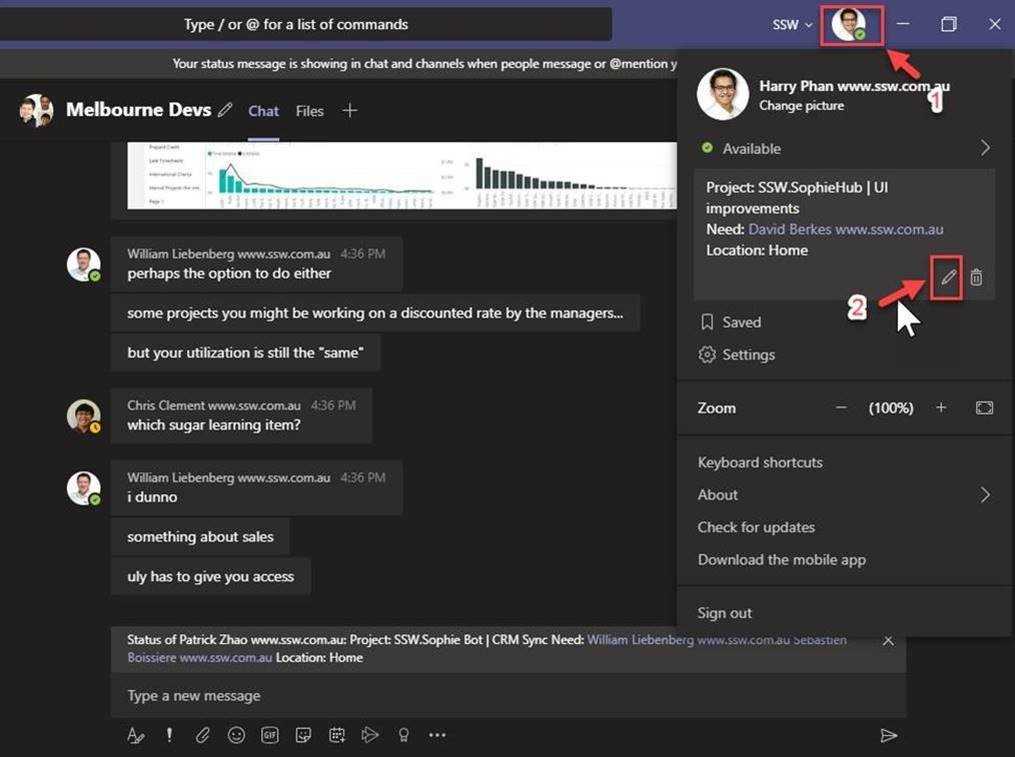
Figure: Edit the Teams status message each day The status message is helpful when it contains:
- Project: xxx (the product/project you’re working on) | yyy (the tasks you’re working on)
- Need: xxx (team members that you’re working with – use @mention to tag these members)
- Location: xxx (where you’re working from e.g. Home, SSW Melbourne, CBA, etc.)
Note: the benefit of using the field names with the colon is that it allows you to programmatically extract the information e.g. on SSW SophieBot when you ask who is Patrick, you could also see this information and query why the location field is different from the Wi-Fi he is connected to.
- Enable “Show when people message me”
- For “Clear status message after”, select Never (to prevent Microsoft from deleting the status message)
- Click Done once complete
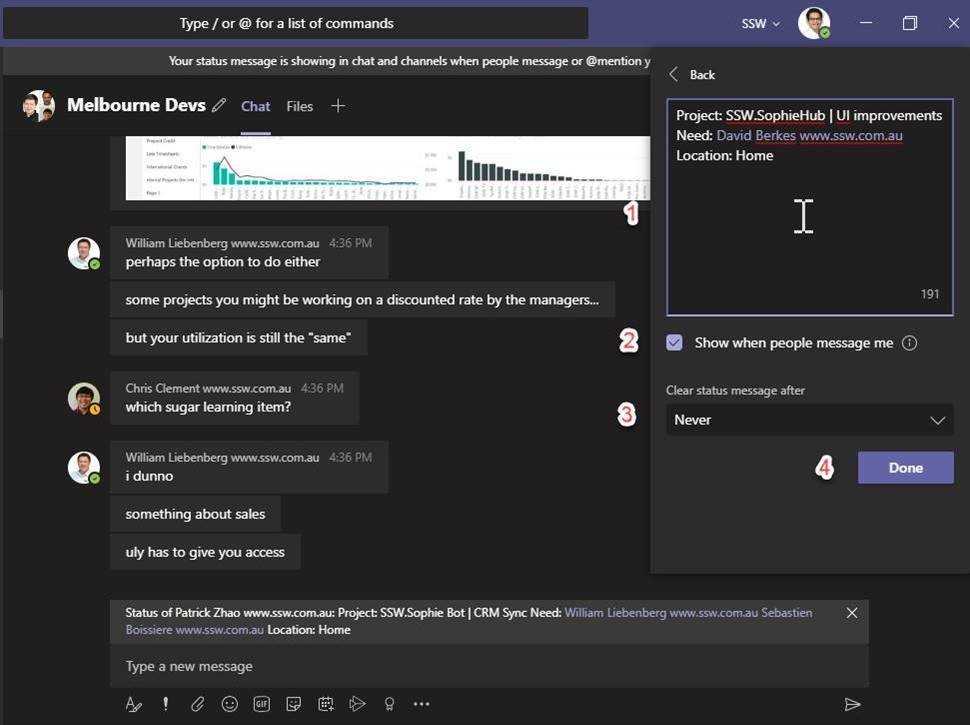
Figure: Edit the status message Receiving Teams messages after work hours can be stressful, disrupting personal time and mental well-being. Microsoft Teams' Quiet Hours feature helps you create boundaries by silencing notifications during non-work hours. By proactively setting Quiet Hours, you can reduce interruptions, maintain focus during work, and preserve your personal time for relaxation or family.
Teams notifications pop up repeatedly during dinner, creating stress and distraction.
Figure: Bad Example - Notifications during personal time without Quiet Hours enabled
Quiet Hours silences Teams messages after work, leaving you stress-free to enjoy family time.
Figure: Good Example - Quiet Hours helps maintain boundaries for better work-life balance
Why use Quiet Hours?
- Reduce Stress: Continuous notifications can lead to burnout and stress
- Maintain Work-Life Balance: Ensuring that work stays within its designated hours is crucial for personal well-being
- Minimize Unnecessary Interruptions: For non-urgent communications, email is often less intrusive than instant messages. Do you send emails for tasks only?
How to Enable Quiet Hours
- Open the Teams app on your mobile device and tap on your profile picture in the top left corner
- Navigate to Notifications | Under Blocked notifications | During quiet hours
- Set your preferred Quiet Hours (specific hours) and Quiet Days (specific days)
- To sync quiet hours across all mobile devices, turn on the Set on Teams and Outlook toggle
Tips for Effective Use
- Set Clear Expectations: Inform your team about your Quiet Hours to align communication strategies
-
Encourage Alternatives:
- Use emails for non-urgent matters
- Escalate urgent issues through other means if necessary
Related Considerations
- For urgent or emergency communications, follow the principle of using calls or alternative means
- Understand the broader implications of after-hours messaging and employee rights under regulations like the Right to Disconnect
By using Quiet Hours in Microsoft Teams, you can enjoy better focus at work, a healthier personal life, and a more effective communication strategy within your team.
Dealing with distractions is a fundamental rule to a successful project. Microsoft Teams is a great way to get distracted. Following these options helps you to minimize message distractions:
-
Your machine - enable Teams on start-up
- Now with the application always on your desktop, there is no reason to want email or phone alerts
-
Teams - Open notifications settings
- Disable email alerts - this reduces bloat in your task list
- Set all settings to "Only show in feed" - this prevents distracting phone and email alerts
-
There is a myriad of options to choose from when storing and sharing documents: SharePoint, or OneDrive/Dropbox/Google Drive, or Microsoft Teams. The best choice is Microsoft Teams because it brings together the best of SharePoint, cloud file storage, real time collaboration and more into a single location.
Warwick Leahy tells us why it's so important to save our files in the right place:
Video: Store your notes in Microsoft Teams with Warwick Leahy (2 min)Want to learn more? Watch Jean Thirion's longer video on this topic:
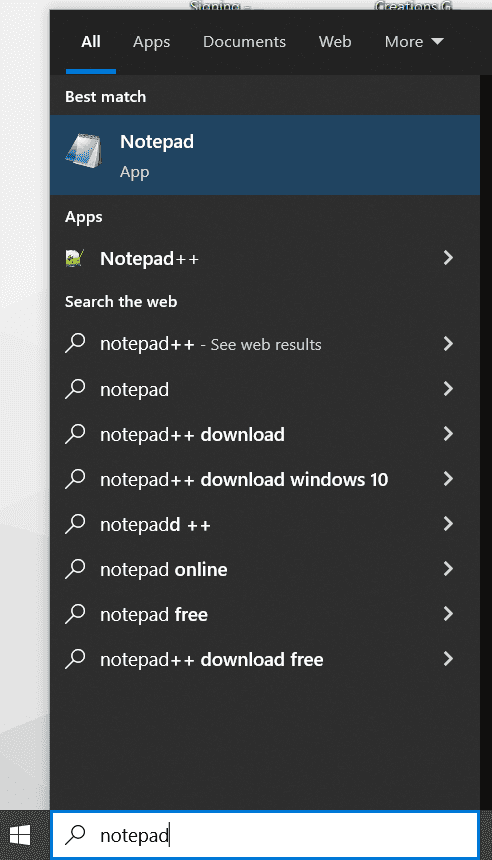
Video: Microsoft Teams and Dynamics 365 - You won't believe where you should store your documents! (4 min)Don't start searching from your start menu either for a program whether that be Notepad, Notepad++, OneNote or even Word. This will open the new file locally on your laptop which requires manual copying/sharing later - and it's easy to forget to do that.
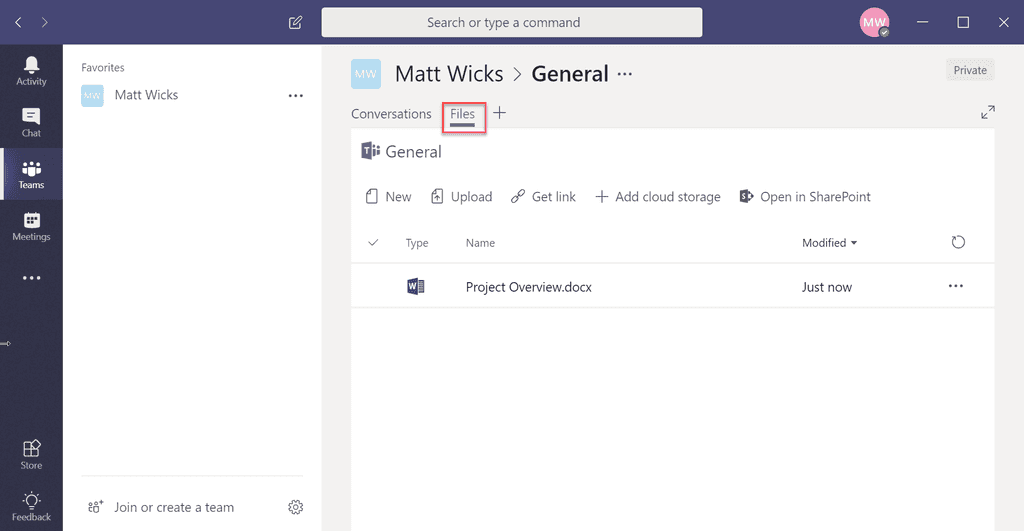
Instead create your file in the Team for a start. It is immediately backed up and shared to the entire Team.
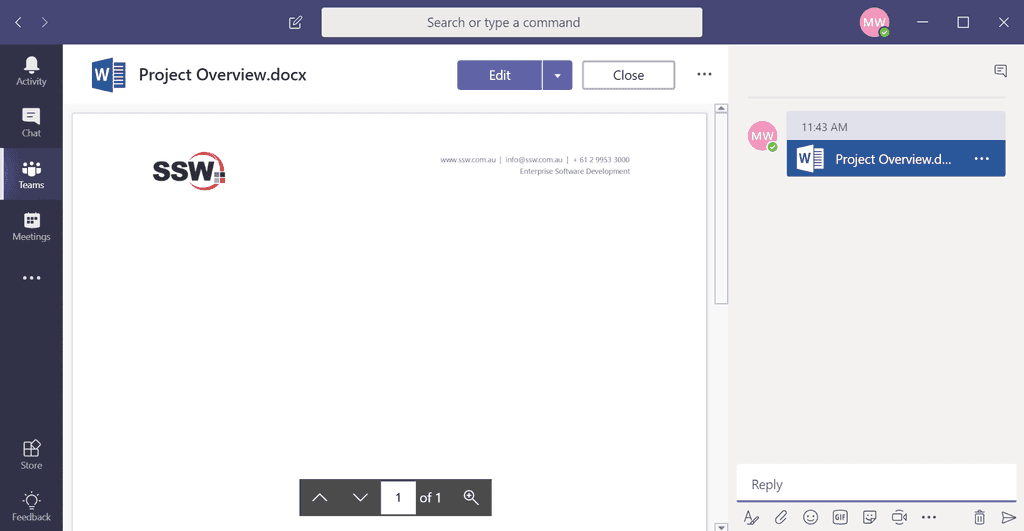
The great thing about having conversations next to the file is that it is always in context. Also, future users can view the conversation when they open the file in teams.
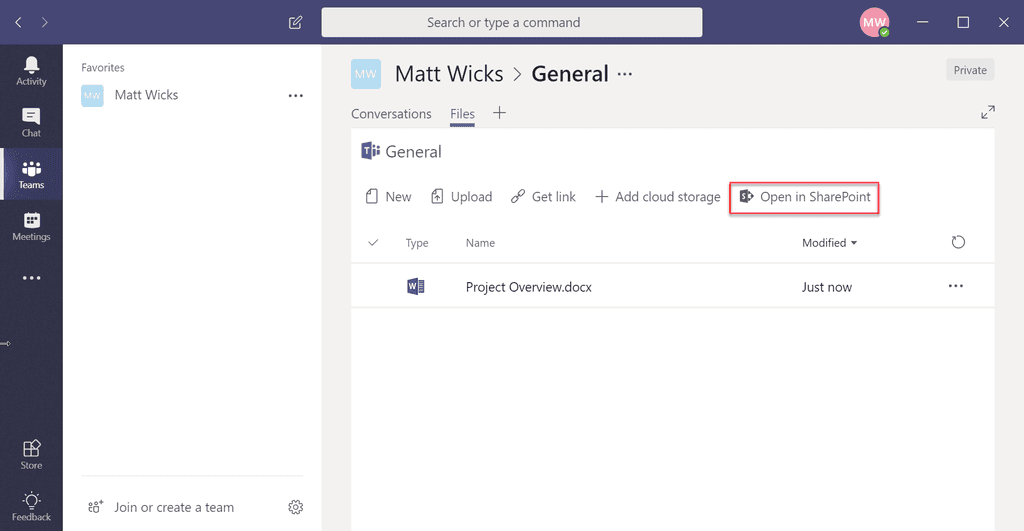
Behind the scenes, storage is provided by a SharePoint site; so that is there if you want to use it. As an added bonus thanks to this; you can take the files offline by syncing with OneDrive for Business and by default each channel gets its own folder.
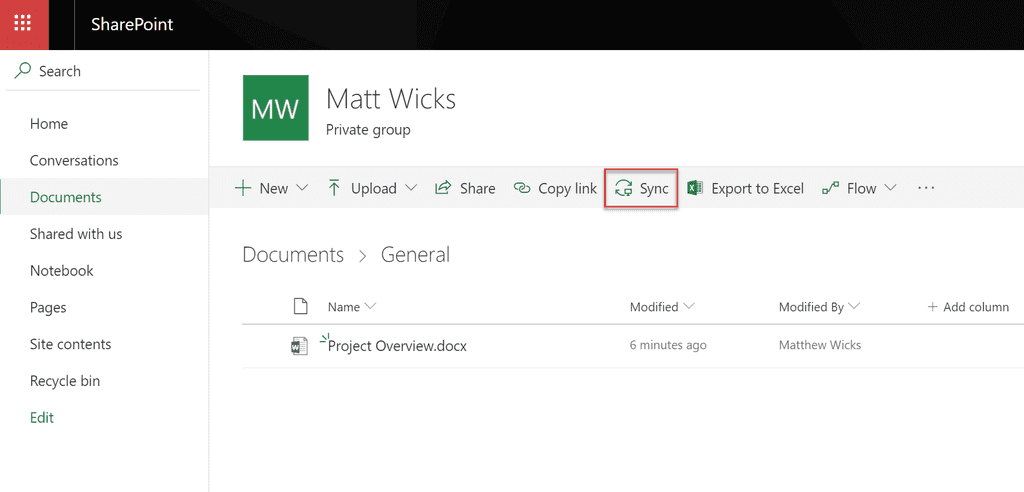
Figure: Good example - You can sync the files in SharePoint with your current machine through OneDrive. A toast notification should popup indicating that files will be synced Note: If you realize later that you have created a client document and uploaded it to OneDrive instead of saving it to Teams, then you should Sync Teams to your drive and copy the file locally. This will keep the file version history. Uploading the file in Teams loses that history so you may end up with an old client Team containing notes that appear to be new.
Note: Although you can add other cloud storage providers for file storage e.g. Google Drive, Dropbox, etc... this is not recommended, as they aren't first-class citizens (i.e. if you want to share files from them, you need to go to the provider's sharing settings outside of Teams).
What does not get stored in Microsoft Teams?
For developers
- Code obviously belongs in GitHub, Azure DevOps, etc
- The 8 important documents should be stored in Azure DevOps (was TFS/VSTS), or instead use Markdown with the Wiki
For designers
- For large files, OneDrive is a better choice. See the best Source Control for Designers
Warning: By using Teams instead of SharePoint, you are losing a number of key features:
- No full fidelity support for Metadata in Document Libraries. E.g. Can’t add extra columns into the “Files” tab
- No support for private channels. E.g. You will need a team per subset of users with different permissions
- No direct access to version history from Teams UI (still exists on SharePoint UI)
- No access to the cross-office365 Search feature. E.g. SharePoint search is better
- No access to external content in the search feature. E.g. Can’t search ssw.com.au/rules
- No access to SharePoint designer workflows (although the new way to do it is Microsoft Flow)
What about usernames and passwords?
Documents with usernames and passwords should not be stored in Microsoft Teams. Security is very important for everyone and every company. Use a password manager to store usernames and passwords.
Note: API keys, whether generic or for the individual should also be stored in a password manager.
Microsoft Teams gives you the ability to sync your files to File Explorer. A lot of people don't realize this feature exits. Let's see how to do this.
Instead of going to Teams | Files to upload or find a file, you can:
- Find you Team folder in Teams
- Open the folder in SharePoint
- Click Sync (signed on OneDrive)
- Done - a new folder will be available in your File Explorer
Now you can manage your files just as a normal document in your machine.
Warning: If you don't want to be part of that Team anymore, don't delete the folder in File Explorer - This will sync with Teams and remove the files there too. You should go to OneDrive | Settings | Stop Sync.
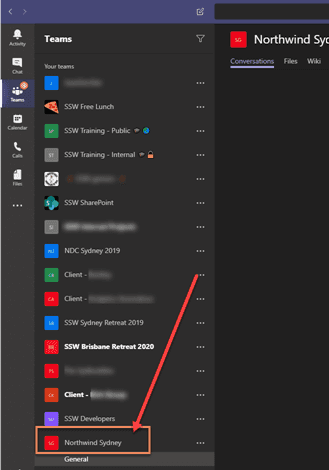
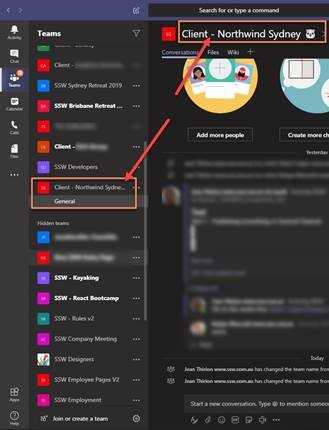
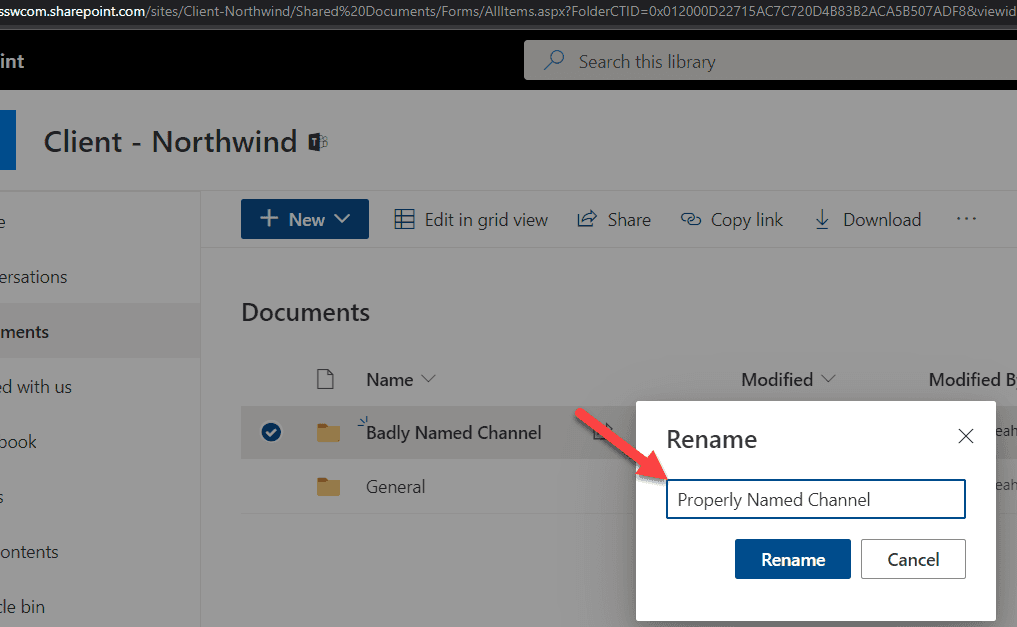
Have you ever made a spelling mistake when you named a Teams channel? Have you then tried to rename the Channel? If so you will notice that the underlying SharePoint folder is still named incorrectly.
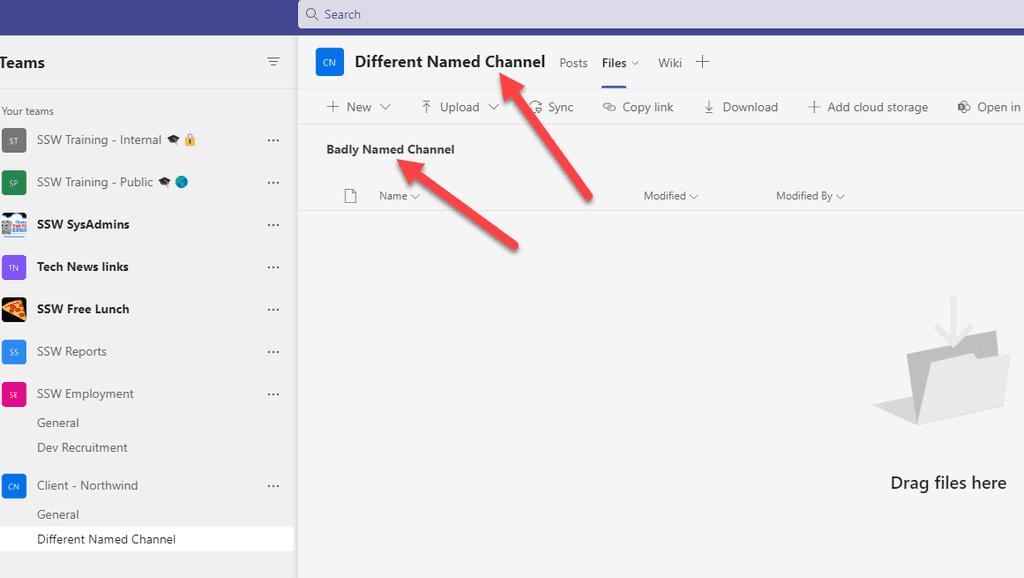
Figure: Unwanted name on channel There is a workaround to rename the folder correctly.
- Rename the Team channel
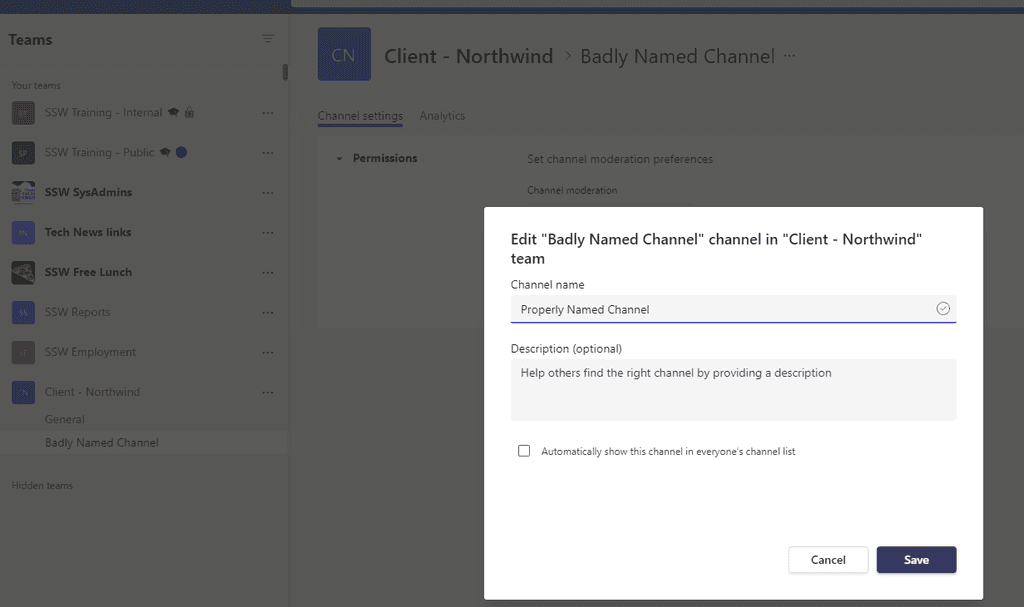
Figure: Renaming the channel Note: This hasn't changed the name of the folder in SharePoint!
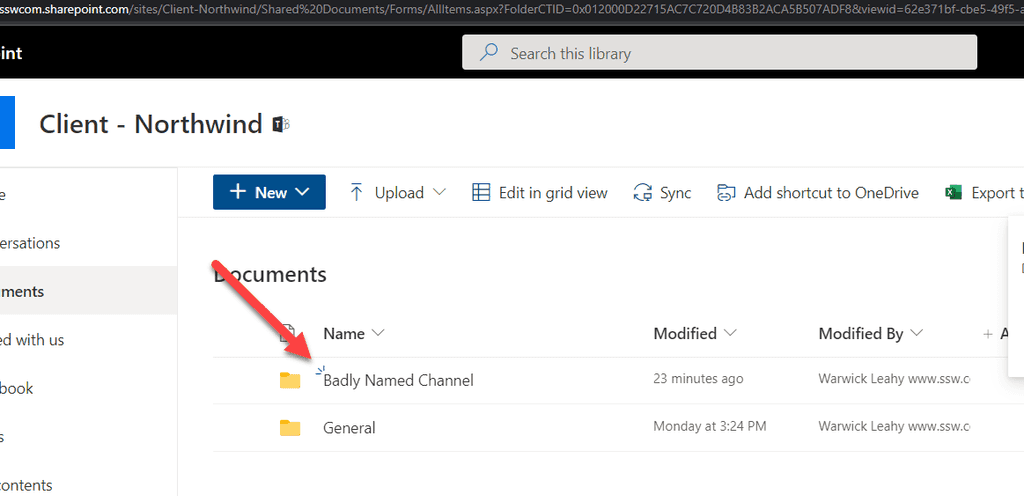
Figure: The folder name didn't change yet - Delete the channel
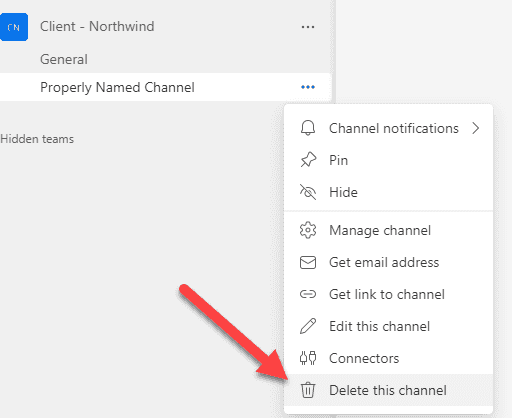
Figure: Delete the channel - Now, in SharePoint, rename the folder
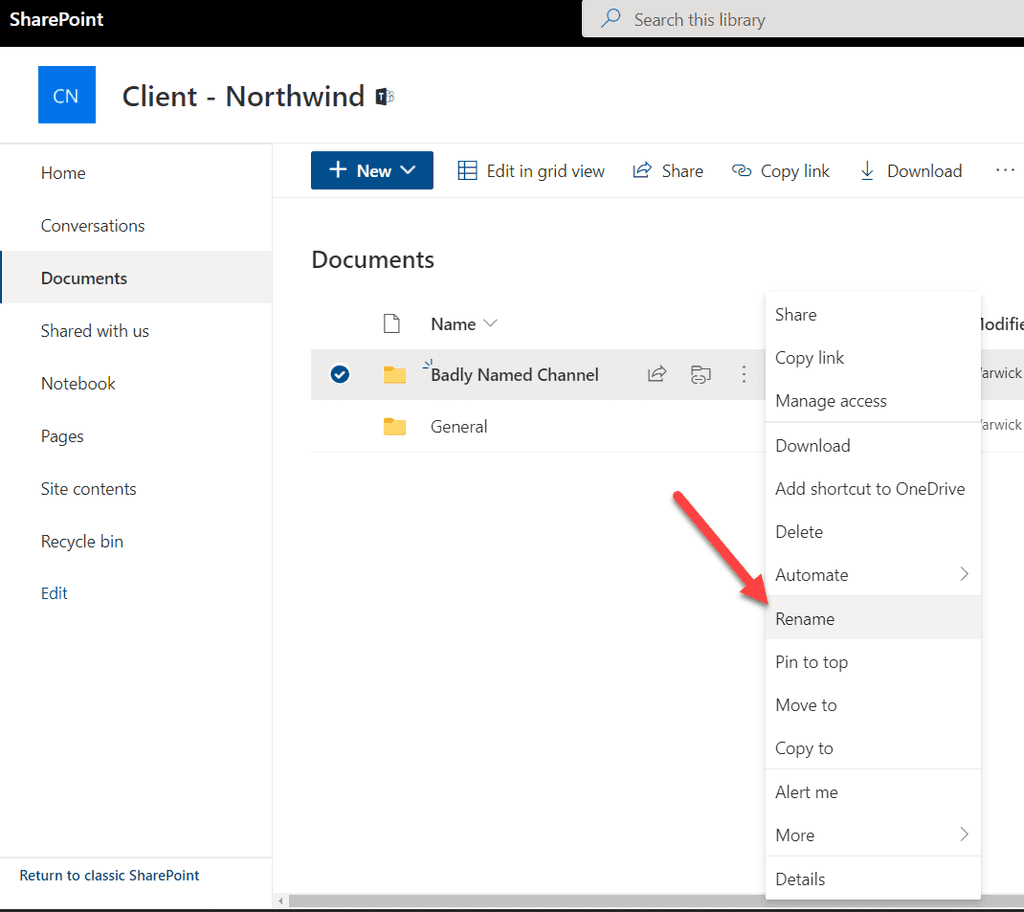
Figure: Renaming the folder in SharePoint When you're having a discussion about the Northwind ordering system that you're building, you need to see your backlog, and of course, it would be handy to see a OneNote diagram of the workflow. It might also be handy to see an Excel spreadsheet of the stakeholders and testers.
What separates Teams from other chat programs, such as Slack, is the ability to add Tabs to your conversations.
The number of tabs is really broad and starts with the standard Microsoft products such as Excel, Word, and PowerPoint. You can also create tabs using Trello, YouTube, Zendesk, and more. The usefulness of this feature cannot be understated – it is so handy to have all your work items in one place.
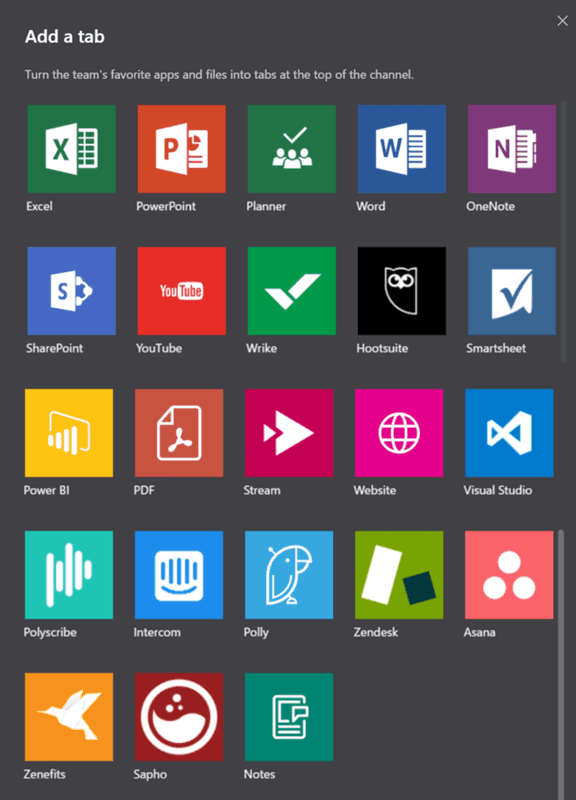
Figure: There is a virtual smorgasbord of tabs to add the conversation – aggregating all your necessary work parts into one easy, accessible location 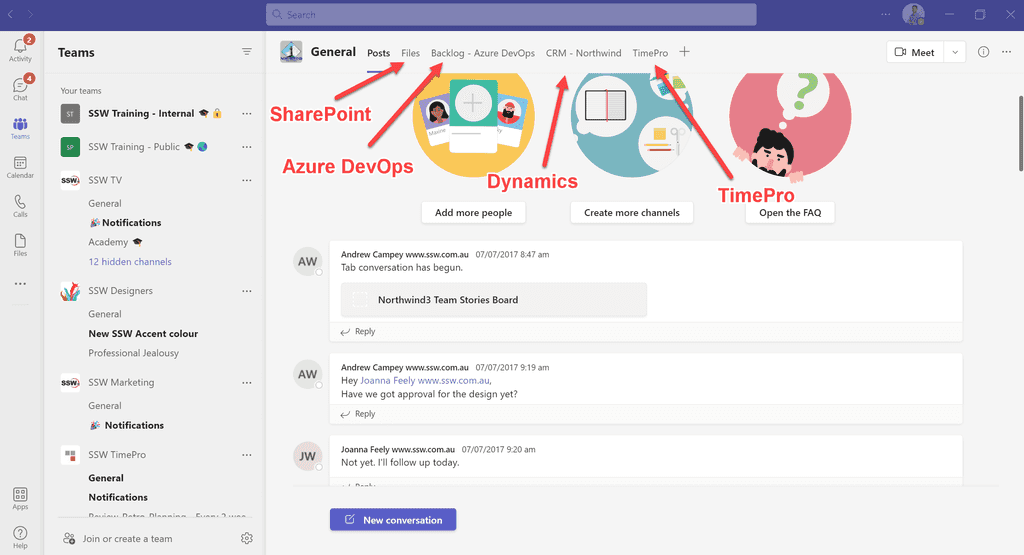
Figure: Beyond our posts, we have 4 tabs – our files, our Backlog, our CRM, and our invoicing system Some information sent via email, such as an event agenda will often be accessed multiple times by recipients. Instead of having to search through your mailbox every time you need the details of an invitation, if you are using Microsoft Teams you can easily set up a page as a tab inside your Team.
A SharePoint page can also have dynamic content such as Document Library views, Youtube players, and much more. You can even embed your own custom web parts, rendered in Teams with full fidelity.
To set up a SharePoint Page as a Tab in Teams, follow these steps:
- Navigate to SharePoint:
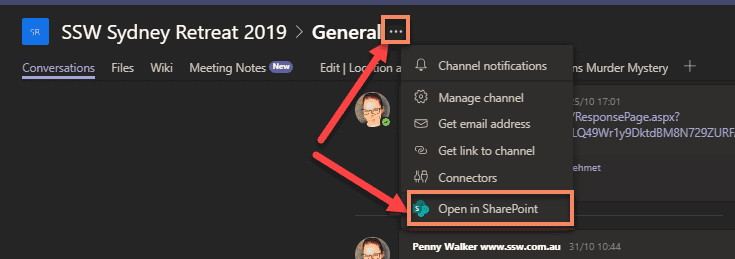
Figure: Navigating to SharePoint from Teams - Create a SharePoint page
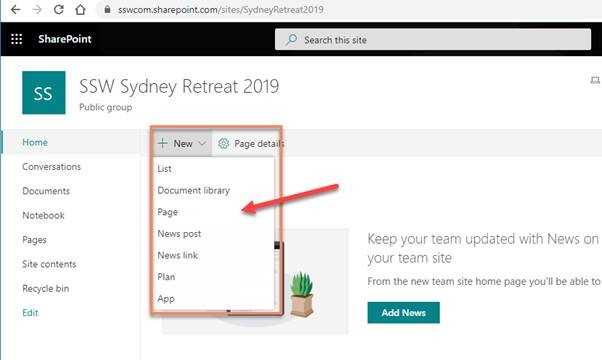
Figure: adding a new SharePoint page - Customize it
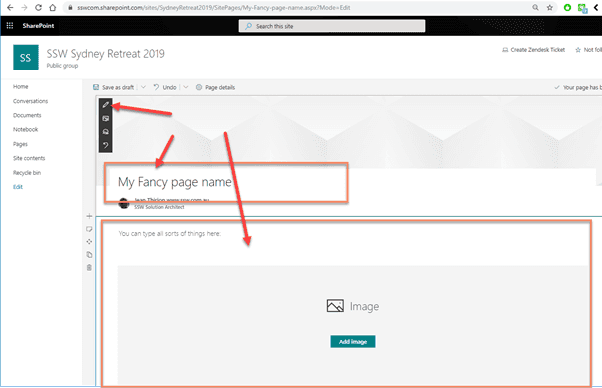
Figure: Customizing the page using the different controls - Publish it (tips: you can even share it via Email or Promote it as a News)

Figure: Publishing the page 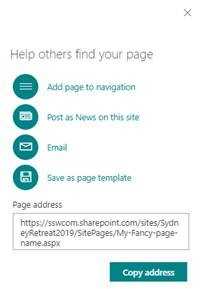
Figure: several options available once the page is published - Go To Teams and Add new Tab
- Select “SharePoint”
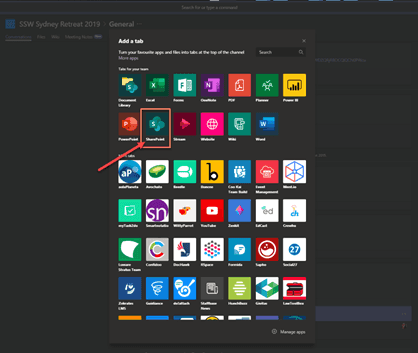
Figure: Adding the page as a tab in Teams - Select the page you just published and hit “save”
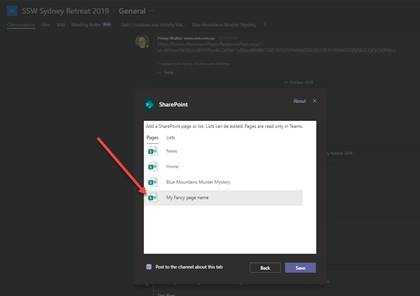
Figure: picking the page from the menu Tasking out work means adding it to the backlog. Adding it to the backlog has project management benefits and is easy to do if you have a tab for VSTS in the channel.
TODO: Have the bot listen in on the conversations to remind you about the rule
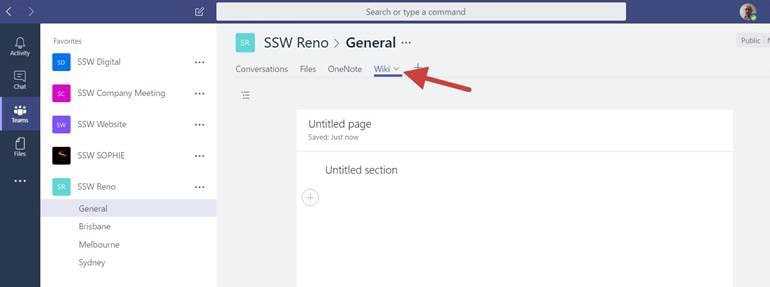
You should use OneNote instead of the default Wiki. This way you can use it offline on your mobile apps.
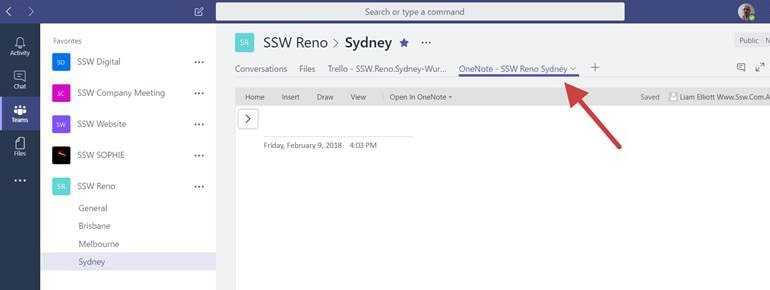
Good Example: Use OneNote. Now you can use the normal OneNote Desktop and Mobile app for iOS and Android (including offline support) Note: Rename the tab to show that it is a OneNote Tab. E.g.: " OneNote - SSW Reno Sydney "
Microsoft Teams search is designed to help you quickly find the files you are collaborating on.
From the main search box, you can search for:
- Teams
- Channels
- Messages
- People
- Files
Be aware of Teams Search limitations
Video: Teams and SharePoint Search Bug with Jean Thirion (6 min)If you start typing in the search box, you will see a dropdown with the main results that matches your query divided by type, prioritizing Teams and Channels:
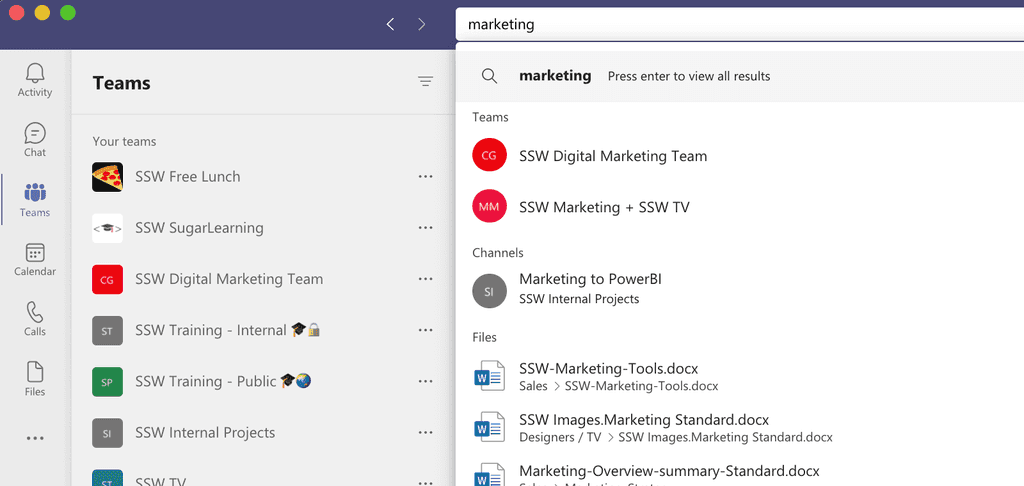
Figure: Search results for "marketing" Tip: Apart from the little heading, as per the image above, you can recognize a Teams result when it only shows up the title, while a Channel result shows the title with the name of the associated Team underneath.
Once you hit "enter", you will be directed to all results, separated by Messages, People, and Files tabs:
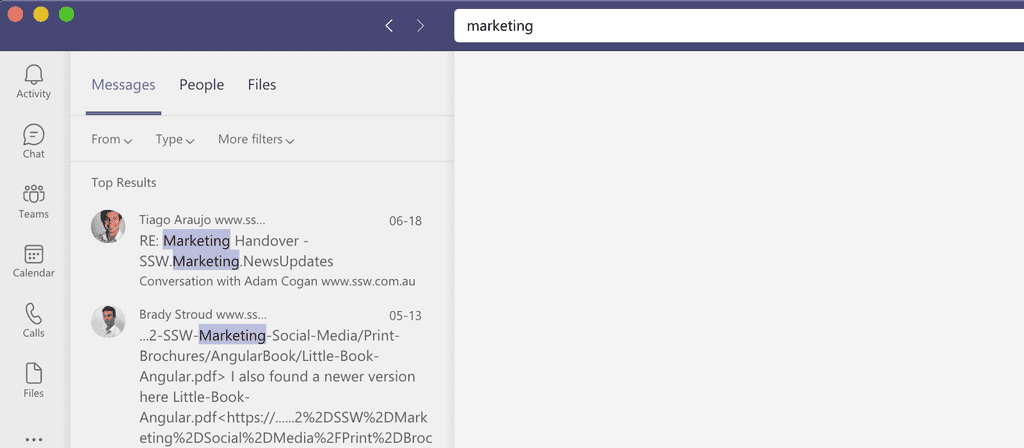
Figure: Use the 3 built-in tabs to search through the different types of results Tip: After hiting "enter", to see the Teams and Channels results, simply click the search box again.
You may use built-in filters to refine your search under each of the tabs:
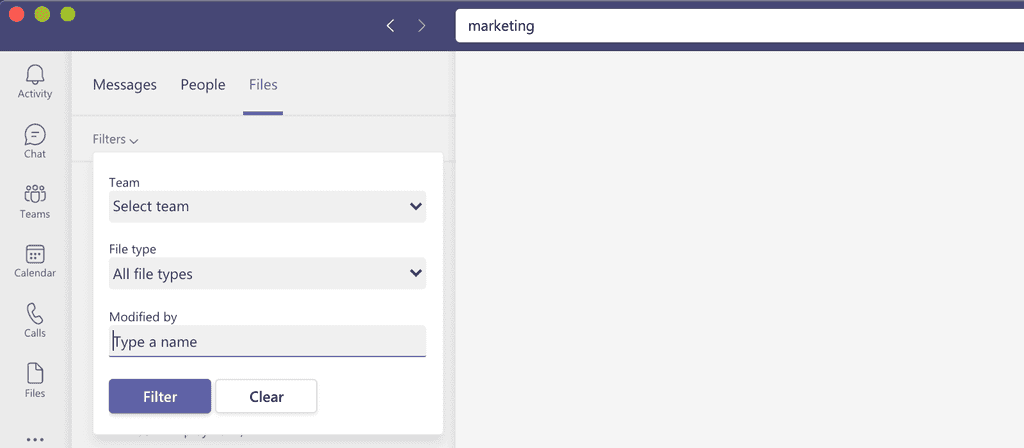
Figure: Built-in filters for Messages Important: Even though Teams search gives you quick access to all your messages and documents; the search is scoped to Teams only, which means you cannot search for files hosted on SharePoint, OneDrive, other Office365 products (E.g. Delve/UserProfile), or external sources (E.g. sugarlearning.com).
When you need to do a more extensive search, it is advised to use SharePoint search instead.
Imagine you’ve been on vacation for several weeks (lucky you!) and on returning you want to see what’s been happening in your project in your absence. If your project used a “team” within Microsoft Teams, you'd easily be able to review the team’s conversations and progress. You’d be able to see what issues have arisen and where the team has been spending their time.
A "team" is a great way for teams to communicate and have a persistent forum to share information and discuss project related topics. The extensibility of a team also allows the addition of tabs that integrate with 3rd party applications to bring timely and relevant information into the team site. This allows team members to see at a glance what has been happening on the project.
To: All Developers
Subject: What’s been happening on SSWTimePro in the last couple of weeks
Hi Devs, I’ve been away for a couple of weeks. Can you tell me what’s the latest?
Figure: Bad example - Broad email asking what’s been happening
Teams can keep you abreast of all the events happening on your project.
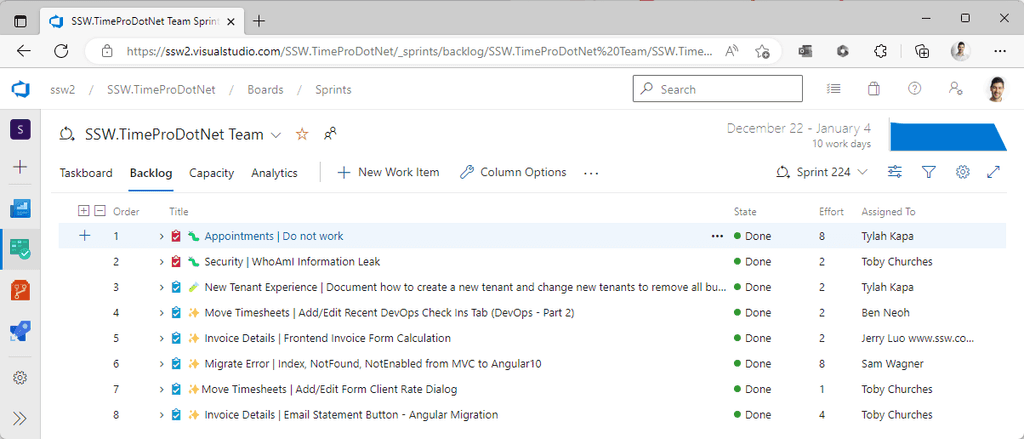
Figure: Good example - Look back over the Sprints you missed to see what was worked on and completed Message in the group chat:
Hi team, I’ve been away for a couple of weeks. I've had a look through the latest PBIs and notifications... what else did I miss?
Figure: Good example - Informed chat message to get the TLDR (too long; didn't read)
You can also add Bots to communicate on your channel, or even better, Connectors! You can add Connectors that, for example, notify you of any new pull requests in Azure DevOps or GitHub. Microsoft used to have several social media Connectors, but these have been retired. It is possible, but more difficult, to add social media notifications with Power Automate, or with a third-party service such as IFTTT.
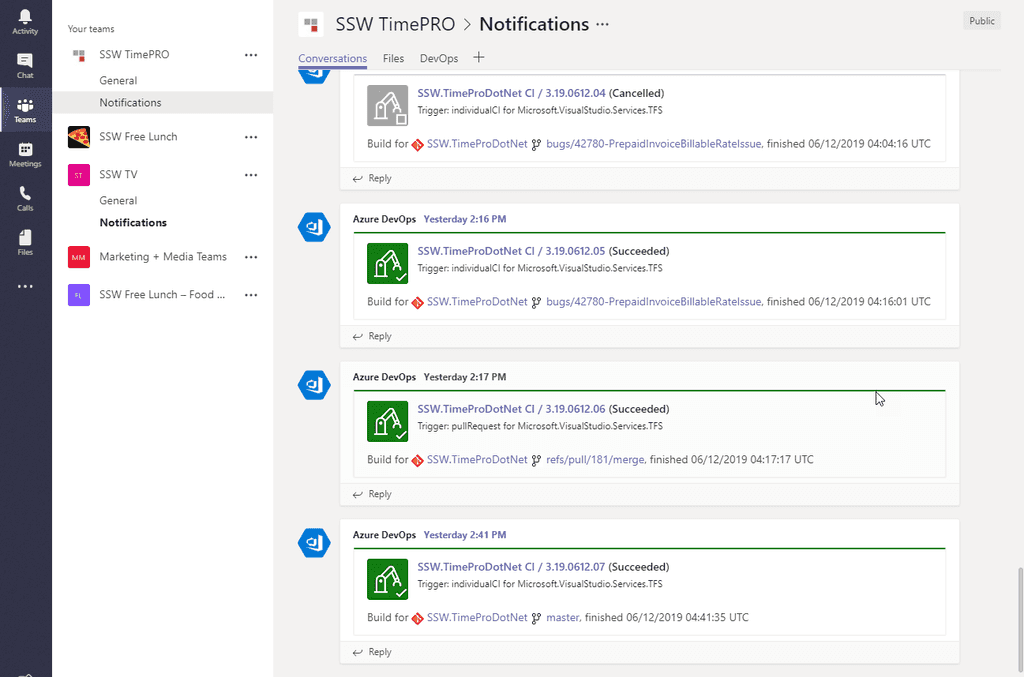
It is important to have a feed of what is happening in your project while still keeping a clean space to have discussions. This is why your Team should always have a Notifications channel.
A majority of these notifications can be created using the connectors that are built into Teams. To create a connection:
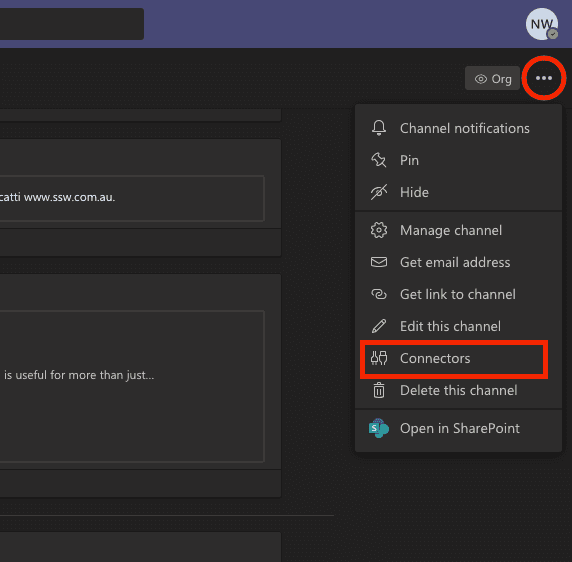
- Select the three dots in the top right of the screen and select "Connectors."
Figure: This is how you begin the process of adding a connector.
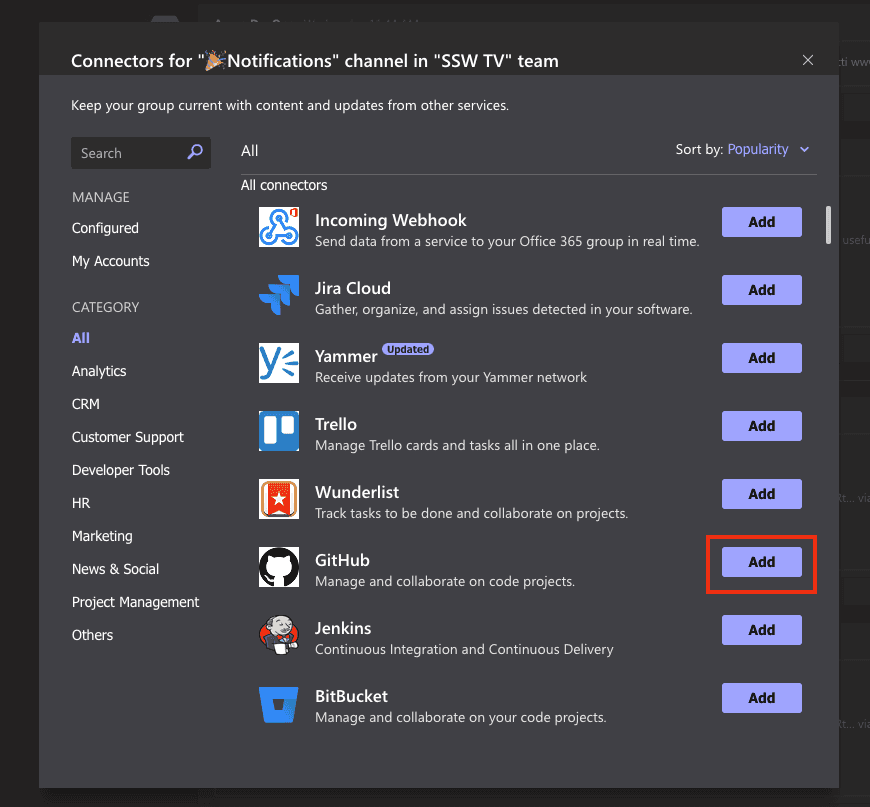
- Select "Add" on the connector that you want to use.
Figure: This is the pop-up that allows you to select which connector to add.
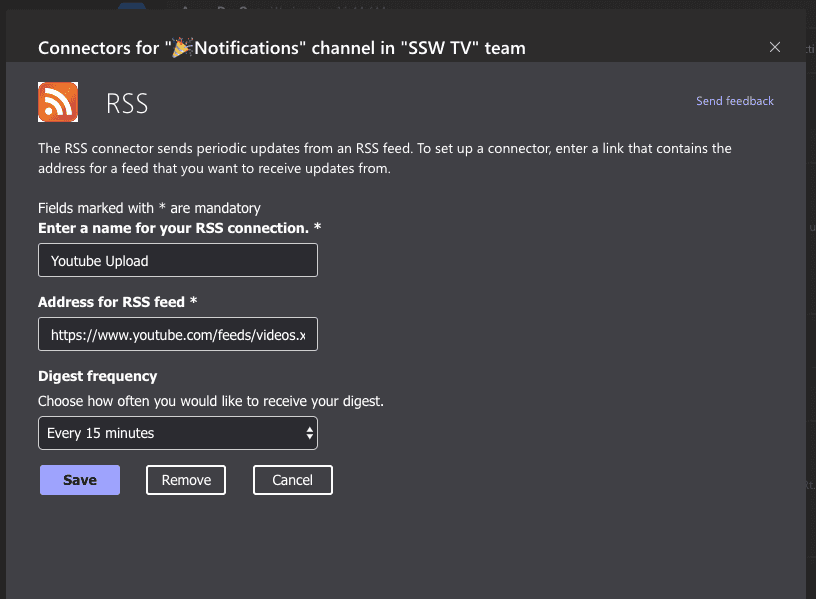
- Give the Connector a name that describes what it does.
- Complete the other configuration options for the Connector and click "Save."
Figure: The configuration page for the RSS Connector that notifies of a new video being uploaded to the SSW TV Youtube channel with a name that describes what it does.
Sometimes you may have to choose between multiple connectors that can serve the same base purpose. In this situation, it is good to choose the one that provides the important information in the easiest way.
Figure: Bad example – There is no thumbnail and no link to the video. (It is nice that you can add custom text – inside the 2 emoijs)
Figure: Good example – There is a thumbnail and a link to the video. (Although there is no custom text)
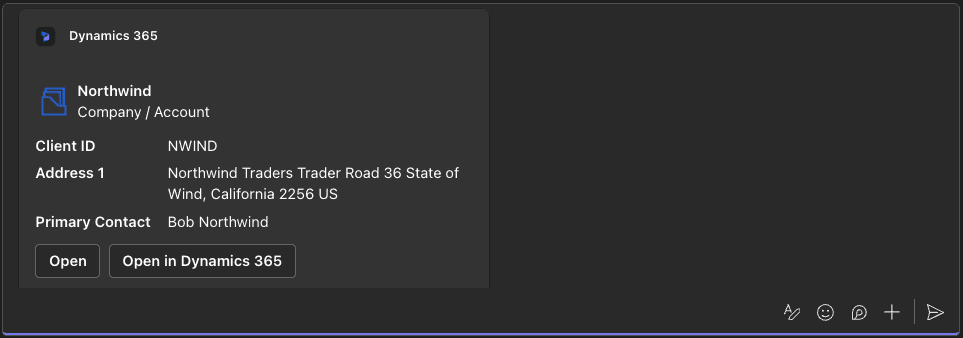
The Dynamics 365 app for Microsoft Teams lets you share records with colleagues without leaving the app. Instead of sharing non-descriptive URLs, use the integration to provide more context.
There are two ways to share a Dynamics 365 record in Teams:
1. Share in a chat
You can quickly share a record in a conversation.
Click the + button in the text box | Dynamics 365 | choose a record | Send.
2. Add as a tab
If your team needs frequent access to a record, you can add it as a tab.
Click the + button in the top bar | Dynamics 365 | choose the record | Save.
At your company, you never want to have a person asking "Where is that file?"The answer should be "The answer is Teams, the question is irrelevant".
Microsoft Teams is a great solution for organizing client files and conversations. Create a new Team for each of your clients, and if you have multiple projects for one client, use Channels to keep them separate. There's no need to create a new Team just for a new project.
Once you have this set up, it is likely that you want to have a link between your Teams instances and the associated CRM record.
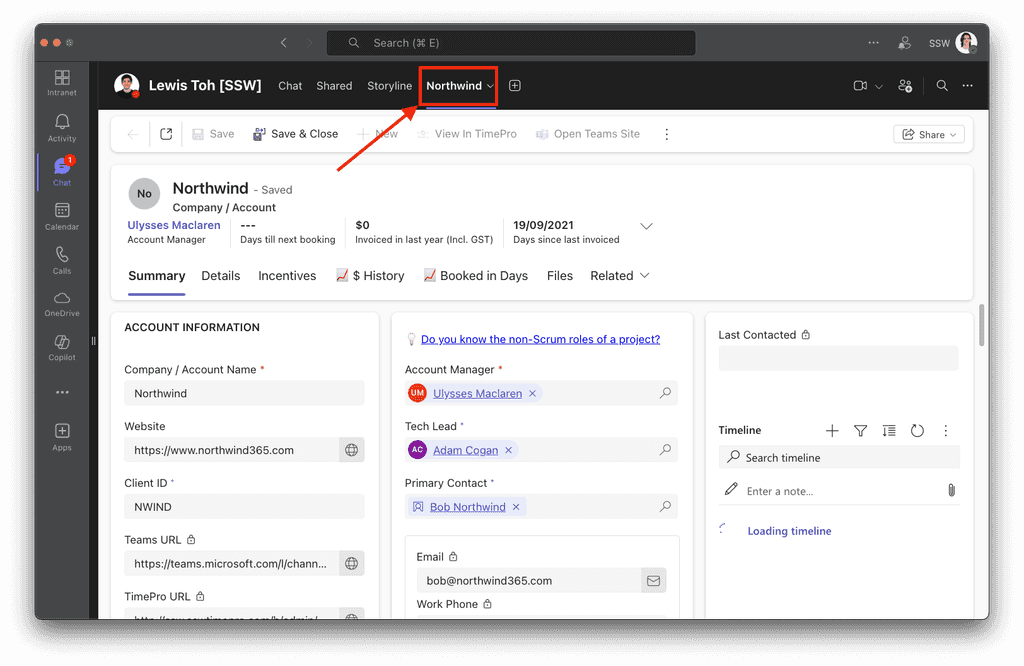
In the video, Adam Cogan describes how they connect Dynamics 365 and Teams with an extra field. They change the Account table to add a custom column 'Teams-URL'.
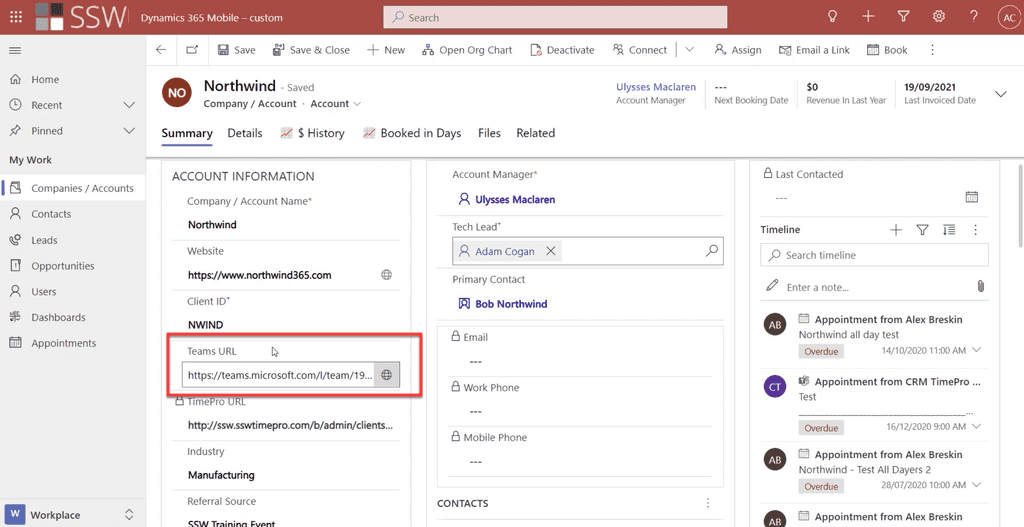
Figure: CRM | Company/Account Form – added Teams URL field Note: Each client should have its own Team. You might have two associated clients - e.g. Northwind Australia and Northwind USA - but if they are separate legal entities and have separate accounts in CRM, they should have separate Teams.
Level 1: Manual method
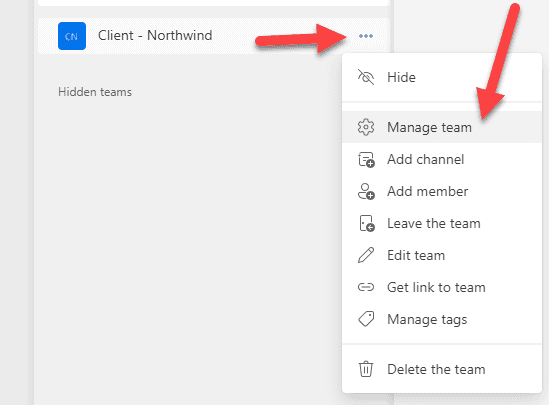
To get that URL, simply click the ellipsis next to your Team name and click "Get link to Team".
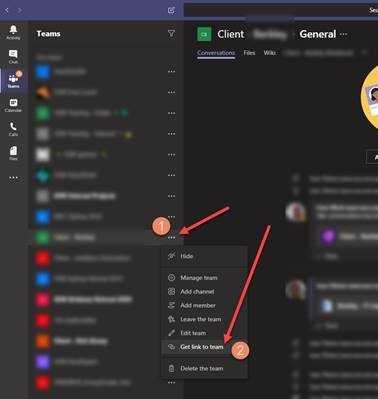
Figure: Get the Teams URL Level 2: Automatic (Basic)
Add a button to the Ribbon to provision a new team and link to it.
How to add the button to the Dynamics Ribbon?
- Option A - Customize the command bar - Power Apps | Microsoft Docs (new approach - customizing command bar using the command designers)
- Option B (old approach) - Ribbon Workbench
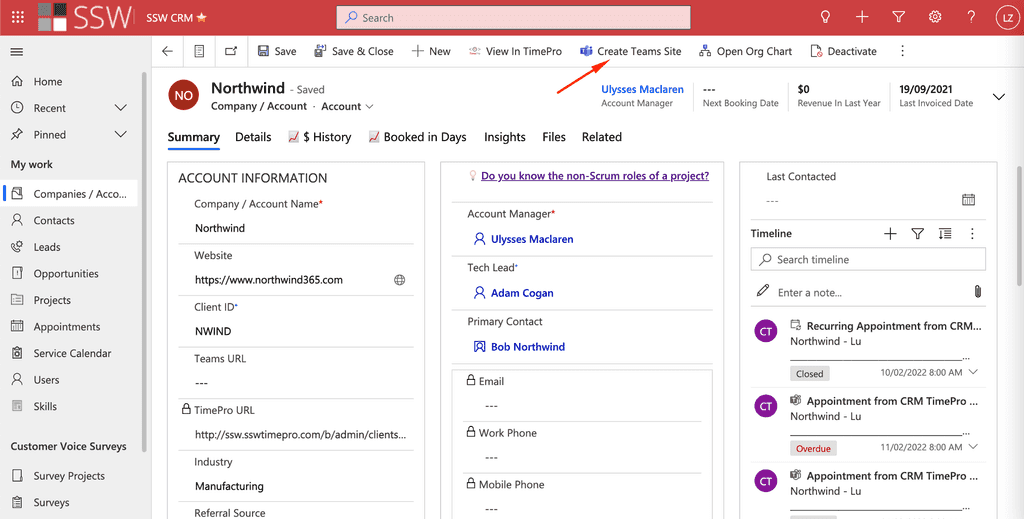
Figure: Use the Ribbon Level 3: Automatic (Advanced - best UX)
Using a PCF control you can add a button directly into the form that can do everything for you.
Click on this section on your CRM Dynamics to have a Team created:
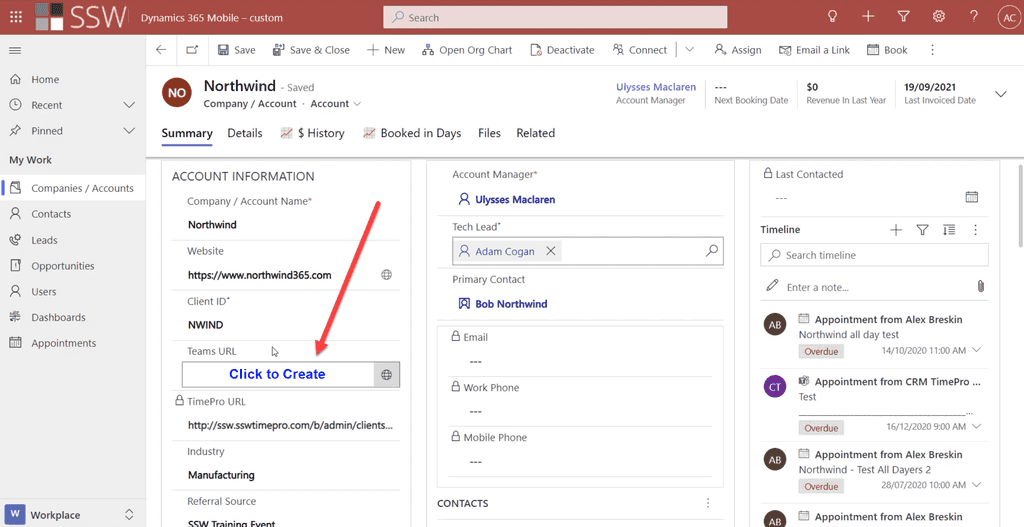
Figure: PCF control allows you to add a button to create a Team Notes:
- Alternatively, this process can even be automated using Azure functions and Graph API to provision a new Team every time a new client is created in CRM. This has the disadvantage that every single Account would get a Team...and that could create a real mess of unused Teams
- The Team's name can get out of sync if the Dynamics client name is changed, therefore you need one extra flow that is called when the client name is changed to keep them in sync
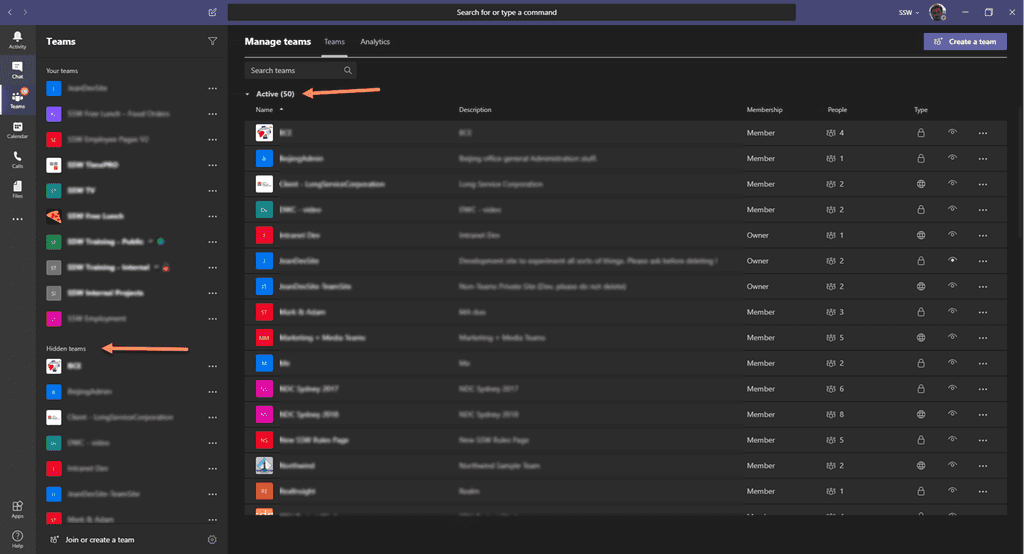
Within a team or project-based organization, the number of Teams can rapidly grow out of control. The more active Teams you have, the harder it gets to find the right information when you need it.
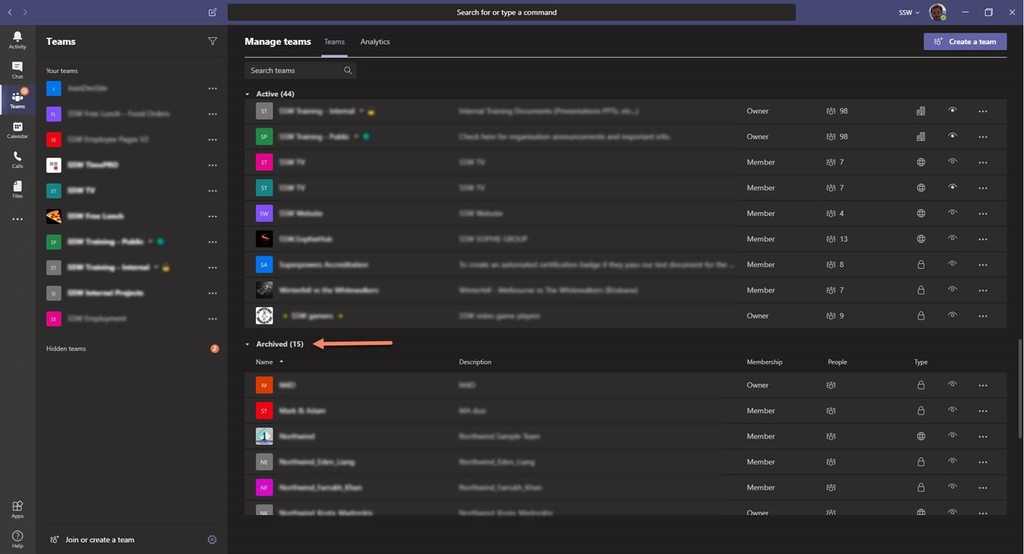
Hiding teams works well enough for end users but doesn't help administrators figure out which teams are actually in use. You should "Archive" unused teams instead – making the team unavailable read-only.
To archive a Team, follow these steps:
- Click on "Manage Teams"
- Choose the team you want to archive (you must be owner of that Team)
- Click the "..." (ellipsis)
- Click "Archive team"
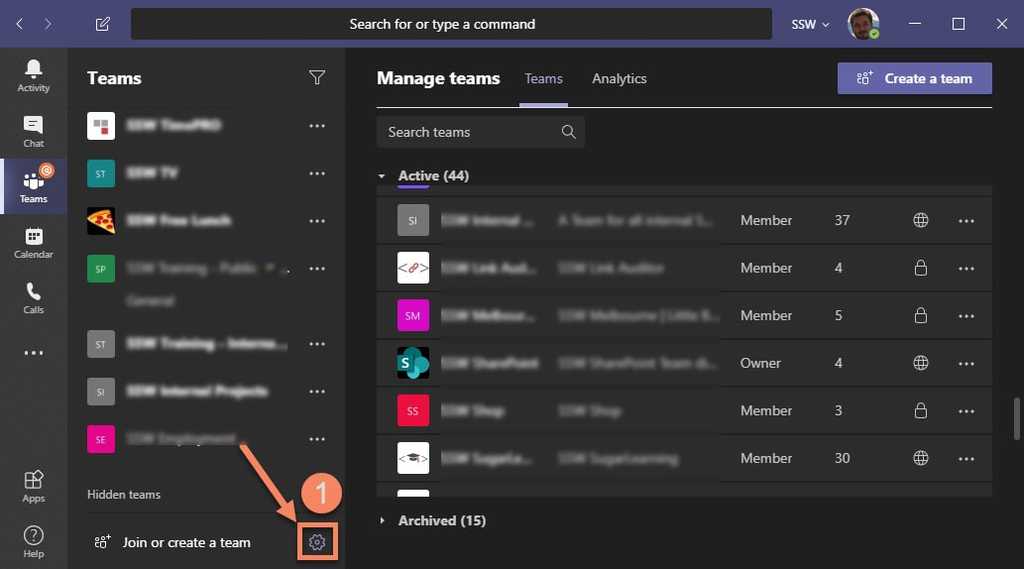
Figure: Clicking "Manage Teams" 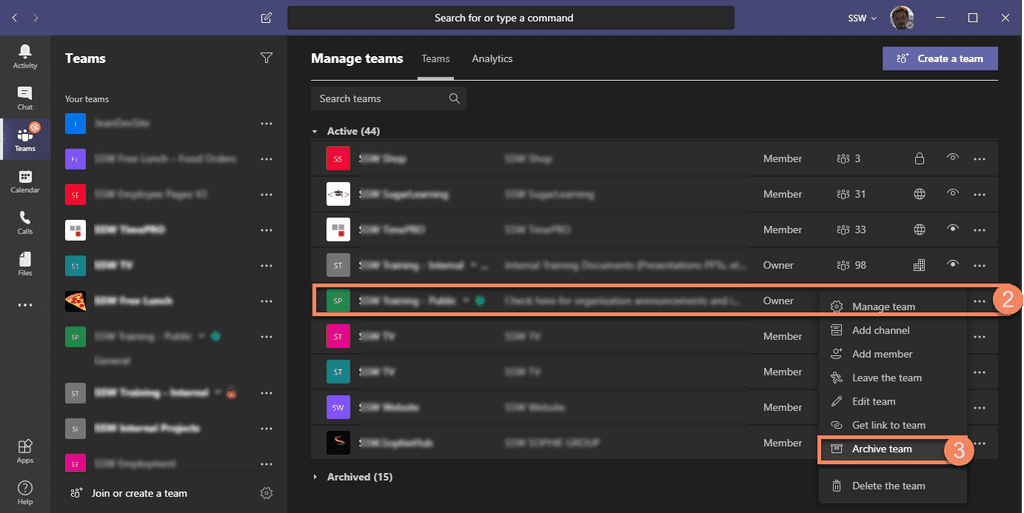
Figure: Clicking "Ellipsis" | "Archive Team" Note: Archived teams can be restored at any time to be made available again.
When creating a new Team in Microsoft Teams, you can add Tabs to keep track of important information and you can also add Apps (generally bots) to channels.
Apps enhance your Teams experience in various ways e.g.:
- Apps can be bots, and you can talk and interact with them
- Apps can add and change your messages in Teams
- Apps can also be Tabs, they overlap a little
You can also read more about Apps at Five things to know about apps in Microsoft Teams.

Figure: There are various apps you can add to channels 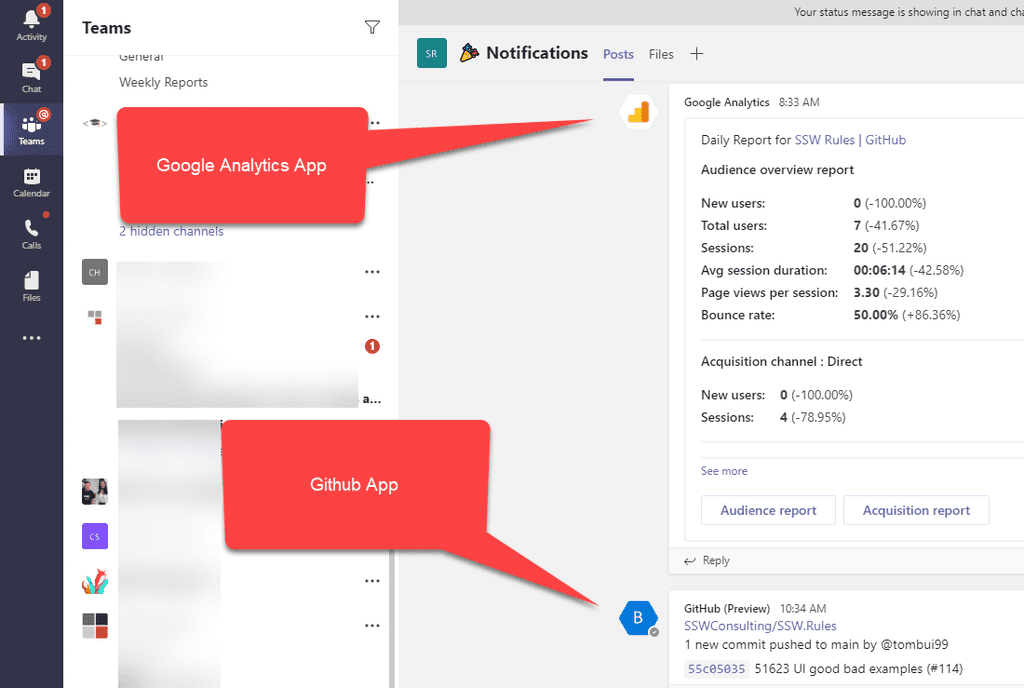
Figure: Apps for Google Analytics and GitHub in a channel Microsoft Forms is a great way to send out a quick survey to a group of people to get feedback, come to a consensus, or organize team events.
It’s very easy to log in and send one out from your own Office 365 account, but then only you can see the results. A better way is instead to create it from a Group (note every Microsoft Team has a Group).
- To do this, follow these steps:
- Go to Microsoft Teams
- Navigate to the team you’d like to be able to see the results of the form
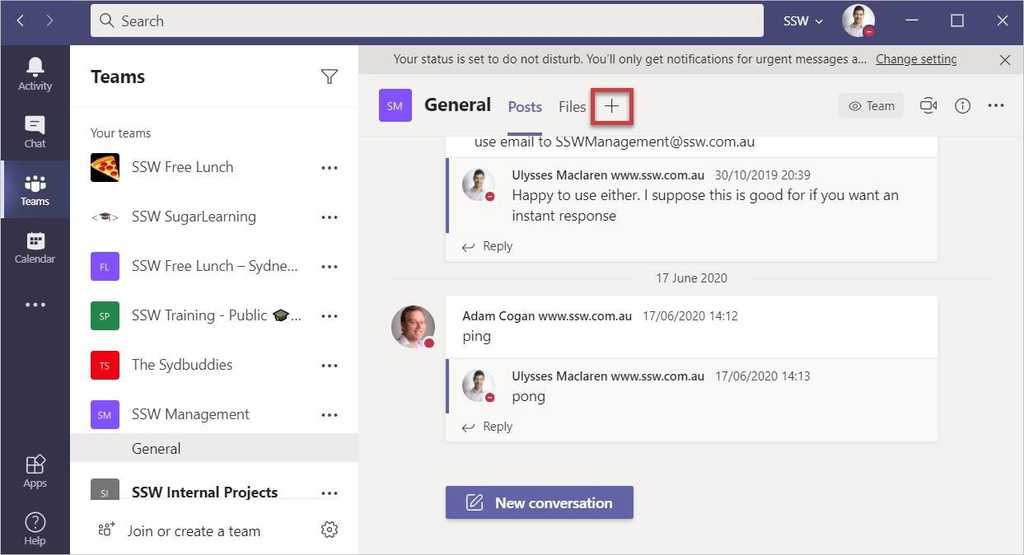
Figure: Click “+” to make a new tab 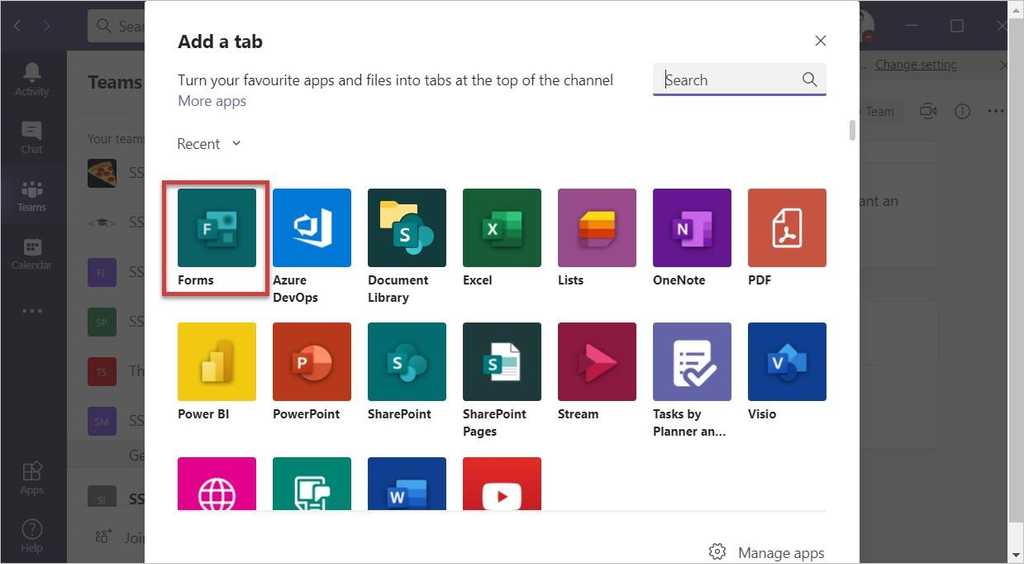
Figure: Select “Forms” 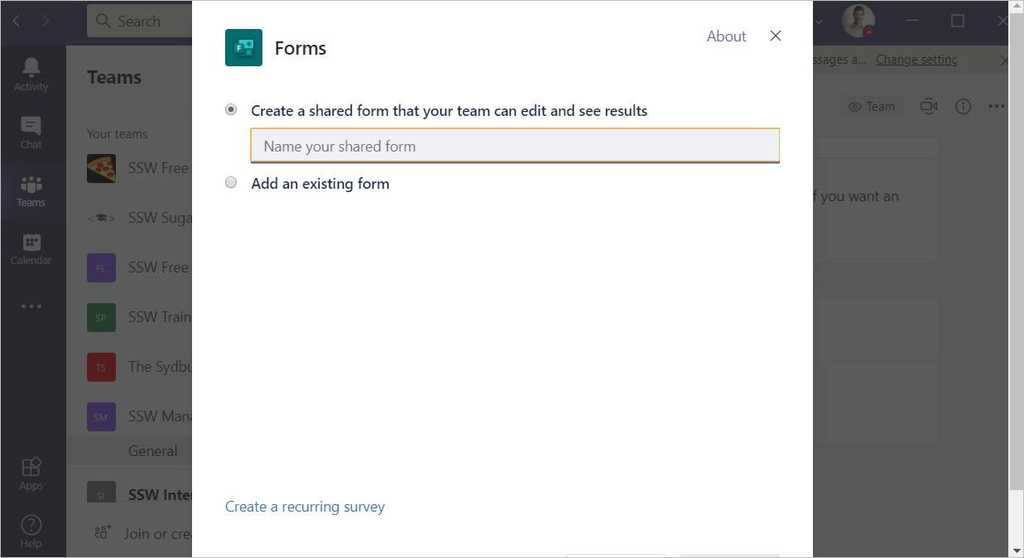
Figure: Name your form, and then continue as usual to create and share it If you do accidentally create a personal form instead of a group form, you can move it to a group in http://forms.microsoft.com by clicking “All my forms” | … | “Move”
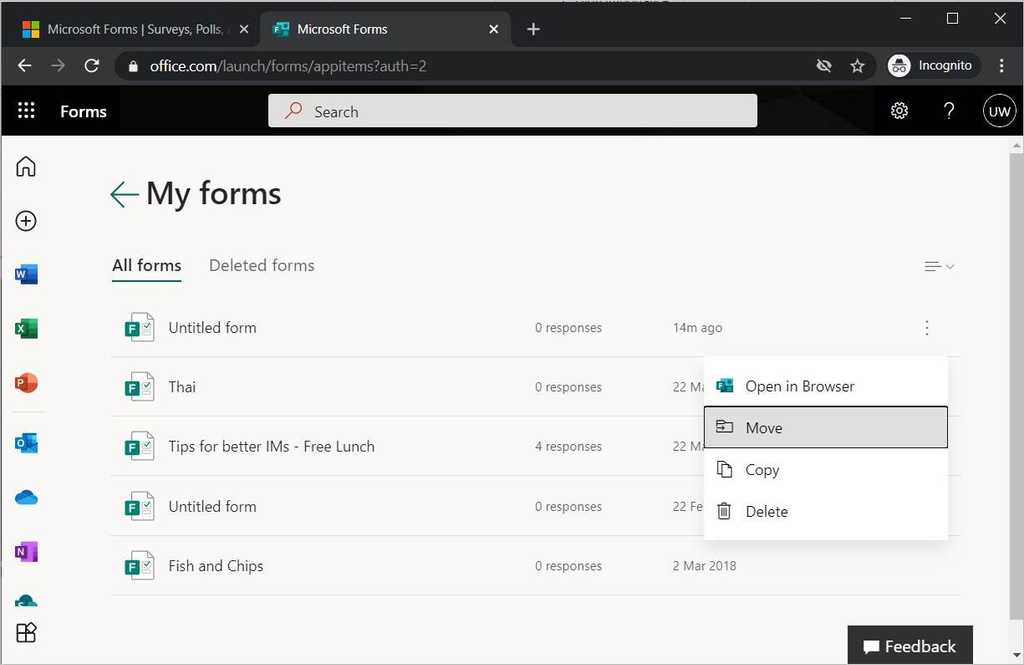
Figure: How to move a Personal form to a Group Having poor performance on video chat?
In Windows 10/11 you need to set your video chat app (i.e. Teams) to use the GPU.
- Open Settings | System | Display
-
Scroll down a bit and click Graphics settings
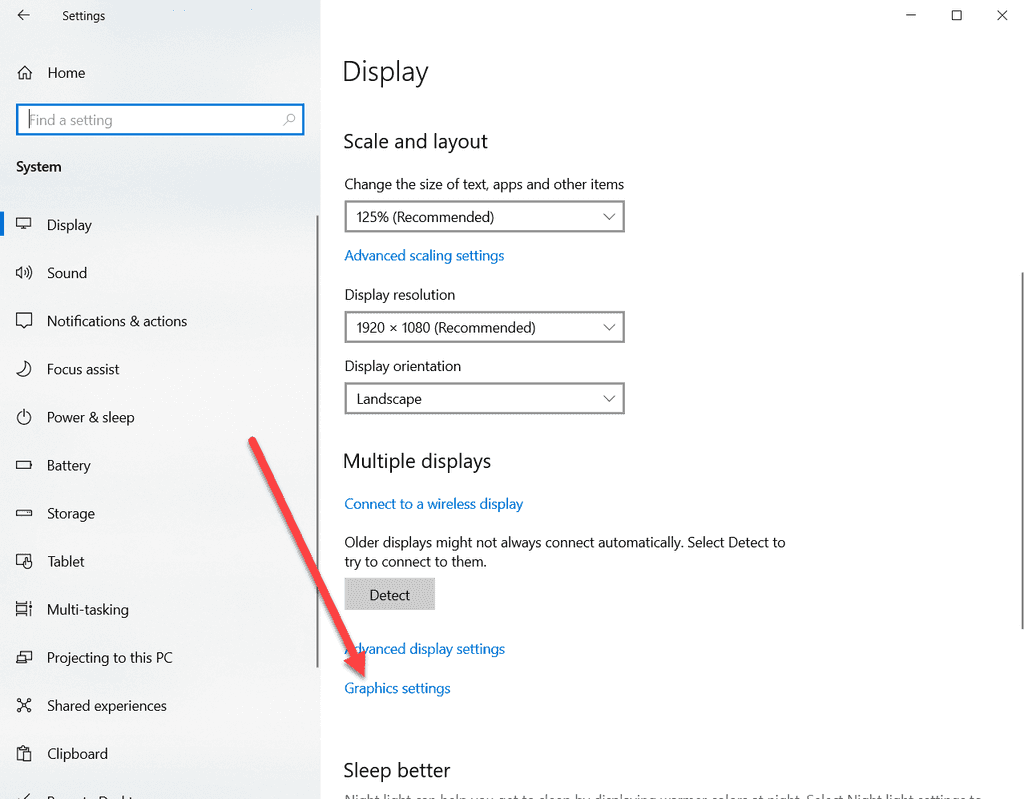
Figure: Choose Graphics settings -
Either choose Microsoft Store apps and choose the relevant app or choose Desktop apps and browse for the executable
Note: Microsoft Teams is a desktop app under your local user profile i.e. C:\Users%username%\AppData\Local\Microsoft\Teams\current\teams.exe
-
Select options and choose High Performance GPU
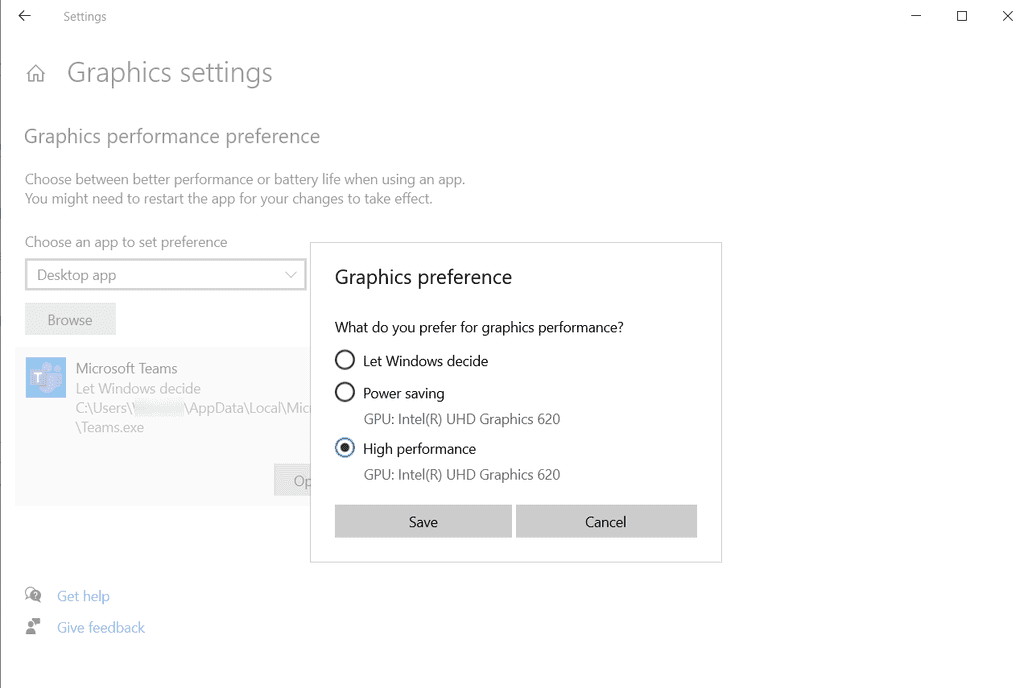
Figure: Choose High Performance GPU
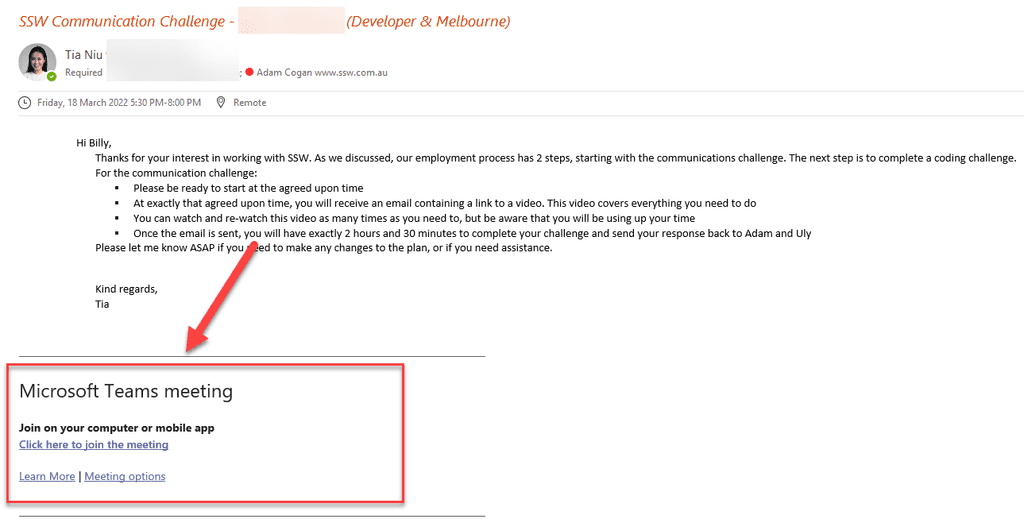
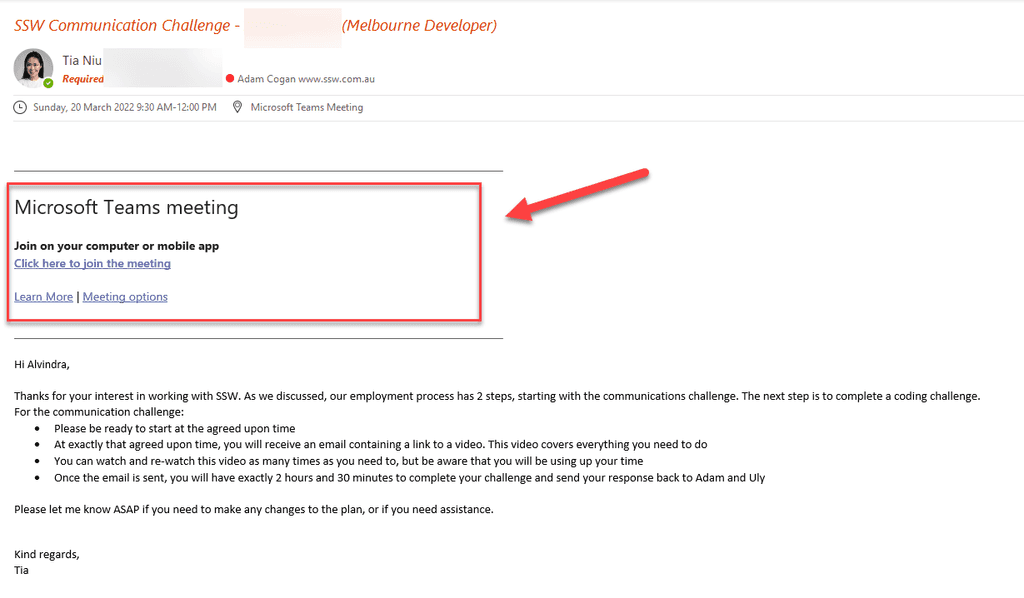
When you send a meeting appointment to someone, it’s important to put the meeting join information (e.g. Microsoft Teams Meeting URL) at the top of the email body as whoever is invited will be able to quickly find the link.
If the meeting URL is placed under the email body, there are more chances the receiver could miss out on your meeting URL.
By doing this, you will make it clear it is a remote meeting held via the tool you decided to use. This gives the receiver more time to get prepared for the meeting (e.g. Download and test a software they are not familiar with).
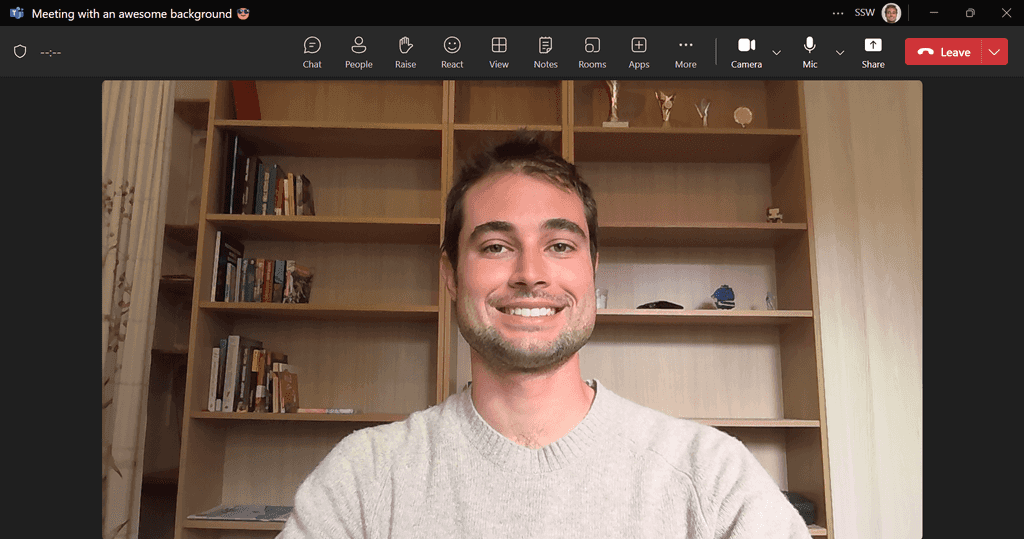
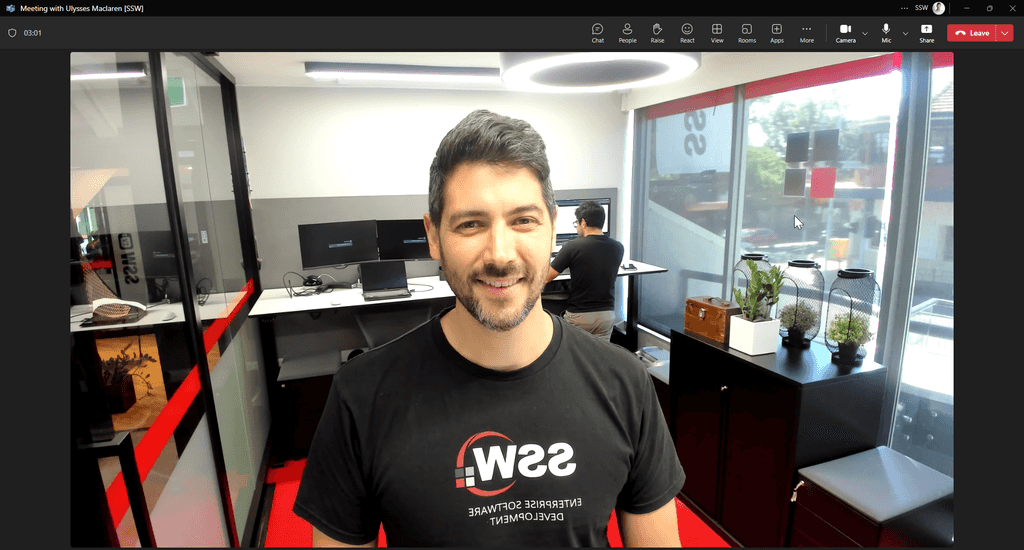
You are likely to have constant Teams or Zoom video calls with clients or work colleagues. One of the first things you should think about should be how to have a nice background.
Home offices
For home offices, follow "less is more" - A neutral background, good lighting, and a clutter-free space can significantly enhance the quality of your video.
- Have a neutral wall or setup behind you or with minimal objects - you may be fond of family pictures or band posters, but the person on the other side may be distracted
- Check you don't have a pile of clothes to fold, boxes, or any mess that may be behind your desk
- Good lighting can improve the general quality of your video
- If you want to go the extra mile, designate one wall as your company wall and keep it consistent with the company branding
Test your background - Start by sitting at your desk and taking a selfie to check your background. Use this as a guide to tidy and organize your space for a more professional appearance.

Figure: OK example – Clean home background with a branded monitor showing off the company website (unnecessarily hard to set up) On-site offices
When you're in the office, it's easy to have a professionally branded background, which remains the most effective option.
Virtual/Blur backgrounds (⚠️ not preferred)
Ideally you should have a clean, professional background (like in an office).
While not preferred, virtual/blur backgrounds can be used when your background has unavoidable clutter or distracting elements. The virtual/blur effect should be your last resort - only use it when your physical background is genuinely unprofessional.
- Teams - Custom backgrounds in Microsoft Teams make video meetings more fun, comfortable, and personal
- Zoom - Virtual background feature allows you to display an image or video as your background during a Zoom meeting
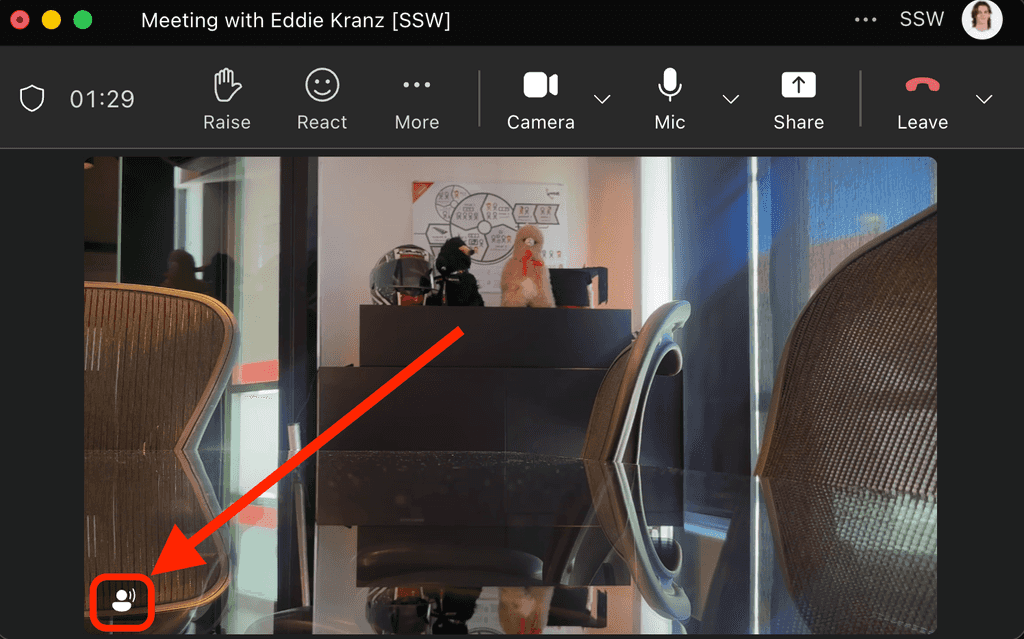
Background noise during Teams calls can be unprofessional and distracting for others.
This is a problem you can solve very easily! Here's how:
How to enable voice isolation
Voice isolation uses AI to mute background noise while keeping your voice clear.
Switch it on in Settings | Devices | Noise Suppression | Enable Voice Isolation

Figure: How to enable voice isolation No more worrying about your noisy neighbours!
In speaker lounges and team calls alike, people often appreciate a professional-looking video setup. But it doesn't take a fancy camera or expensive gear to achieve that.
Use your phone as your webcam. With modern devices, it’s easy to connect your phone to your laptop and benefit from better video quality, including portrait mode and studio lighting effects - no complicated configuration needed.
When travelling, a simple setup can look and sound great:
- A tablet can double as a second monitor
- A small tripod helps position the camera at head height
- For casual video calls, the built-in laptop mic is fine
- For recordings or interviews, a compact wireless mic (e.g. DJI Mic Mini) can dramatically improve sound quality
Using gear you already have, and making small improvements to framing and audio, can help you look and sound professional—whether you're presenting at a conference or joining a daily stand-up.
Learn more on Continuity Camera: Use iPhone as a webcam for Mac.
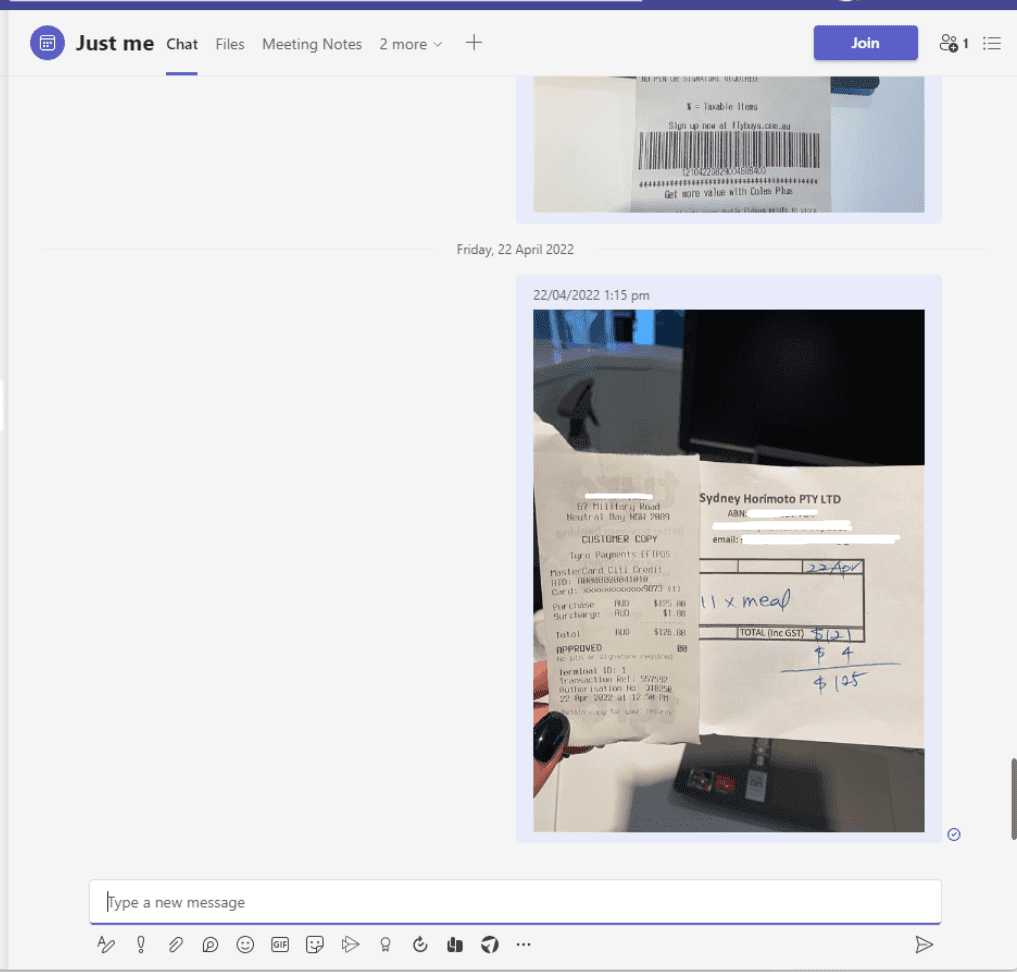
If often you see yourself trying to find an easy way to share an image or a note from your mobile to your laptop, this is a quick and easy tip to help you do this through Microsoft Teams.
Here are the steps to send a message to yourself on Teams:
- Schedule a meeting with just yourself and give it a title like “Just me” or anything similar that is obvious to you
- Open the meeting request like any other meeting on Teams
- Open the chat feature and write yourself a “test” message
- You should see a new conversation next to all your other groups and private chats
- Pin it, and now you have a wall for your thoughts 💭 🧱
Sometimes people fire a few questions at you and the tendency is to answer in all kinds of ways that can make our signal to noise ratio poor.
Tips when answering IMs:
- Answer each question in order
- Repeat the keywords of each question
- Avoid grouping your messages together as per the rule
- Gary: Welcome back from your holiday. How many items in your inbox? Can you give me the link for better IM rules? When is your next client work?
- Dave: Next Monday Will work for Northwind. I have 85 items and the link is https://ssw.com.au/rules/rules-to-better-im
Figure: Bad example - We must try to find the answers one by one
- Gary:
Welcome back from your holiday. How many items in your inbox? Can you give me the link for better IM rules? When is your next client work?- Dave:
- I have 85 items in my inbox
- Here is the link: https://ssw.com.au/rules/rules-to-better-im
- I start working for Northwind next Monday
Figure: OK example - Each question answered in order
- Gary: Welcome back from your holiday. How many items in your inbox? Can you give me the link for better IM rules? When is your next client work?
- Dave: I have 85 items in my inbox
- Dave:
Here is the link: https://ssw.com.au/rules/rules-to-better-im- Dave:
I start working for Northwind next Monday.Figure: Good example - Questions answered separately so that they can be responded to individually
Usage analytics is quite important - it allows you to identify popular and unused teams, and helps figuring out Microsoft Teams adoption across your business (i.e. How many meetings? How many chats? etc...)
There are 2 places to check for usage reports in Teams:
Team Usage
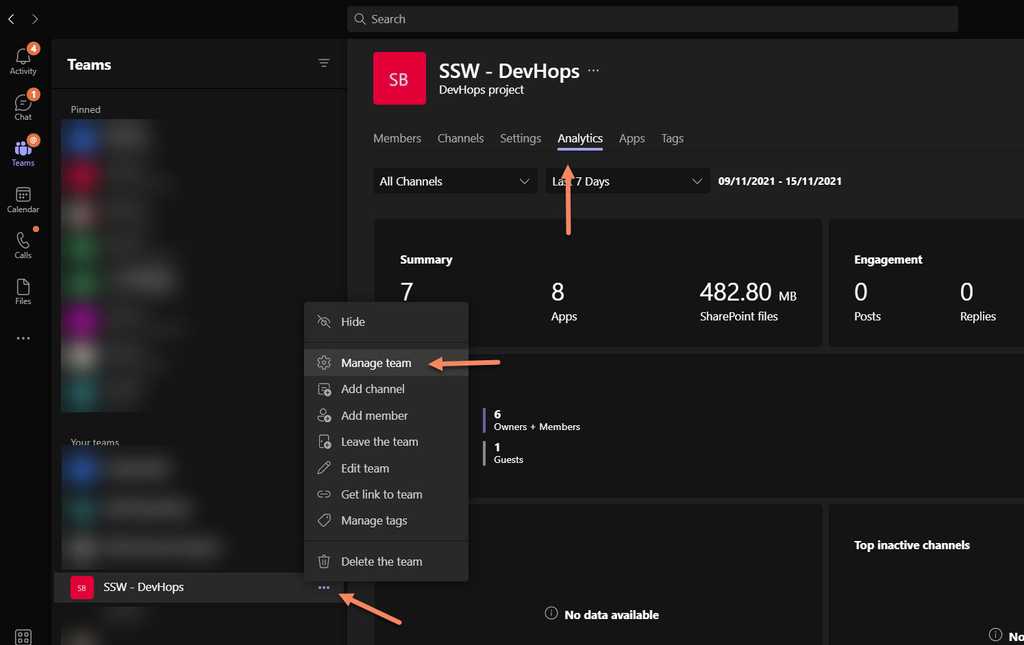
Figure: Access team usage from "Team Settings" | "Manage Team" | "Analytics" Tenant Usage
This is by far the most interesting and import report. You need special (tenant-level) permissions to access those usage reports.
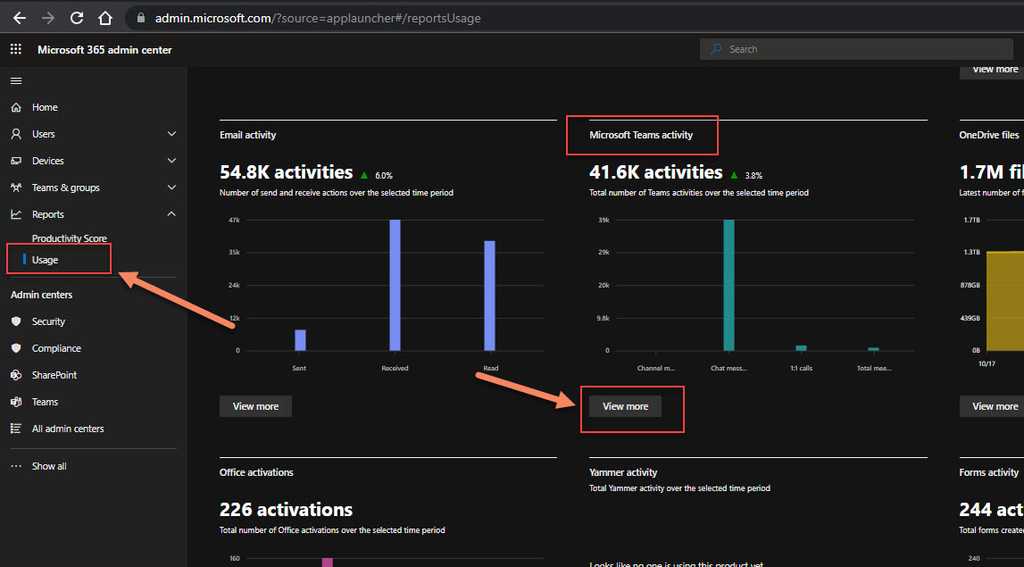
Figure: Access tenant level usage via "Office 365 Admin Center" | "Reports" | "Usage" | "View More" (under Microsoft Teams activity section) Now enjoy the full power of Teams usage analytics!
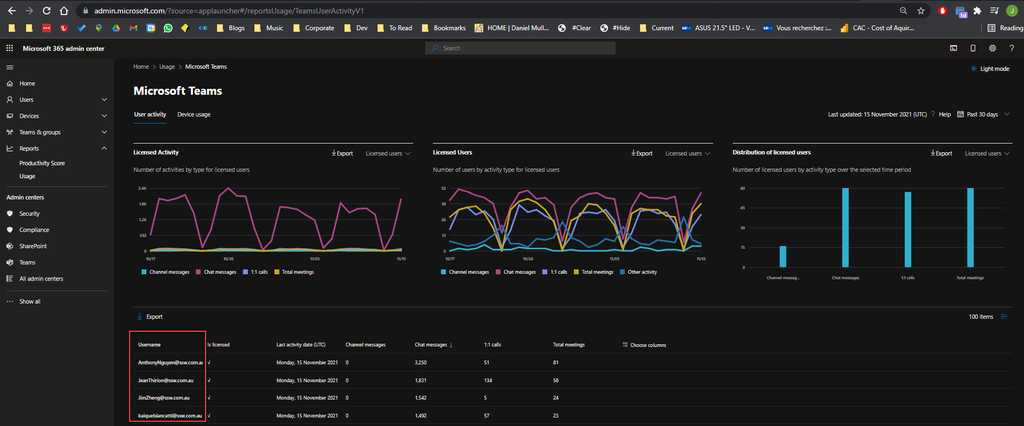
Figure: Click on column names to sort data (e.g. "Chat Messages") Important: If you can't see users logins such but GUIDs instead, you will need some SysAdmin magic to make it happen. Simply follow these steps: Show user details in the reports
...and unlock the power of full O365 reporting!
In a fast-paced work environment, efficient communication and collaboration are paramount. However, we often encounter a common and frustrating pain point when entering a meeting room: the time-consuming and error-prone process of setting up and configuring the technology.
Video: Effortless Meetings with Logitech Tap Rally Bar + Microsoft Teams Room | Kaique Biancatti (6 min)The pain
- Wasted Time - We've all been there - you step into a meeting room, only to find that the TV is off or the settings are incorrect. The precious minutes spent troubleshooting can disrupt the flow of your meetings and impact productivity
- Complexity - Modern meeting rooms are equipped with a variety of devices and software, making it challenging to ensure everything works seamlessly. The juggling act of remote controls, apps, and cables can lead to confusion and frustration
- Missed Opportunities - In today's fast-paced business world, every second counts. A delayed start or technical glitches can result in missed opportunities, whether it's a crucial client call or a collaborative brainstorming session
- User Discomfort - Users may feel uncomfortable or overwhelmed by technology issues, affecting their confidence and overall experience in the meeting room
The solution - Microsoft Teams Rooms
Now, imagine a solution that eliminates these pain points, making every meeting a hassle-free and productive experience. Microsoft Teams Rooms offers user-friendly options to transform your meetings into smooth and efficient interactions.
Find more information on Microsoft's website for Microsoft Teams Rooms.
The hardware
Before you think about Microsoft Teams Rooms, you need different pieces of hardware to be able to use it. This generally consists of:
- An intelligent camera
- Good microphones
- Speakers
- A touchscreen to control your call
- A small computer to run Microsoft Teams Rooms on, or a built-in system, where all the above is connected to.
These are generally sold by Microsoft Teams Rooms partners like **Logitech, **Yealink, Poly, Dell, Cisco; and they are generally sold in bundles by room size: huddle/small, medium, large/boardrooms.
You can check out certified Teams Rooms devices at Microsoft Teams Rooms Packages and Systems
After you've acquired the gear, then it's time to see how to use your Microsoft Teams Rooms setup. In the scenarios below, let's pretend that TeamsRoom@northwind.com is the email address set for your Teams Rooms device.
Option 1 - Start a call from Microsoft Teams Room
- Check if the TV is on. If it's off, use the remote to turn it on.
- Change the HDMI output on your TV to the Microsoft Teams Rooms device, if not already.
- On the Microsoft Teams Rooms touchscreen, click "Meet" to start a call.
- Invite participants as needed.
- Utilize the touchscreen for meeting controls, such as sharing content and adjusting settings.
- End the call using the touchscreen.
Option 2 - Add the Microsoft Teams Room to your Teams call
- Start a Teams call from another device, like your laptop or mobile phone.
- Add TeamsRoom@northwind.com to the call, like you would invite anyone else.
- Mute yourself on other devices to avoid audio issues.
- Continue the call.
Option 3 - CC (Carbon Copy) the Microsoft Teams Room in Your Outlook Appointments
- Include TeamsRoom@northwind.com in your Outlook appointments.
- Scheduled appointments will appear on the room's screen.
- On the touchscreen, join the meeting by clicking "Join" when the appointment starts.
Option 4 - Forward the appointment to the Microsoft Teams Room
- If you already have a meeting scheduled in Outlook or Teams, open the calendar appointment.
- Forward the invitation to TeamsRoom@northwind.com (the email address assigned to your Teams Room device).
- The meeting will automatically appear on the room’s touchscreen console.
- When it’s time for the meeting, simply walk in and tap “Join” on the console to get started.
Bonus - Share your laptop screen
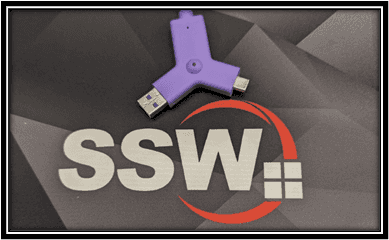
Logitech is the recommended partner for getting your hardware from, as they have many options and easy-to-use systems. One of these options is the Logitech Swytch, a USB-C/USB-A dongle that you can use to connect any computer to, and it then shares your laptop screen directly to the TV.
- Use the Logitech Swytch to share your laptop screen
- Connect the Logitech Swytch to your computer via USB-A or USB-C
- A five-second warning will appear on the screen
- Your screen will be shared directly on the TV
Use IM to chase up that important email. You can make it easy for everyone by pasting the email subject for context.
I sent you an email just now, please approve
Figure: Bad example - client need to filter his emails manually
I need you to reply to my email... Subject: CBA Software Audit
Figure: Good example - client can search your email based on the subject
Extra: Use a different text formatting
To make your messages more visually appealing, you can use "> {{ MESSAGE }}" in Microsoft Teams chats to highlight your message as a quote. This works particularly well when you want to refer to an email subject, i.e:
When collaborating within teams, the current process involves soliciting individual updates or feedback, with one team member responsible for manually compiling this information. Unfortunately, this method presents several challenges:
- The need for manual compilation of feedback/updates
- Time-consuming process
- The individual providing the original feedback must verify it, as it has been consolidated into a single file
- Any subsequent updates may necessitate the creation of a new version (v2) of the compiled file
Fortunately, Microsoft Loop offers a solution by introducing interactive notes shared seamlessly across all Microsoft 365 products. This addresses the challenges by eliminating the need for manual compilation, streamlining the process, and ensuring that updates are instantly accessible to all stakeholders.
❌ Manual Compilation - The need to manually gather and compile updates or feedback within OneNote
❌ Limited Real-time Collaboration - OneNote may not offer extensive real-time collaboration features, hindering simultaneous contributions
❌ Version Control Issues - Challenges in managing versions of a OneNote document, particularly when multiple edits are made concurrently
❌ Accessibility Challenges - Ensuring all team members have immediate access to the latest updates in a cohesive and organized manner can be cumbersome in OneNote✅ Automated Compilation - Microsoft Loop automates the compilation of updates and feedback, eliminating the need for manual efforts
✅ Real-time Collaboration - Loop facilitates seamless real-time collaboration, allowing team members to contribute simultaneously and see updates instantly
✅ Versionless Updates - With Microsoft Loop, there's no need to create new versions for subsequent updates, ensuring a single, dynamic source of information ✅ Integrated Accessibility - Loop's integration across Microsoft 365 products ensures that updates are easily accessible and shared across the entire ecosystem, enhancing collaboration efficiency
✅ Dynamic and Visual Collaboration - Microsoft Loop offers a visually appealing and dynamic collaboration environment, allowing for the incorporation of rich multimedia elements, interactive charts, and engaging content
Explore the Microsoft Loop App:
