Rules to Better Pull Requests - 20 Rules
Pull Requests are the backbone of an effective development team. That's why it's crucial to ensure that everyone on the team understands the expectations around Pull Requests.
Everybody strives to be perfect, but mistakes are normal, and it is easy for a developer to skim over errors when they've read their own code code hundreds of times!
Pull requests are the best way to ensure that two sets of eyes see every change - so the responsibility is never solely on the person writing the code.
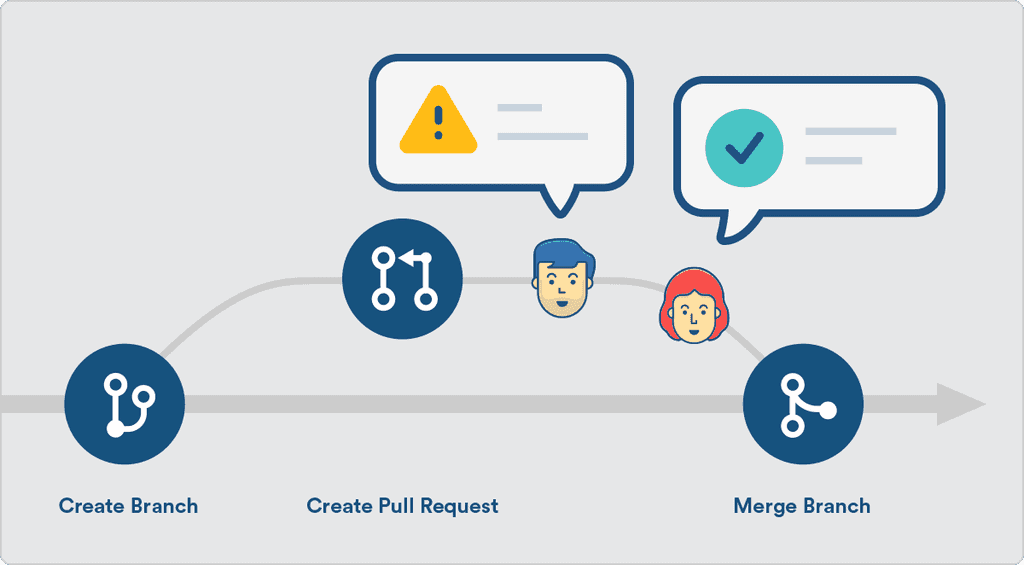
When Pull Requests are enabled, developers must create a branch and make their changes on that branch. Then they submit a Pull Request to merge their changes back into main. Each pull request must be approved by another reviewer.
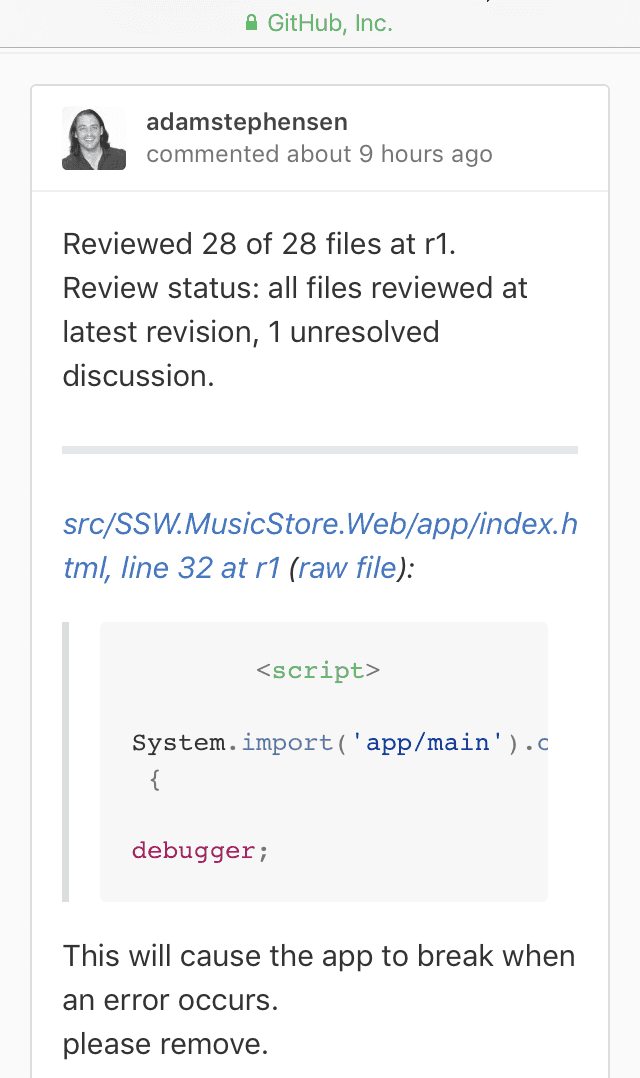
Figure: Pull requests also give version history for rejected code! Useful resources - learn about Pull Requests
Video: What is a Pull Request? (3 min)As a software developer, you are going to create Pull Requests (PRs) that you want to be easy for others to review and approve. The quality of a Pull Request can vary - from cryptic to well-written.
Including a little bit of context helps your reviewer understand changes quickly so they can review your PR faster and give better suggestions.
There are 2 essential things you should have when writing a Pull Request:
1. Concise and self-explanatory title
Good PR titles provide a clear, concise summary of the change, helping reviewers quickly understand its purpose and priority.
- What the PR will do
- How the PR achieves it
- Emojis! Follow the GitMoji.dev standard
The key to writing a concise Pull Request is to base the PR itself on a PBI / Issue (assuming they are well written).
PBI title: Product Backlog Item 100359: "Desktop App | Exporting occasionally failed"
Pull Request title: Fix exporting
Bad example - Pull Request title does not tell what issues have been fixed and how
PBI title: Product Backlog Item 100359: "Desktop App | Exporting occasionally failed"
Pull Request title: 🐛 BUG - Fix desktop app exporting - prevent database concurrent access while exporting
Good example - Pull Request title briefly describes the fix that it has
Having the "What" information allows the reviewers to quickly understand what this is about while having the "How" can help the reviewer to quickly understand how your PR solved the problem. Sometimes we might want to put the "How" in the PR descriptions (see below) if it is too long or hard to explain in one sentence.
2. Clear and informative description
The Pull Request description is a medium for the developer to tell the reviewers what the changes are about.
Good PR descriptions provide context to help others quickly understand the problem, solution, and rationale. This minimizes confusion, accelerates reviews, and improves overall code quality.
Tip: For rare straight-forward changes, the self-explanatory title might be enough. You should still make sure there is enough details so the reviewer knows what initiated the changes. E.g. "PR Title: Fixed broken LinkedIn link caught by CodeAuditor on footer"
Examples of sentences to have in a good PR description:
- "Relates to #{{ ISSUE NUMBER or URL }}" (⚠️ see avoid linking to Issues you do not want to close)
- "From email subject: {{ EMAIL SUBJECT }}" (similar to the rule on warn then call)
- "As per my conversation with {{ NAME(S) }}" (similar to "as per our conversation" rule)
- "Worked with {{ @MENTION(S) }}" (as per pair or mob programming rule)
- "This PR is to {{ ACHIEVE THE FEATURE / FIX THE BUG / OTHER GOAL(S) }}" (anything that was not possible to explain in the title)
- "See {{ SCREENSHOT / DONE VIDEO }} for more details" (to help the reviewer to understand the changes. E.g. styling changes)
If you noticed that a change needed to be made and had no specific task/issue, use:
- "I/We noticed a problem: {{ DETAILS }}"
If there is an area you are uncertain about, add:
- "I'm looking for feedback on this code"
If the PR is closing an email task after merged, remember to refer back to it:
- "Done - see email: {{ EMAIL SUBJECT }}"
Linking the source to a PR serves as documentation on which development work that was done. It helps in the future to debug when and which changes were introduced and the original specification of that piece of work.
PR title: Update Rule “meaningful-pbi-titles/rule”
PR description:
Figure: Bad example - Cannot tell what was done here
PR title: Update Rule “meaningful-pbi-titles/rule”
PR description: Added missing video caption + removed unnecessary brackets
Figure: OK example - Clear and concise description, however it's not clear what task triggered the change
PR title: Update Rule “meaningful-pbi-titles/rule”
PR description: From email subject by @bob: SSW.Rules - Video caption missing. Done - Added missing video caption + removed unnecessary brackets
Figure: Good example - It's clear what changes are being made and where the task came from
There is also well-known Pull Request semantics like Conventional Commits on how to write a PR body, but we can still have a great PR without using such preciseness.
How to approach making a Pull Request
Video: 5 Tips For Better Pull Requests (11 min)
FAQs
Q: Are you making many small changes? A: You should summarize by saying: “Improved readability” OR “Fixed typos and grammar”.
Q: Are the changes big and complex? A: You should include a demonstration of the change.
E.g. A screenshot to show text/UI changes, or a Done video to demo functionality changes.Q: Are you using a CMS editor (i.e. Netlify or Tina) A: CMS editors may automatically add a placeholder description. If you're using a CMS to make your changes, you may need to go to the PR afterward and update the description to include the context.
Tip: Ensure devs follow these tips by using a template. Learn more and check out a template example.
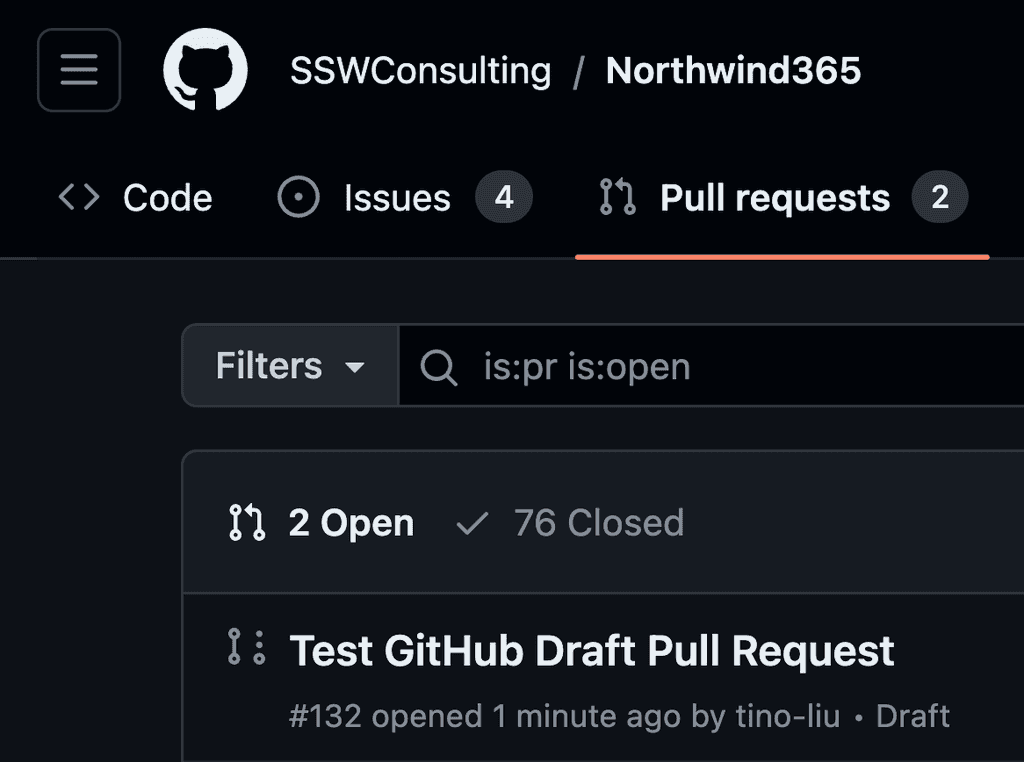
The use of Draft Pull Requests is a handy practice to indicate work in progress promoting early collaboration and continuous feedback.This approach enhances code quality, reduces duplication, and helps to maintain a transparent and efficient development pipeline. Creating Draft Pull Requests will also trigger GitHub Workflows so developers get early feedback on the quality of their changes.
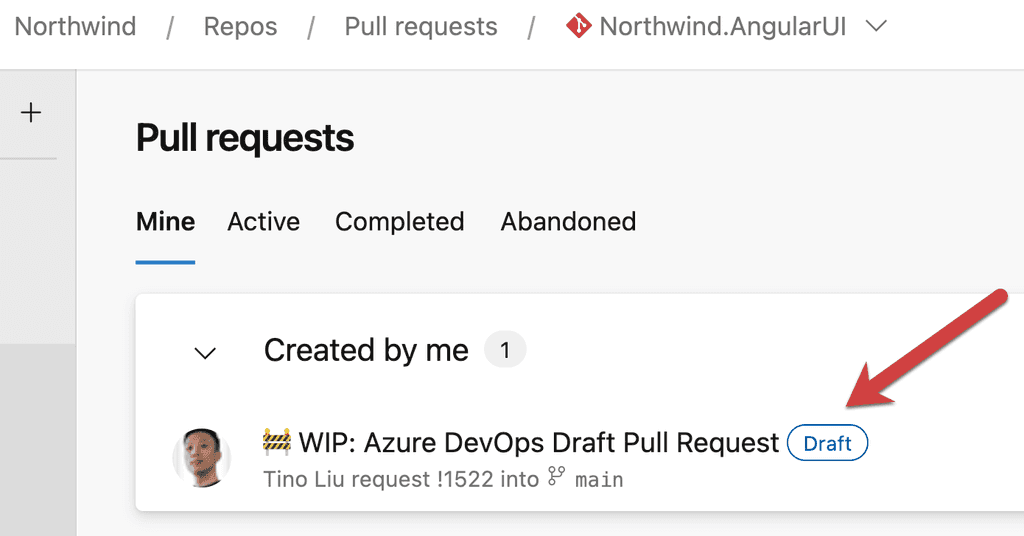
Draft Pull Requests are less effective if they are not clearly marked as Draft, as is the case on GitHub. To make them clearer, use a naming convention like
🚧 WIP: {{PR Title}}to clearly show that it is a Draft Pull Request.GitHub
If you want to go one step further, you can add the WIP App to your repo. The WIP App prevents the merging of Pull Requests with "WIP" in their title. When you are ready to go, you just remove the WIP prefix.
Azure DevOps
The PR author is responsible to follow up and get PRs merged as soon as possible. An "over-the-shoulder" review is one of the best ways to avoid merge debt.
When a pull request (PR) is ready to be reviewed, get someone with you either in-person or on call, and go through the PR together. This not only allows you to demo the content of the PR but also talk with the person taking feedback when needed.
When you have finished coding, don't just create a PR and throw it over the fence. Part of finishing a PR is getting it approved.
The best way to get it approved is via an "over the shoulder" review.- Adam Cogan
Drafting PRs
A good way to avoid someone merging your PR before you have done an over the shoulder review is to keep the Pull Request in draft mode until you are ready for it to be reviewed for merging.
When a pull request is left open for a long time, it becomes stale and accumulates merge debt. The longer it remains open, the more changes occur on the main branch, increasing the work needed to update and merge the PR. This can lead to conflicts, bugs, and unhappy developers.
Video: Merge Debt | Matt Goldman & Luke Cook | Rules (16 min)Merge debt can be avoided by:
- Ensuring PRs don't stay open for too long - you could use SSW Dory to automatically inform you of any outstanding PRs
- Conducting daily reviews on repos to ensure all PRs that can be merged are merged
- Ensuring that once a PR is ready to be merged, an "over the shoulder" review occurs
- Following the Single Responsibility Principle (SRP) - if a PR covers multiple tasks, it is harder to review and can create more problems
Internal contributors
If you are in a team (i.e. an internal contributor) it is the PR author's responsibility to get the PR reviewed and merged ASAP.
Tip: For internal contributors, it's a good idea to have a call with the PR reviewers.
Note: If are a PR author and you don't have merge permissions, add a comment to the description, so Repo maintainers can action.
Outside contributors
If you are not part of the team (i.e. an outside contributor), reviewing and merging the PR is the responsibility of the Repo maintainers. Actioning the feedback is still the responsibility of the PR author.
Tip: For outside contributors, it's a good idea to chase the reviewers by reaching out with a comment on GitHub, or through the repo's community (e.g. Discord channels).
Note: Remember that before declaring a task 'Done' with a link, your changes should be live for verification.
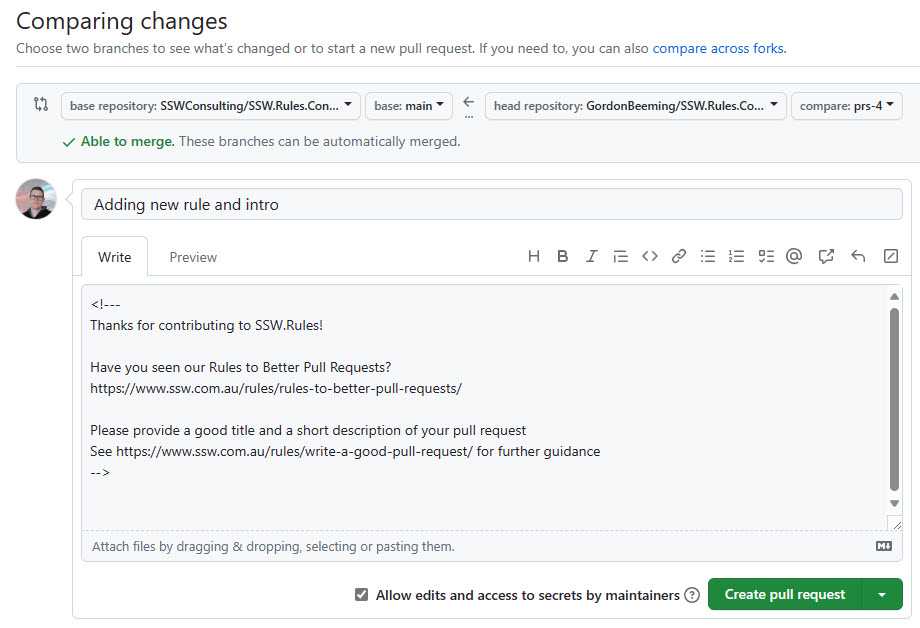
Pull Request templates are a great way to communicate expectations to developers. You should create different PR templates for different types of PRs. For example, you can have a PR template for bug fixes, a PR template for new features, and a PR template for refactoring. You are also able to create specific PR templates for specific code paths.
You can read how to implement PR templates in the GitHub Docs - Creating a pull request template for your repository.
When creating a PR template, think of how you can help developers create great PRs.
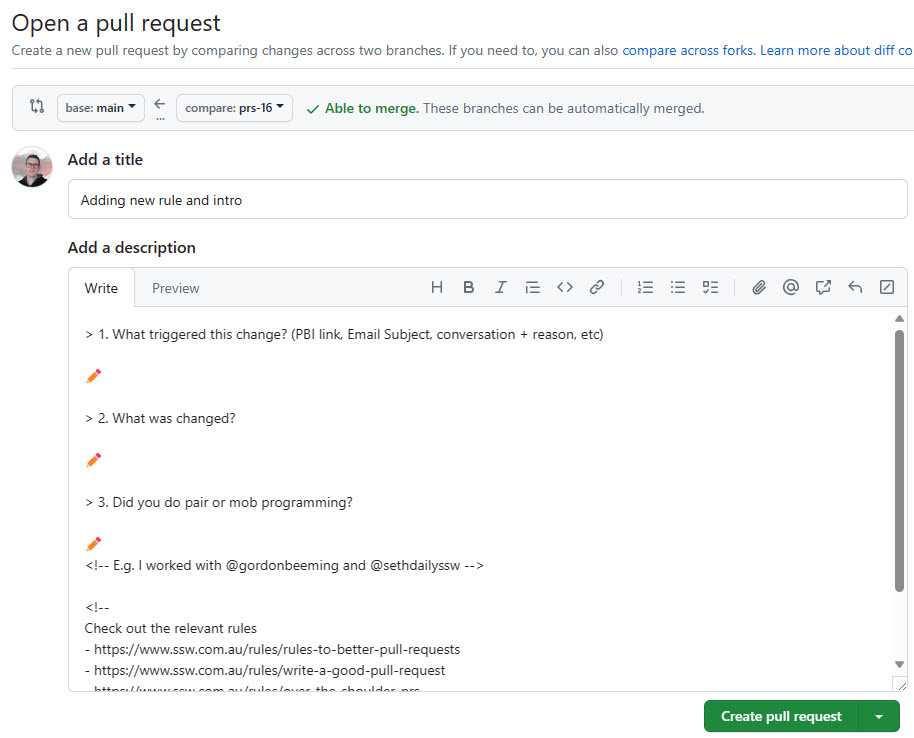
Figure: Good example - This PR template asks for context (to help reviewers), along with guidance links for creating great PRs ⭐ Tip: You can use comments in the Markdown as above. These comments will not show when the PR is created, and is only visible when editing the description.
For a great Pull Request template, take a look at @SSWConsulting/SSW.GitHub.Template.
For the original article check out Don't "Push" Your Pull Requests by Ilya Grigorik.
Open source software projects love it when the community get involved and pitch in.
It's great when someone fixes a bug.
A short PR to fix a small problem is easy to review and accept.
It's great when someone adds a much-needed feature......as long as the feature fits in with the project the core contributors have for the project......and it meets the existing coding patterns and engineering standards.
This is where frustration often starts to set in on open source projects.
A contributor has a great idea for a feature, or identifies an area where they can add value and does so without consulting with the core contributors who have often spent hundreds of hours working on the project.
Their contribution might solve their problem, but after it has been accepted it will most likely be left for the core contributors to maintain.
❌ Poor communication contribution
Poor early communication can lead to mis-directed work and pull requests not being accepted.
- Developer has good idea for project
- Bashes away and writes 600 lines of code
- Submits pull request
- Core contributor looks at large pull request They don't fully understand purpose of request / the problem it solves They don't like that the PR author hasn't followed the existing coding standards They make a push back comment
✅ Good communication contribution
Good communication leads to collaboration and better outcomes for the author and the project.
- Developer (PR Author) has good idea for project
- Reviews the list of outstanding issues for the project and confirms that someone hasn't already had the same idea and started a discussion on it
- Author creates an issue on GitHub and outlines the problem they are trying to solve, and outlines their suggested solution
- The core contributors and other interested parties can help refine both the idea for the feature and the suggested implementation
- The author can then start working on the feature knowing that their idea for the project complies with the maintainers vision for the project and know it is likely to be merged into the core codebase
Projects with internal teams
- Internal team members should only work on features during work hours that have been assigned to a release by the core contributors for a project
- Features will be assigned to a release during the Community Standup
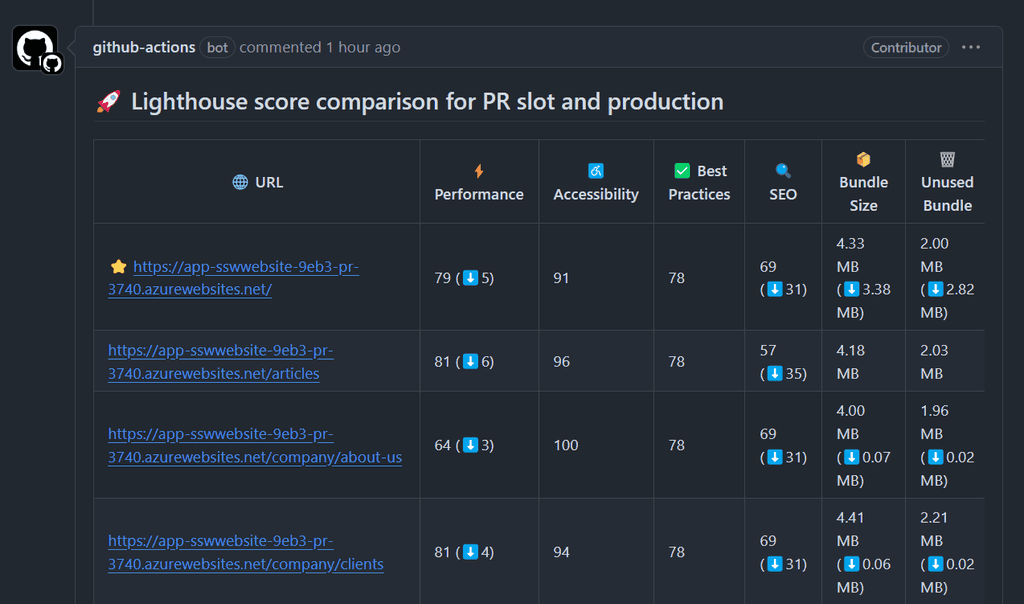
Before merging any Pull Request (PR) that might affect your application's behavior or performance, you should run comparison tests between the production environment and the PR deployment slot to identify potential issues.
Why compare PR performance with Production?
It is essential to compare PR performance against the production environment. This ensures that new changes do not introduce performance drops that can negatively impact user experience, SEO rankings, or best practices.
Modern web applications are dynamic, with frequent updates to code, styles, and assets. Even minor changes can lead to increased load times, larger bundle sizes, or degraded accessibility. By integrating automated performance checks into your CI/CD pipeline, you can catch issues early and maintain high application quality.
How to compare PR performance with Production?
One of the best ways to measure performance is by using Lighthouse, a widely used tool for analyzing key web performance metrics such as:
- Performance (e.g., page load speed, rendering time)
- Accessibility (ensuring usability for all users)
- Best Practices (security, coding standards)
- SEO (ensuring search engines can properly index the site)
- Bundle Size & Unused Code (optimizing assets for faster loading)
Automating Lighthouse Comparison in PRs
You can integrate Lighthouse into your GitHub Actions workflow using Lighthouse CI Action. This enables automated comparison of the PR deployment with the current Production site. A summary comment can be added to the PR, showing key performance differences.
By following this approach, teams can ensure that new code changes do not negatively impact performance. The comparison table allows developers to quickly identify performance drops and take action before merging, leading to a more consistent and reliable user experience.
Pull requests are a fundamental feature of collaborative software development, allowing contributors to propose changes to a project and receive feedback from other developers. When reviewing a pull request, it can be tempting to make additional changes beyond those requested by the PR creator.
Certain projects (E.g. SSW.Rules) allow these additional edits, without the need for extra reviews by someone else. Knowing that, it's crucial to make sure the changes are correct, necessary and beneficial to the project before adding them.
Most common scenarios where editing an existing PR is encouraged:
- Fixing typos
- Grammar improvements
- Formatting (Markdown) fixes/improvements
For the cases where your wanted change can serve as a learning opportunity to others, it is always best if you ask them to action by requesting a change. This way the extra change can be avoided in the future.
Warning: Only experts should include their own changes to an existing PR.
Never add extra changes to a PR if you are less experienced or unfamiliar with the project. The additional changes may be unnecessary or even harmful!Ultimately, the decision to add additional changes to a pull request should be made based on the needs of the project and the expertise of the contributors involved. It's important to carefully consider the impact of any additional changes and ensure that they are aligned with the project standards.
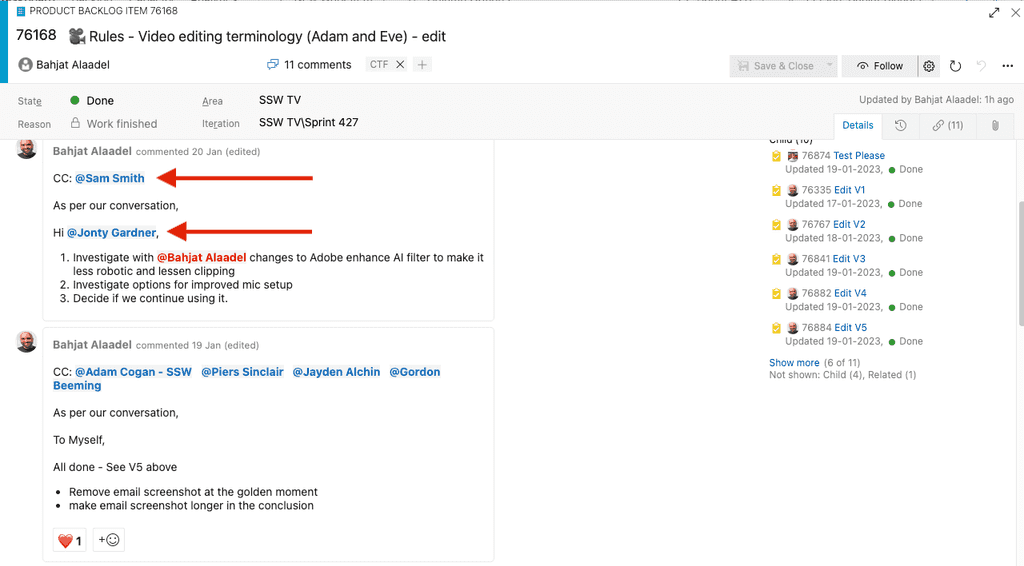
When the Product Owner makes a verbal change request or decision, you might consider sending an email and CCing others, but that limits visibility to only those on the thread.
A better approach is to update the PBI to document the change, making the conversation visible to the entire team. Use comments with tags/mentions (@username) to notify the Product Owner and any relevant team members. This ensures they receive email notifications about the update.
✅ The benefits of using comments with @mentions on PBIs
- Quick and easy, no need to compose an email
- History is visible to anyone looking at the PBI (with email, if you don't CC them, they wouldn't have a clue)
- Easy to see all important information in one place, instead of digging through email
How it works
Say the Product Owner asks you to prioritize and update PBI 1234.
To: {{ TO MYSELF }} Cc: {{ PRODUCT OWNER }}, {{ RELEVANT PEOPLE }} Subject: SugarLearning - Use third party for quiz engine Figure: Bad example – Don't use emails for tasks updates
Exception: You may send a "To Myself" email and CC relevant people when there is no Product Backlog related to the request.
"I have found and updated the PBI and moved it near the top of the backlog"
Bad example - Change documented in the backlog, but no @mention tag used
"I have found and updated the PBI, prioritized it near the top of the backlog, and @mentioned you and relevant team members so you know when it is actioned"
Good example - Change documented in the backlog and @mention tag included
Format PBI comments like an email
Try formatting your mentions like an email to clarify both accountability and responsiblity and identify the current status of the project. This is especially useful when requesting a "test please".
Note: You can and should use @mention on pull requests as well.
Use YakShaver and make it even easier
You can save time by not writing change requests manually.
With YakShaver, simply record your message and let the AI do the rest. YakShaver writes a clear and complete PBI, GitHub Issue, or even an email (for projects without a backlog), mentioning/tagging the right people and assigning it to the correct team.
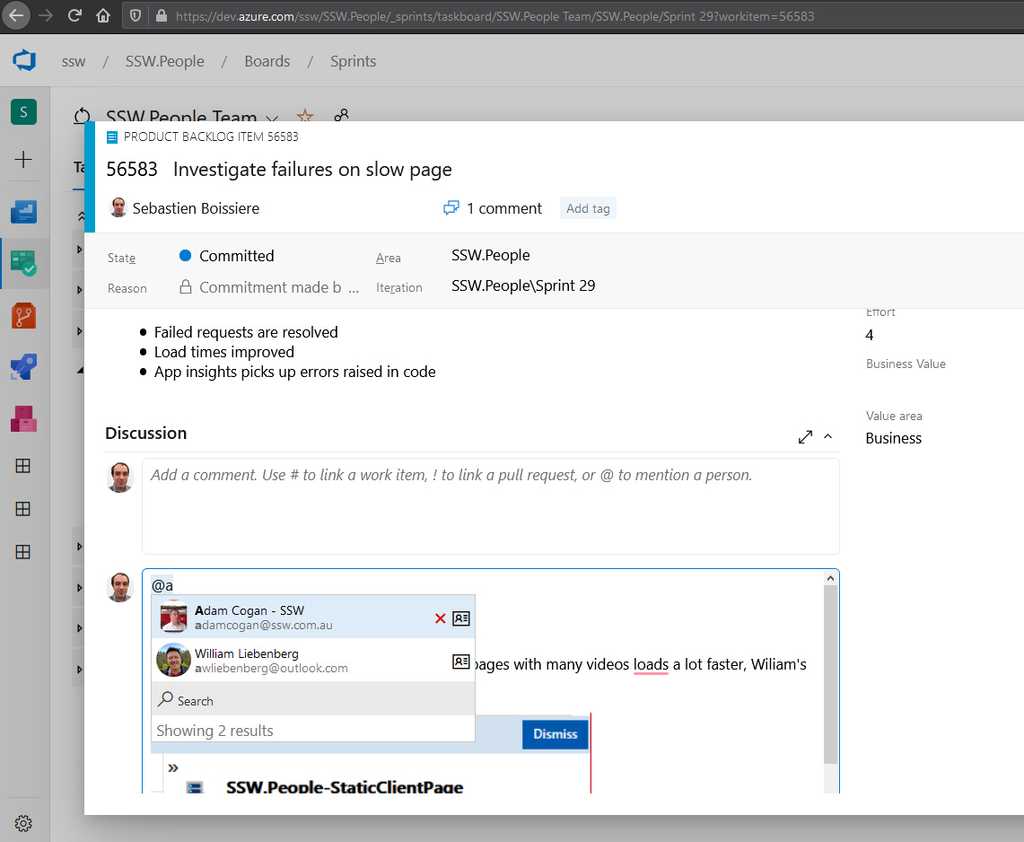
How @mentions work
Below are examples of how mentions work in different platforms.
GitHub Issues
Azure DevOps PBIs
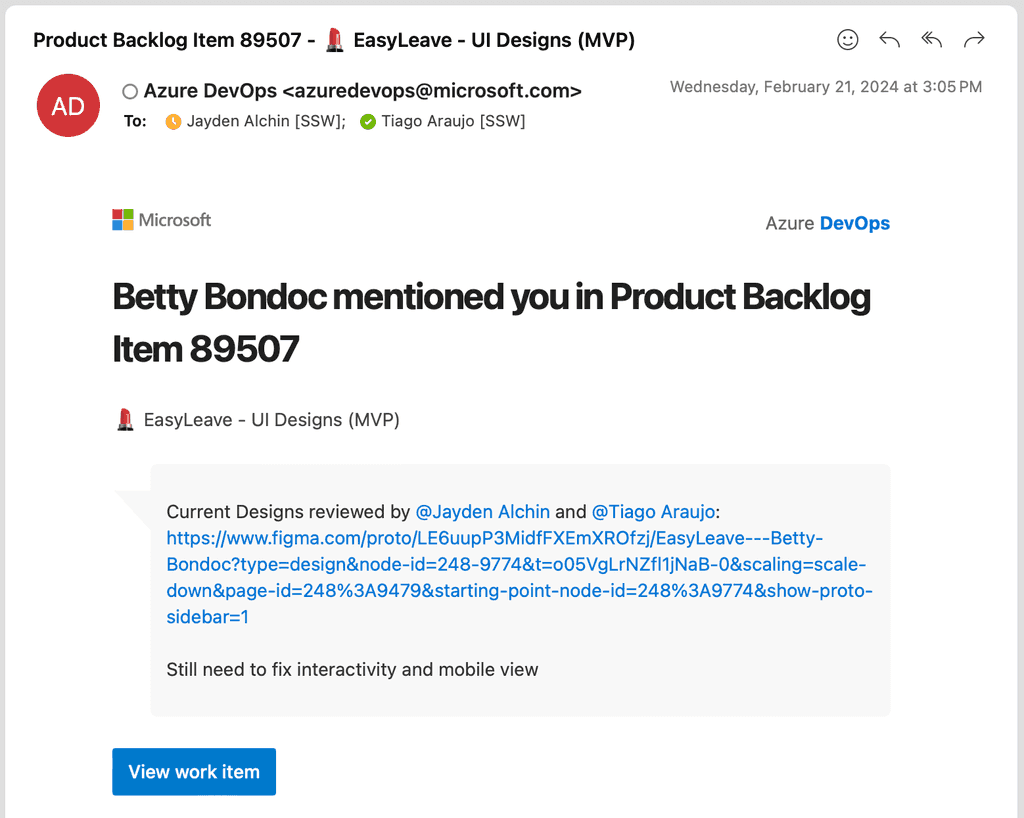
Figure: Good example – Emails are sent to the users who are mentioned in the discussion, so they can still chime in if any details are needed
Related suggestion
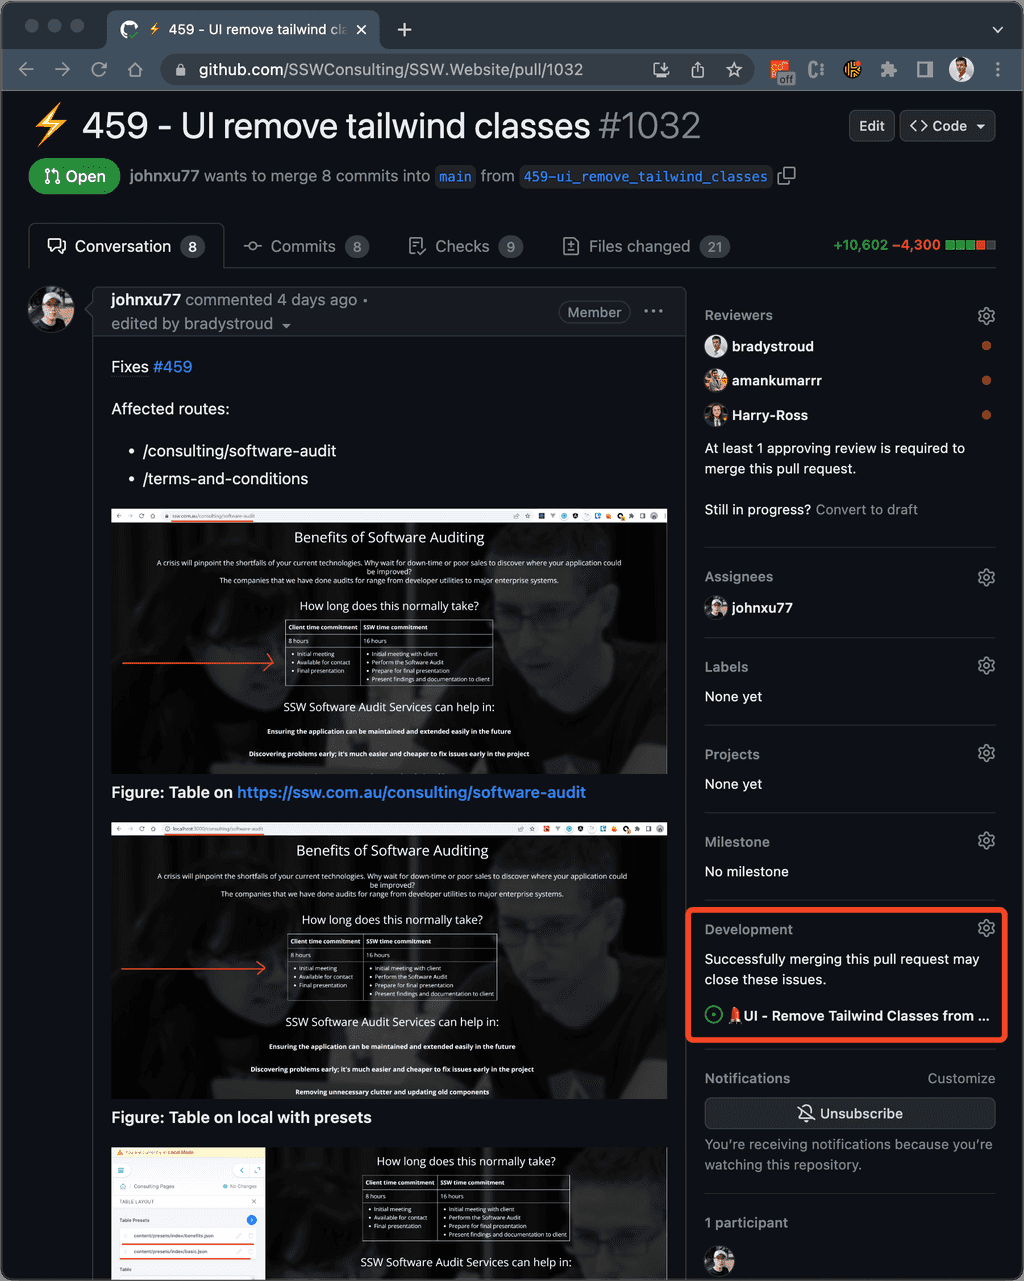
GitHub provides a way to link issues to PRs. This is useful to see what PRs are associated with what issues. However, when you make this link, the issue will close when the PR is merged.
This is not a good idea because it can cause Issues to be closed prematurely. This can lead to confusion and lost work.
Luckily, GitHub provides a way to avoid this auto-closing behavior by disabling it in the repository settings.
Issues should not be closed until all the tasks are complete and have a done comment as per closing PBIs with context.
Disabling auto-close at the repository level
If your team prefers to keep the linking functionality but disable the auto-close behavior, repository administrators can now turn this off in the repository settings:
- Go to Settings | General
- Scroll down to the Issues section
- Deselect Auto-close issues with merged linked pull requests
See Managing the automatic closing of issues in your repository for more details.
When you are working on an open source project, you will often get pull requests from contributors. When you merge these pull requests, you should use the "Squash and merge" option. This will squash all the commits into one commit and then merge it into the target branch. This is a good practice because it keeps the commit history clean and easy to read. It also makes it easier for other developers to understand what changes were made in each PR.
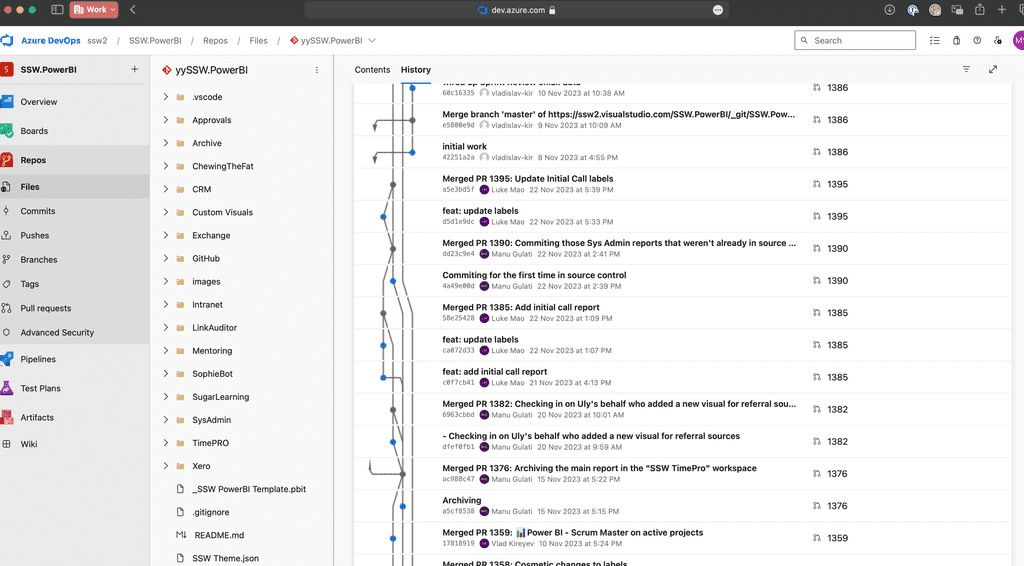
Figure: Bad example - It's hard to follow the changes since there’s noise from all commits on the merged branches Commit Messages
Like any commit message, the PR commit message should be short and descriptive. The easiest way to achieve this is to combine the PR title and commit details.
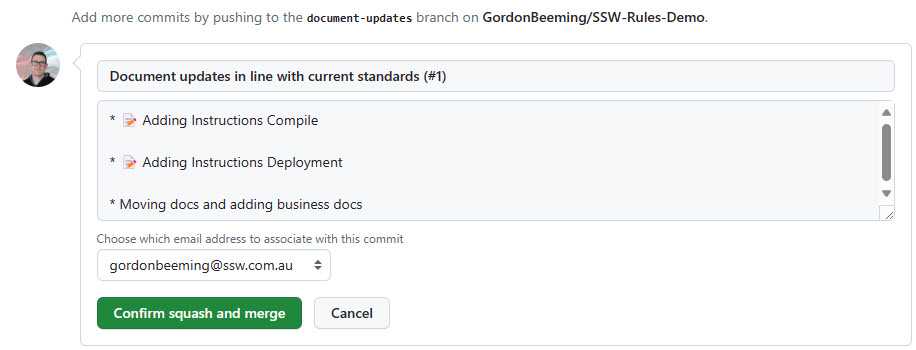
Figure: Good example - This merge will include all the commit messages as part of the PR commit message In order to get GitHub to use your commit details by default you need to change the configuration for the repository.

Figure: Repo Settings | Pull Requests | Allow squash merging, and change the value to "Default to pull request title and commit details" Limit merge types
You should limit the merge types that are allowed on your repository. This makes it easy for everyone to know the expected merge type of the repository when the PR is merged.
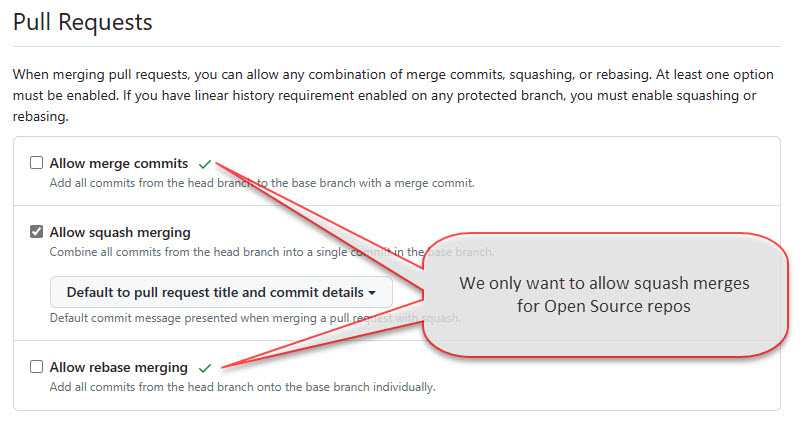
Figure: Repo Settings | Pull Requests, remove "Allow merge commits" and "Allow rebase merging" to force all PRs to be squash merged Automatically delete head branches
After a branch is merged into the target branch, you'd not want to continue development on the previous branch as the changes were squashed in. It's always a good idea to create a new branch after a PR is merged from the target branch if you have additional changes. To make this easier, you can configure GitHub to automatically delete the branch after the PR is merged.

Figure: Repo Settings | Pull Requests, enable "Automatically delete head branches" to avoid stale branches Other configurations
If you find that Pull Requests are often approved but for some reason not merged in, you may want to enable
auto-merge. This will automatically merge the PR when all the required checks have passed.
Figure: Repo Settings | Pull Requests, enable "Allow auto-merge" You may want to enable "Always suggest updating pull request branches", this can be done from Repo Settings | Pull Requests, this provides contributors with an easy way to update their branch from the target branch without performing the merge themselves on their local machine.

Figure: Providing contributors with an easy mechanism to update their branch helps reduce conflicts if they need to make more changes Getting started with a new repository can be daunting, especially if you are new to the project. Having a standard set of pull request workflows can help you get started and make sure you are following the same process as everyone else on the team.
A few standard workflows helps developers see a consistent process across all repositories. This makes it easier for developers to get started with a new repository and makes it easier for developers to move between repositories as the feedback they get from each pull request is consistent.
Below are some standard workflows that you can use in your repositories.
T-shirt size the PRs
This workflow uses the microsoft/PR-Metrics action to update each pull request with information that helps ensure engineers keep PRs to an appropriate size with appropriate test coverage, while informing reviewers of the expected time commitment for a thorough review of the code.

Figure: PR Metrics gives warnings with suggested actions You can find the workflow at SSWConsulting/SSW.GitHub.Template/.github/workflows/pr-metrics.yml
Tip: This action is customizable to cater for repositories where different file extensions are considered "code" and how to size the PR. For example, the SSW.Rules repository considers Markdown to be code and has custom sizing configured to help us review PRs - see SSWConsulting/SSW.Rules.Content/.github/workflows/pr-metrics.yml
Manage stale PRs
This workflow creates adds labels to pull requests as they age.

Figure: It's easy to see at a glance when PRs have been around for a while The workflow will also ping the author of the pull request after around 36 hours and remind them about merge debt
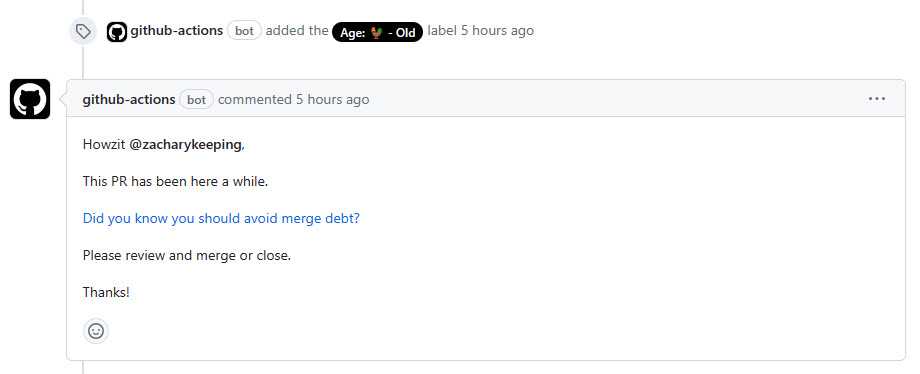
Figure: A gentle reminder helps remind developers the next day that their pull request needs attention You can find the workflow at SSWConsulting/SSW.GitHub.Template/.github/workflows/pr-manage-stale.yml
As a repository maintainer you would generally setup a branch policy which may include a certain number of reviewers before a pull request can be completed, this could also include that certain reviewers are required instead of this being wide open to just anybody. This is a great way to ensure that code is reviewed before it is merged into the main branch.
However, this does not mean that you should not review pull requests that you are not required to review.
Let's take a look at some of the benefits of reviewing pull requests, even if you are not a required reviewer.
As a junior developer, you may not feel comfortable reviewing a senior developer's code, but you should. You may not be able to provide any feedback around standards and best practices, but you can ask questions. This is a great way to learn and understand why the senior developer did something a certain way.
When you ask questions in a pull request, you are giving the author the opportunity to take a step back and think about what they have done and how they've done it, explain their thought process and potentially where you could learn more about the approach.
Alternatively, you could point out a different way of achieving the same result which could be a better approach and they could change their PR.
✅ Benefits
- You could learn something new
- The author could learn something new
- You've just created some micro-documentation that may never have existed before
- Shows the team you understand and agree with the code changes
The more people approve a pull request, the more confidence you can have that multiple team members have reviewed and agreed the code is ready to be merged.
This is effectively the same approach as getting a "Checked by xxx" on an email, see Do you use 'Checked by xxx'?.
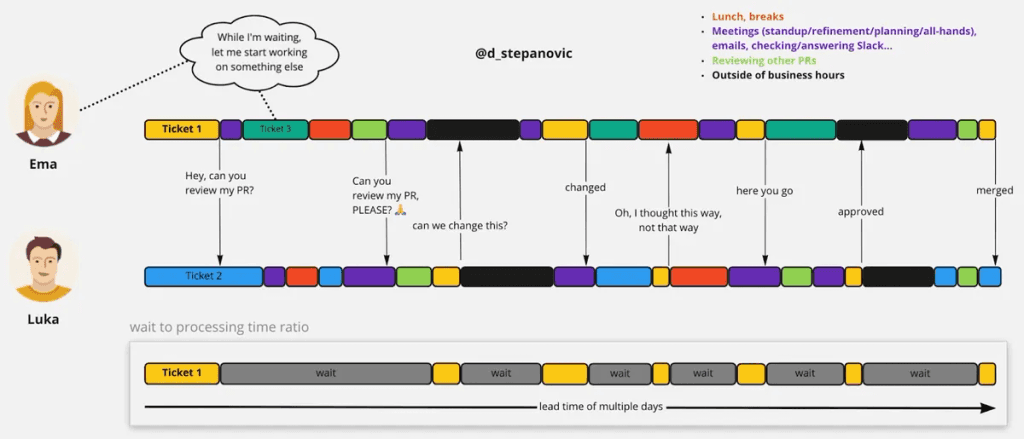
These days Pull Requests are the de facto standard for getting code reviewed. Once a developer has finished their change, they will typically submit a Pull Request and move on to their next task. This allows for an asynchronous process to take place which may seem like a good idea, but often is not and can also lead to inefficiencies.
Video: Pair Programming best-practices (11 min)❌ Problem - Inefficient Code Reviews
Inefficient code reviews can be caused by:
- Requesting feedback too late
- Receiving feedback too slow
- Creating large Pull Requests
- Excessive context switching
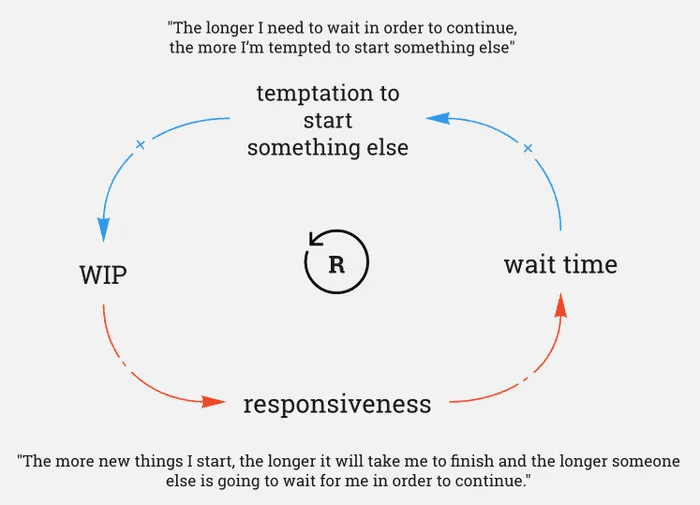
- Too much work in progress
- Unclear feedback
Source: From Async Code Reviews to Co-Creation Patterns
✅ How to Make Code Reviews More Efficient
- Author - Do over the shoulder reviews
- Author - Ask for feedback early before the PR, if you are uncertain that you're on the correct path
-
Limit work in progress
- Author - Make sure your Pull Requests are merged, before starting a new task
- Reviewer - Prioritize Pull Requests before starting a new task
-
Author - Create small Pull Requests
- This requires a smaller block of time to review which makes it easier for the reviewer to find the time
- Less risk - reduces the chance of an incorrect approach being taken
- Get quality feedback - small blocks of code are easier to digest
- Create a great Pull Request to make it easier for the reviewer to understand your changes.
-
Reviewer - When reviewing asynchronously
- Be explicit and suggest the exact code changes where possible (GitHub has a feature for this, see Incorporating feedback in your Pull Request
- Call the developer for more complicated changes
The Ultimate Solution - Co-Creation Patterns
Small Pull Requests have many benefits as outlined above. However, each Pull Request comes with an overhead and making Pull Requests too small can introduce unnecessary waste and negatively affect the throughput of code. In order to not lose throughput with small PRs, reviewers need to react faster. That leads us to synchronous, continuous code reviews and co-creation patterns.
So, with the async way of working, we’re forced to make a trade-off between losing quality (big PRs) and losing throughput (small PRs).
We can avoid this by using co-creation patterns. As a general rule, Pull Requests with less than 20 lines of code, and larger changes with a degree of complexity/risk, make good candidates for co-creation.
The idea is that you do small PR's but also limit WIP. If you create several small PR's quickly and are waiting for code reviews, you can become blocked very quickly. By co-creating, the small PR's get reviewed & merged instantly which avoids getting blocked and enables you to smash out loads of small PRs! 💪
Daniel Mackay - SSW Solution Architect
Patterns
Co-creation patterns can take some different forms:
- Pair-programming: Two developers starting, reviewing and finishing a change together
- Mob-programming: Working in a small group, that collectively has all skills required. See https://www.goretro.ai/post/mob-programming
For the patterns above, the similarities are that there is a driver and a navigator.
Driver - Implements the solution/solves the problem at a granular level. They're the ones on the PC writting the code. Navigator(s) - Observes and understands the what the driver is implementing at a high-level and inquires where needed to help/direct the driver.
Note: It is not the role of the navigator to micromanage the driver.
These roles should swap often to keep a high level of focus and give everyone an equal chance to participate as a driver and navigator.
When using co-creation patterns, ensure you use co-authored commits to give credit to all the developers involved.
Advantages of co-creation
Co-creation allows us to have both quality and throughput by providing the following advantages:
- More context when reviewing
- Higher quality
- Faster communication
- Faster course correction
- Less delay - no waiting
- Eliminates context switching - working on a change together reduces WIP which further increases throughput
- Emotions are removed - instead of having an 'author' and 'critic', the code is created together.
How to get started with Pair Programming
Here's a quick guide to getting started. Just note that these are just guidelines and your team, task and experience will dictate exactly how to achieve your goals and increase your code quality
- Select a Collaborative Task: Pick a Product Backlog Item (PBI) that you and a colleague can jointly work on.
- Set Up a Shared Workspace: Arrange a comfortable space with one computer and two chairs.
- Assign Initial Roles: Decide who will start as the 'driver' (writing the code) and who will be the 'navigator' (reviewing the code).
- Maintain Open Communication: Keep an ongoing dialogue to discuss ideas and approaches.
- Regularly Swap Roles: Switch between the driver and navigator roles periodically to maintain engagement and balance in the partnership.
<!--TODO: Add a PR screenshot of pair programming, show the PR Dan M with Jack R for the big PR for Rules GPTTODO: Add a PR screenshot of mob programming, we need to demonstrate what the PR would look like for this-->
When using co-creation patterns such as pair-programming or mob-programming, you should make sure that all the developers get attribution. When done correctly co-authored commits stand out as a testament to teamwork and shared responsibility, reflecting the collaborative efforts and diverse expertise contributed to each change.
There are several different ways to create co-authored commits, depending on the tools you are using.
Live-Share
If you use Visual Studio Live Share to collaborate, it will co-author the git commits with everyone on the share session
Visual Studio Code
Visual Studio Code the Git Mob Extension can be used to co-author commits.
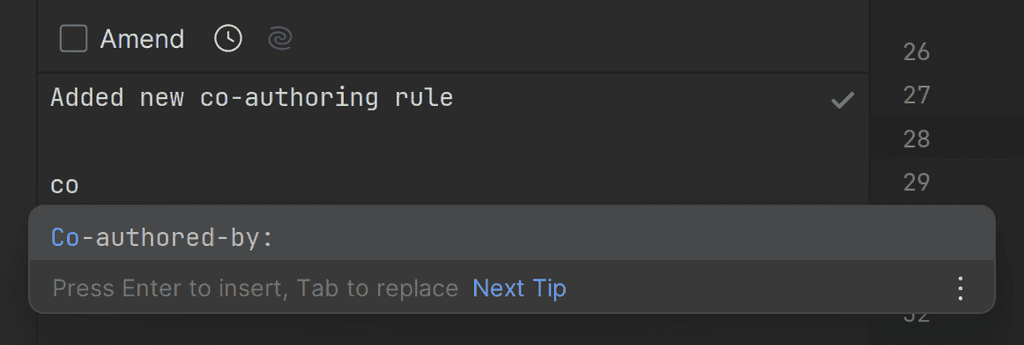
Rider
Rider has a great UI that makes creating co-authored commits easy. It provides intellisense for the co-authored commit trailer, and will suggest the names of the people who have access to the git repository.
GitHub Desktop
GitHub Desktop supports co-authored commits out of the box.
Git CLI
When writing the commit message, leave 2 blank lines, and give each co-author their own line and Co-authored-by: commit trailer
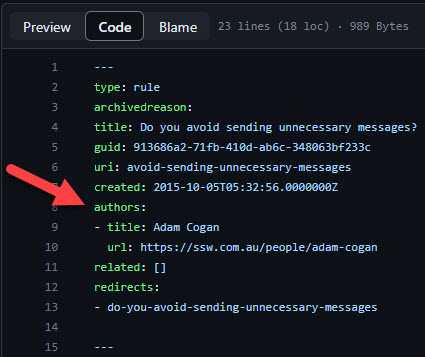
$ git commit -m "Refactor usability tests. > > Co-authored-by: NAME <NAME@EXAMPLE.COM> Co-authored-by: ANOTHER-NAME <ANOTHER-NAME@EXAMPLE.COM>"Managing webpages can be challenging, especially in projects with many contributors. When editing a page, a common problem is not knowing who the original author was. This is bad, because it's important not to change something that was there for a reason!
The best way to solve this is by having a page owner for each webpage.
Why?
A designated page owner ensures someone is responsible for the accuracy of the page content. It avoids confusion about who to approach for major changes, and it allows the page owner to keep an eye on changes.
Steps
- Markdown files - Add an 'owner' field in the frontmatter metadata for each page.
- New pages - The field should be required when creating a page.
- Pull requests - Automatically add the page owner as a reviewer for any pull requests that modify their page.
Tip: this can be done automatically with a GitHub Action (or similar automation)
✅ The "owner" (person responsible) is aware of and can approve any changes
✅ People know who to consult about changes to the page
🤔 We don't use
CODEOWNERSfor this because we don't want to block pull requests for minor edits❌ When trying to work out who is the page owner, version history is not good enough - often the creator of a page is not the actual author e.g. a dev makes the page for a Marketing person
Maintaining a clean git history is important for readability and understanding the changes that have been made to a codebase. This is especially important when working in a team, as it allows you to see the changes that have been made to a file over time, and who made them. This can be useful for debugging, and for understanding why a particular change was made.
Things that create a good git history include:
- Granularity of commits
- Descriptive commit messages
- Easy to maintain (i.e. easily revert an entire feature)
- Never lose history
Squashing Pull Requests
Video: Git MERGE vs REBASE: Everything You Need to Know (4 min)Squashing commits is the process of combining multiple commits into a single commit. This allows for the repository history to reflect changes to the application over time, rather than individual commits making up a feature which can be hard to follow as they give little context to the feature that the commit is being added for.
Good Pull Request titles
When creating a pull request, it's important to have a clear and descriptive title. This is important when looking back at the git history, as it allows you to see at a glance what changes were made in a particular pull request.
Preserving file history
Often developers will move files around and have major changes to the contents leading to the file history being lost as the the operation will be seen as a delete and add file because of the differences in contents.
This can be avoided by using the
git mvcommand to move files, or by breaking up the operation into smaller chunks i.e.: change content and then move the file as separate commits.
📝 Git Tips - Making structural and content changes (4 min)Merging multiple repositories
Sometimes you have a system that was designed in multiple repositories, and you want to merge them back together. This can be a complex process, but it's important that you know what to do when this situation comes up in order to not lose history.
Source tip
The process of a source tip is to stop using source code from 1 repository as of certain date, and start using it from another repository.
This process leads to a situation where you have a couple of projects/folders of code all being added to a repository as a new commit, and developers would need to look in an alternate place to see the history of that portion of the codebase.
Figure: Bad example
Merge multiple repository histories into one
It's important when combining git repositories that you bring all the history with you. This means that even if the files were added physically to a new repository today, developers will be able to see all the commits originally created in the original repository.
Figure: Good example
Writing descriptive commit messages
It's important to have descriptive names for commits so that you can easily keep track of what was achieved after each commit was applied. Knowing what was achieved when the commits were made will make it easier to retroactively squash related commits as you'll know what work was done. In addition having descriptive commit messages makes it easier for a reviewer to see what you were trying to achieve in your pull request.
Read more about writing descriptive commit messages.
Conclusion
Maintaining a clean git history is important for readability and understanding the changes that have been made to a codebase over the lifetime of the repository.
Below is a summary of the things that create a good git history and the methods to achieve them:
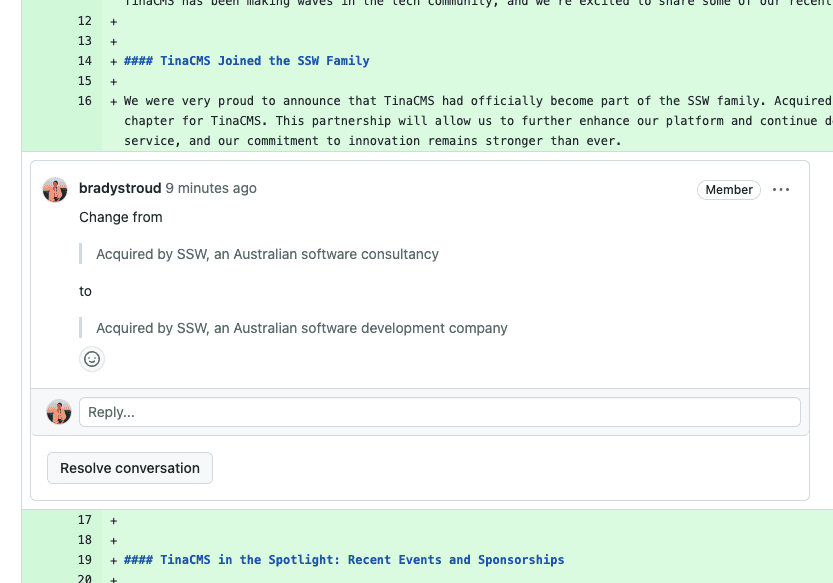
Granularity of commits Descriptive commit messages Easy to maintain Never lose history Squashing Pull Requests ✅ ✅ ✅ Good Pull Request titles ✅ ✅ Preserving file history ✅ ✅ Merging multiple repositories ✅ ✅ Normally, the best way to provide feedback on content changes is to use the change X to Y format. When it comes to reviewing Pull Requests (PRs) in GitHub, this is not the case - it's inefficient for the PR owner. They have to manually interpret each suggested change, implement them in the code, and then commit the changes, which can be time-consuming.
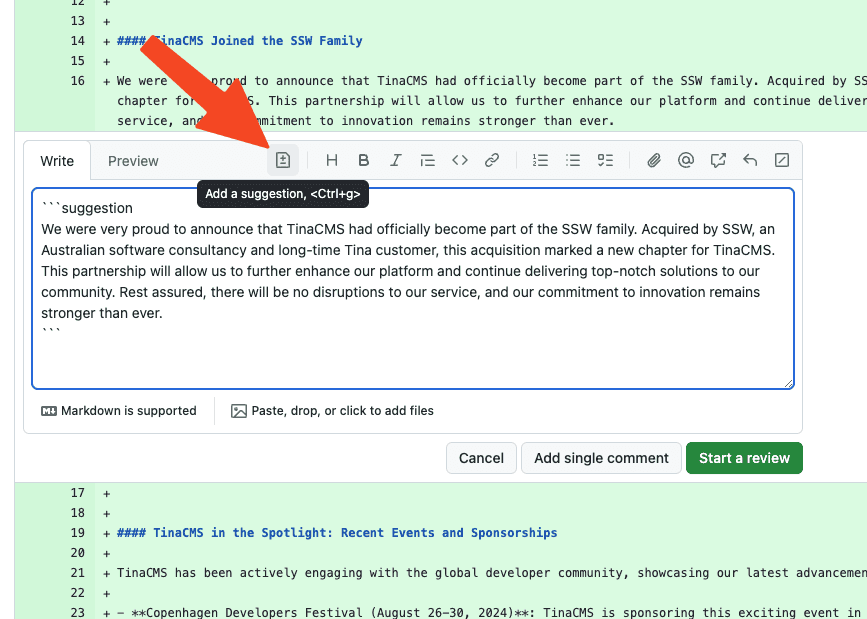
Video: Pull Request Suggestions | Brady Stroud | SSW Rules (4 min)Instead, reviewers should use GitHub's Add a suggestion feature. This allows the reviewer to directly suggest changes in the code diff view, and the PR creator can easily accept or reject these changes with a single click. This process is more streamlined and makes it easier to implement suggestions.
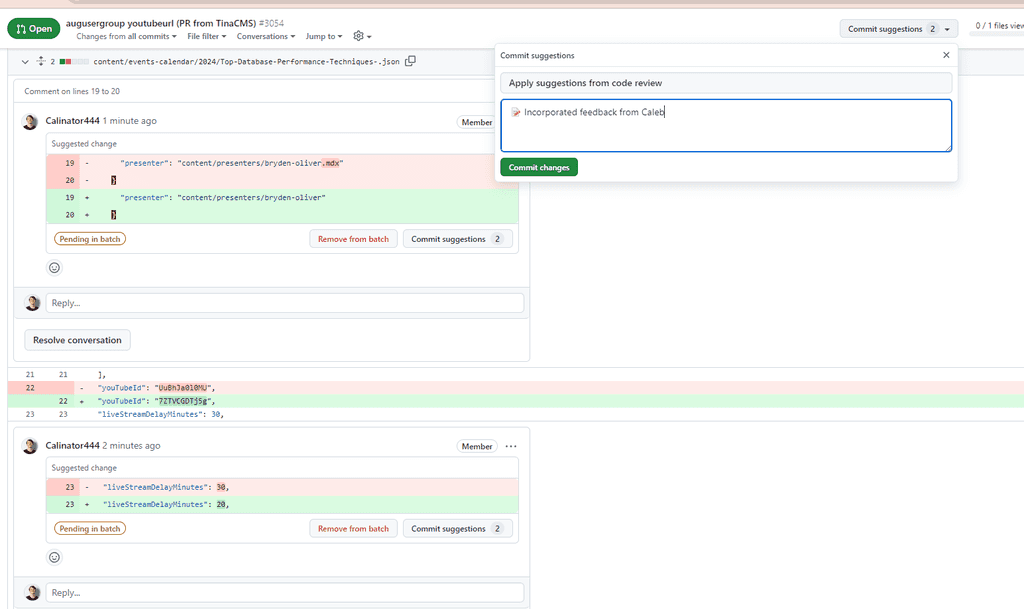
When the PR creator reviews the suggestion, they can either click 'Commit suggestion' to apply it directly or 'Resolve conversation' if they choose not to apply it.
If an author has made multiple suggestions to your code it may be best to add the suggestions in a batch and then. This allows you to create a single useful commit message that summarizes the changes in the feedback.
When reviewing another developer's pull request, review comments can fall into a mix of categories. Some changes might be required, while others might be optional. Do you know the best way to tell the requester which is which?
Types of Pull Request Feedback
When reviewing pull requests, comments can often be divided into two categories:
- Change - you must change this if you want me to approve
- Consider – consider this suggestion, but don’t feel obliged to change (i.e. I would do this, but I won’t block you on it)
- PBI – Important, but create a PBI to fix this in future
By prefixing the comment with one of the categories above, the reviewer can make it clear to the author if they must make the change or not.
When adding 'PBI' comments, a "good Samaritan" approach is to create the PBI and link to it (add a TODO task). Alternatively if you just leave the comment and want the requester to do it, they should do the same (add a TODO with a link to the PBI) before you approve it.
Pull Request Comment Examples
This could be refactored to be better
Figure: Bad example - not clear if the author should make the change or not
Change – check for null reference and throw if found
Figure: Good example - clear that the change should be made before the PR will be approved
Consider – break long method into several smaller ones
Figure: Good example - the reviewer has left a suggestion, but it's up to the author do change or not
PBI – Consolidate these xUnit ‘Fact’ tests to use ‘InlineData’
Figure: Good example - This change doesn't need to be done now, but should be added to the backlog with a comment in the code
