Rules to Better Version Control with Git - 17 Rules
If you still need help, visit Application Lifecycle Management and book in a consultant.
Source control is the backup of your code, as well as your tool for tracking changes over time.
With source control, we can share project code and collaborate with other team members. Using it allows us to track changes, compare code, and even roll-back if required. Moreover, it keeps our code safe and that is the most important part.
It also helps you to do root cause analysis by finding out who made the change. Then, you can chat with them and get aligned on what caused the problem and what is the best solution moving forward. Remember, the person who made the change might have important knowledge that you don't know!
Don't just fix the problem, see who caused the problem and correct them. - Adam Cogan
Using VS Code? There are 2 awesome extensions to see history:
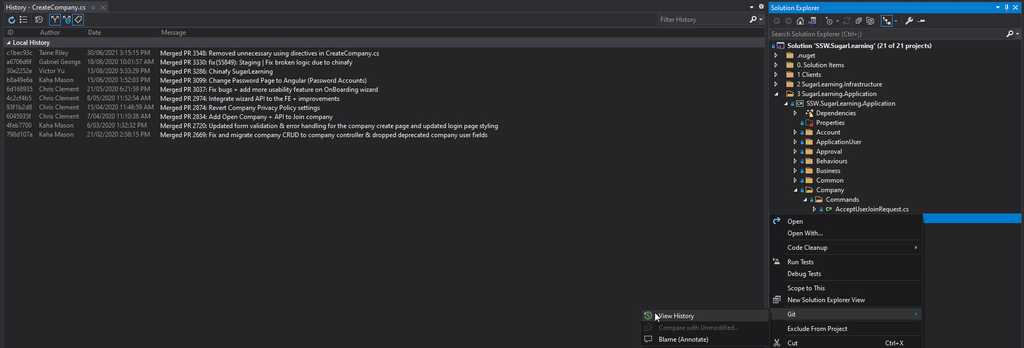
Figure: Right-click a file and select Git | View History to see the changes in source control 
Figure: We can select different changesets and compare the changes 
Figure: We can select different changesets and compare the changes. Blue = modified, Green = addition, Red = deletion 
Figure: Right click a file and select Git | Blame (Annotate) to view the history on a segment basis 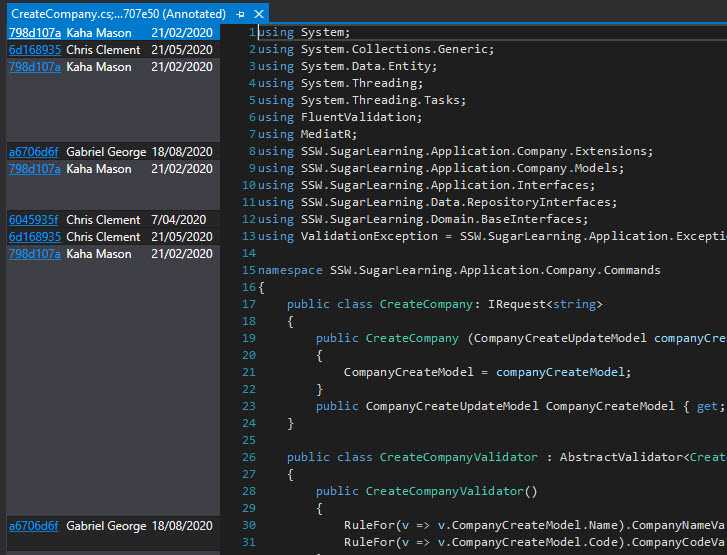
Figure: Use annotate to understand (or find the guy) to understand his thoughts before deleting/changing someone elses code 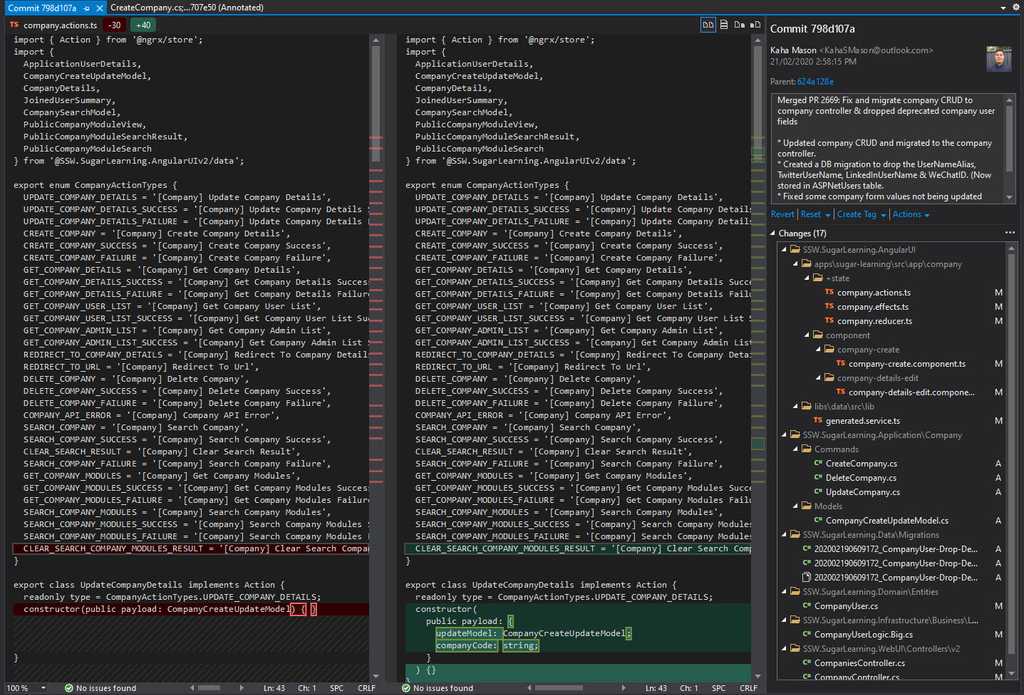
Figure: Annotation is great, but it gets even better when clicking the commit code gives you full details Learn the Git commands every developer should know to keep your history clean, your team in sync and your pull requests stress free.
Git Command Line
The bread and butter of git. Git Command Line is the traditional and most powerful way to use Git.
✅ Pros
- Emphasizes power, control, and completeness
- Provides deep understanding of Git internals
❌ Cons
- Steep learning curve for beginners
- Easy to make mistakes with destructive commands
1. git init
Creates a new Git repository in the current folder.
git initThis sets up Git tracking for your project. It creates a .git directory containing metadata about your repo, including commit history, branches, and remote settings.
2. git clone
Creates a local copy of a remote repository.
git clone {{repository-url}}Example:
git clone https://github.com/test/hello-world.gitThis copies all the files, history, and branches from the remote repo.
If configured, you can clone via SSH:
git clone git@github.com:test/hello-world3. git status
Shows the current state of your working directory and staging area.
git statusYou’ll see:
- Files that have been modified
- Files that are staged
- Untracked files
Here are some most frequently used
git statuscommands:Command Description git statusShows the basic status of working directory and staging area git status -sShows status in short format (compact view) git status -bShows branch and tracking info in short format git status --porcelainMachine-readable output format 4. git add
Adds files to the staging area so they’re ready to be committed.
git add {{file}}
git add .
git add {{file}}adds a specific file.git add .adds all changes in the current directory and subdirectories.Tip: Use git status before running this to see which files you’re staging.
5. git commit
Saves a snapshot of your staged changes with a message. This will open your configured editor.
git commitAlternatively, you can provide a message via the
-mflag.git commit -m “@feature auth added”Each commit should describe why the changes were made—not just what was changed.
Use clear, concise messages that help teammates (and your future self) understand the history.
A commonly followed spec Conventional Commits, serves as a way to keep commit messages consistent and easy to read. This involves prefixing commits with a
typeand optionalscope, e.g.feat(api): send an email to the customer when a product is shipped6. git diff
Shows differences between your working directory and the staging area or between commits.
Command Description Use Case git diffShows unstaged changes Most common - see what you've changed git diff --stagedShows staged changes Review changes before committing git diff HEADShows all changes since last commit See everything that's changed git diff <filename>Shows changes in specific file Focus on one file's changes git diff --statShows change summary Quick overview of what files changed This helps you preview what’s going to be committed or what changed between commits.
7. git log
Displays the commit history.
git logYou’ll see:
- Commit hashes (SHA)
- Author names
- Dates
- Commit messages
You can customize the output of git log with many options. Here are some of the most useful ones:
Command / Option What it does git logShows the full commit history (default format) git log --onelineShows each commit as a single line (short hash + message) git log --statShows files changed and the number of insertions/deletions per commit git log -pShows the actual diff (patch) introduced in each commit git log --author="Name"Shows commits by a specific author git log --graphShows a text-based graph of the branch structure git log --decorateShows branch and tag names alongside commits git log --pretty=onelineShows each commit on one line (more detailed than --oneline)git log --abbrev-commitShows only a short SHA-1 for each commit To exit the
git log, pressq8. git reset
Resets your staging area or moves HEAD to a different commit.
Command / Option What it does git resetBy default, unstages files (moves from staging area back to working directory) git reset <commit>Moves the current branch to the specified commit (default is --mixed)git reset --soft <commit>Moves HEAD to commit, keeps changes staged (in index) git reset --mixed <commit>Moves HEAD to commit, unstages changes (default behavior) git reset --hard <commit>Moves HEAD to commit, discards all changes in working directory and index git reset HEAD <file>Unstages a specific file (keeps changes in working directory) 9. git checkout
Switches branches or restores files.
Switch to a branch:
git checkout mainPassing the
-bflag allows you to create and checkout a new branch at the same time.git checkout -b new-branchDue to the
checkoutcommand having multiple uses, the Git team decided to split its usage into two additional commands,switchandrestore. It's recommended to usegit switch (-c | -C) <new-branch>to switch/create branches now days.10. git branch
Lists, creates, or deletes branches.
List branches:
git branchCreate a new branch:
git branch @feature/login-formDelete a branch:
git branch -d old-feature11. git merge
Combines changes from one branch into another.
git checkout @feature/login-form
git merge main
This merges the main branch into the feature branch.
If there are conflicting changes in the same files, Git will prompt you to resolve them manually.
12. git pull
Downloads changes from a remote repository and merges them into your local branch.
git pull origin mainThis is equivalent to:
git fetch
git merge
Use
git pull --rebaseto avoid unnecessary merge commits.13. git push
Uploads your local commits to a remote repository.
Command / Option What it does git pushPushes current branch to its tracked remote branch git push origin <branch>Pushes the specified local branch to the remote named "origin" git push -u origin <branch>Pushes branch and sets upstream (tracks remote branch) git push --forceorgit push -fForces push, overwriting remote branch history git push --allPushes all local branches to the remote git push --tagsPushes all local tags to the remote git push origin --delete <branch>Deletes a branch on the remote repository Use this to share your work with others.
14. git stash
Temporarily saves changes that you don’t want to commit yet.
git stashThis clears your working directory so you can switch branches cleanly.
Restore stashed changes:
git stash popView all stashes:
git stash list15. git remote
Manages remote repositories.
Command / Option What it does git remoteLists the short names of all configured remotes git remote -vLists remotes and their URLs (fetch and push) git remote add <name> <url>Adds a new remote repository git remote remove <name>Removes a remote repository git remote rename <old> <new>Renames a remote repository git remote show <name>Shows detailed info about a specific remote git remote set-url <name> <url>Changes the URL of a remote repository For more information, check out Git Documentation or Essential Git Command Reference.
Git Clients
Alternatively, developers could choose a user-friendly visual interface that makes version control more accessible. It's perfect for developers who prefer visual interfaces and handles most day-to-day Git tasks without needing to memorize commands.
1. GitHub Desktop
GitHub Desktop is a free, streamlined Git client that great integration with GitHub repositories.
✅ Pros
- Completely free and open source
- Dead simple interface perfect for Git beginners
- Excellent GitHub integration with pull requests and issues
❌ Cons
- Limited advanced Git features
- No built-in merge conflict resolution tools
- Primarily designed for GitHub (limited with other Git hosts)
2. GitKraken
GitKraken is a premium Git GUI that offers a comprehensive visual interface with advanced features and beautiful design.
✅ Pros
- Stunning visual repository graph and history
- Excellent merge conflict resolution tools
- Supports multiple Git hosting services (GitHub, GitLab, Bitbucket, etc.)
❌ Cons
- Requires paid subscription for private repositories and teams
- Can be overwhelming for beginners
- Resource-heavy application (uses more memory)
The .gitignore file tells Git which files to ignore and not track in your repository. Every Git project should have a .gitignore file to keep unnecessary files out of the repo. For example, cache files should not be included in the main repository.
Why Use .gitignore?
When working on projects, you often generate files that should not be committed to the version control system. These might include:
- Temporary files generated during development (e.g., .log, .tmp)
- Configuration files with sensitive data (e.g., .env)
- Build outputs (e.g., bin/, obj/ folders for .NET projects)
- Dependency caches (e.g., /node_module folder for javacript projects)
- Personal IDE config (e.g., .vscode sometimes you might want to share IDE config intentionally)
A .gitignore file tells Git which files or folders to ignore. This keeps your repository clean and ensures that only important files are tracked, improving efficiency.
Common Syntax Patterns for .gitignore
Here are some useful patterns you might need in a .gitignore file:
"*" - (e.g. *.log This will ignore all files ending in .log anywhere in the repository.)
"**" - (e.g. **/lib/name.file This pattern will ignore name.file in any lib/ directory within the repository, no matter its depth.)
" /{{name}}/ " - (e.g. /build/ This will ignore the build/ directory only at the root level.)
For more details and advanced patterns, refer to the w3schools Gitignore tutorial.
How to setup .gitignore?
- Create a .gitignore File: In your project’s root directory, create a file named .gitignore if it doesn't already exist.
- Add Files or Directories to Ignore: Open the .gitignore file and list the files or directories you want Git to ignore. Each entry should be on a new line. For example:
bash
node_modules/
.env
*.log
Figure: Example of gitnore file
Additional Tips
-
Use Pre-made Templates(You don’t need to write a .gitignore from scratch! ):
- Use templates based on your programming language or framework. gitignore template from github
- Use a generator like gitignore.io to create a .gitignore file tailored to your project.
- Use command dotnet new gitignore to create gitignore file for dotnet application. More details on create dotnet gitignore
- Use Comments: You can add comments in the .gitignore file to explain why certain files or directories are being ignored. Use # for comments. For example:
# Ignore environment variables for security
.env

# Ignore node_modules folder to avoid unnecessary files in the repo
node_modules/
Figure: Example of gitignore file with comment
Do you know the best way to manage NuGet packages with Git? You can get into all sorts of trouble by including your packages in source control.
** Do not check packages into Git **
The following are a few issues that are related to having your NuGet packages in source control:
- Over time the packages will grow to be too many and cloning the repository will be slow.
- You could get duplicate NuGet packages in your packages folder as new versions are updated.
- NuGet shows packages to update that have already been updated. This can happen if you have duplicate NuGet packages but they are different versions.
- It becomes harder to "clean" your solution of any unused package folders, as you need to ensure you don't delete any package folders still in use.
Nuget will automatically restore packages with out checking them in to source control
Beginning with NuGet 2.7, the NuGet Visual Studio extension integrates into Visual Studio's build events and restores missing packages when a build begins. This feature is enabled by default and packages.config will be automatically included in souce control.
Here's how it works:
- On project or solution build, Visual Studio raises an event that a build is beginning within the solution.
- NuGet responds to this event and checks for packages.config files included in the solution.
- For each packages.config file found, its packages are enumerated and checked for existence in the solution's packages folder.
- Any missing packages are downloaded from the user's configured (and enabled) package sources, respecting the order of the package sources.
- As packages are downloaded, they are unzipped into the solution's packages folder.
Support in legacy versions of NuGet
It is highly recommended that you upgrade to the latest version of NuGet to to avoid having to configure your solution to not check in NuGet pagages to source control.
You can read more here http://blogs.msdn.com/b/dotnet/archive/2013/08/22/improved-package-restore.aspx?PageIndex=3#comments.
Using the Azure DevOps API you can programmatically get a list of commits from your repository with only a HTTP request.

Figure: HTTPS GET commits from your repository Using HTTPS with basic authentication, make a GET request to a URL as below, substituting in your project details. A JSON object will be returned. To quickly create classes from a JSON response, see the rule Do you know how to easily get classes from a JSON response?
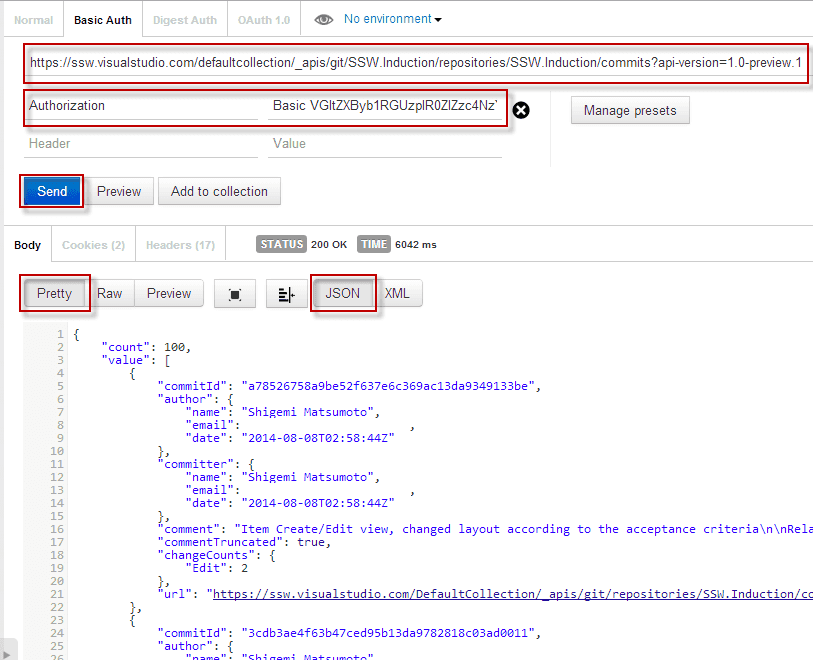
Figure: Using the Chrome extension Postman to execute our request with Basic Authentication For a C# implementation, see this blog post Getting Git Commits with the VSO REST API.
Like most skills, it can take a little while to get your head around Git.We rate our devs and the devs that we mentor on the following scale.
Where are you?
** Level 1 - Understanding the basic principles
At this level, you need to have an understanding of the basic operations (including branching).
Your workflow looks like this:
- init local repository / clone
- pull
- <code>
- commit
- push
** Level 2 - Working with Git on a team
Now that you know the basic Git commands you can start working on projects with more than one developer.
You should be using local feature branches for your work.
Your workflow involves:
- pull
- merge
- push
** Level 3 - Learning to use pull requests
Pull requests can be used for code reviews within your team, or to accept suggested changes from people outside your team.
Pull requests should preferably be used with policies (TFS Git only - harder with GitHub).
** Level 4 - Working with a team advanced - Rebasing (harder, but worth it)
When working in a team, Git does a pretty good job of merging code together from different branches... but it can be very messy. True Git masters master rebasing. It lets you keep a much cleaner project history.
Git process for Git masters:
- pull master
- rebase feature branch on top of remote master
- push feature branch to remote or create pull request
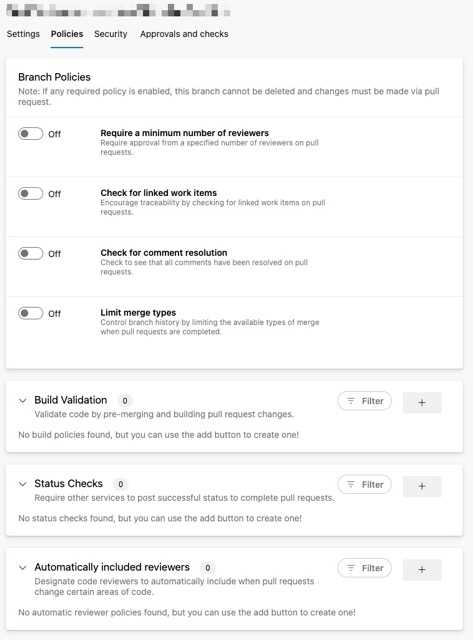
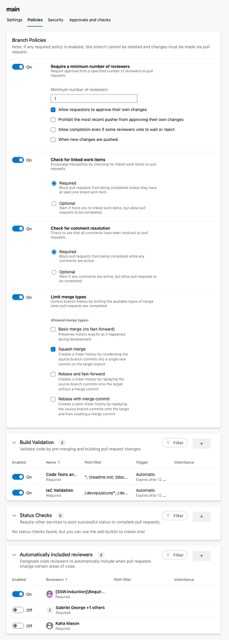
Branch protection is a feature in version control software that allows teams to define rules and restrictions around who can make changes to specific branches, what types of changes are allowed, and if there are conditions that have to be met.
This can include:
- Number of reviewers
- Linked work items e.g. PBIs (super useful to track back to why the code was changed)
- Any feedback has been addressed/resolved
- Enforcing specific merge types
- Checking that builds pass
- Checking other services e.g. code quality like SonarQube
- Automatically adding specific people to review the code
When you merge a branch you end up with messy merge commits.
Rebasing might take a bit to get your head around, but you get a much cleaner project history.
- it eliminates the unnecessary merge commits required by git merge
- rebasing also results in a perfectly linear project history - you can follow the tip of feature all the way to the beginning of the project without any forks.
This makes it easier to navigate your project with commands like git log, git bisect, and gitk.
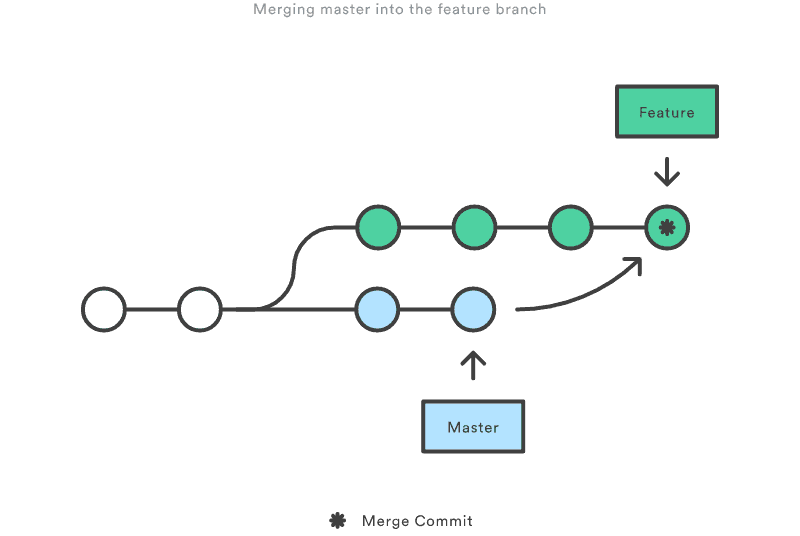
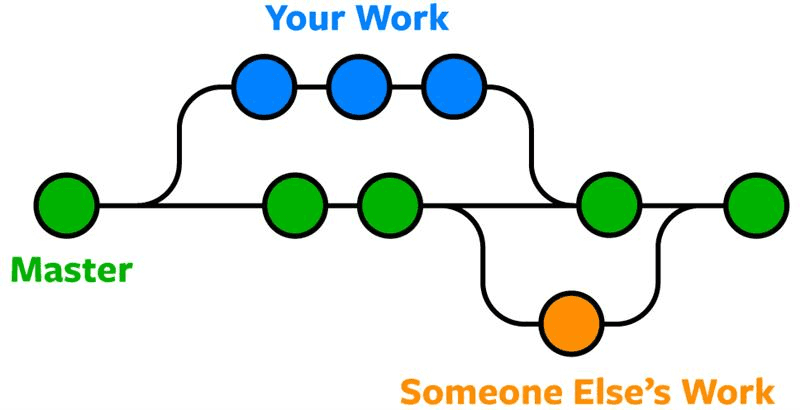
Figure: When merging: a messy merge commit is created any time you need to incorporate upstream changes from the master branch 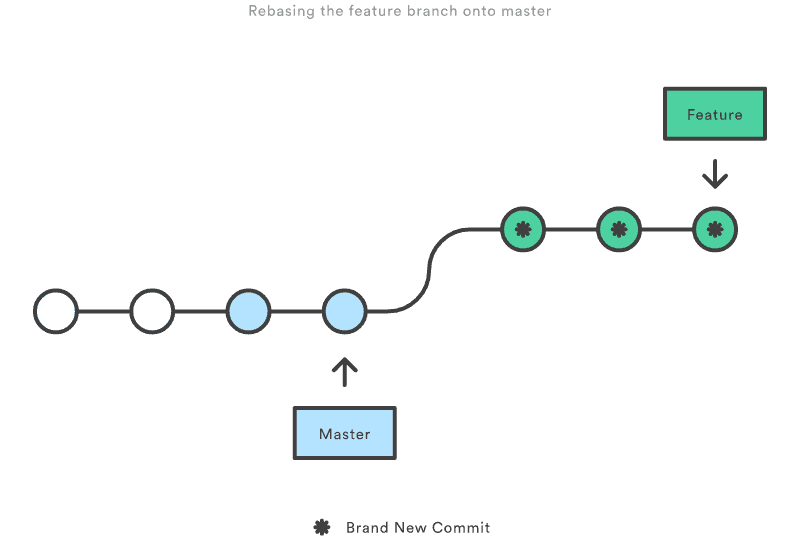
Figure: Git Rebase moves your new commits to the end of the master branch. This ensure that you don't end up with messy merge commits and you have a clean linear project history Warning: If you don’t follow the Golden Rule of Rebasing, you could end up in a world of pain.
Rebasing is great for ensuring a clean project history... but it can be dangerous in inexperienced hands.
The golden rule of git rebase is to never use it on public branches. (ie. never rebase master).
You should never rebase master onto a feature branch. This would move all of the commits in master onto the tip of the feature branch (not the other way around).
Since rebasing results in brand new commits, Git will think that your master branch’s history has diverged from everybody else’s. If you were to Push this to the server... expect lots of pain to fix it up!
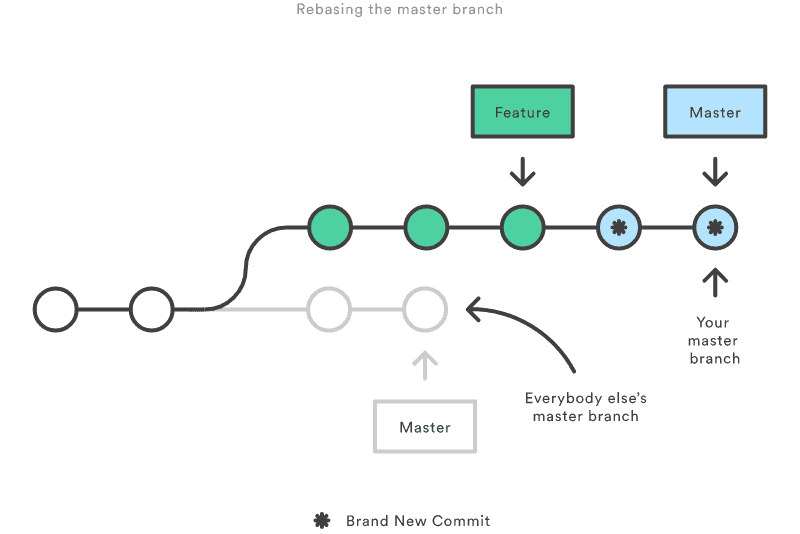
Figure: Bad Example: Rebasing master onto a feature branch can cause project history to become confused. 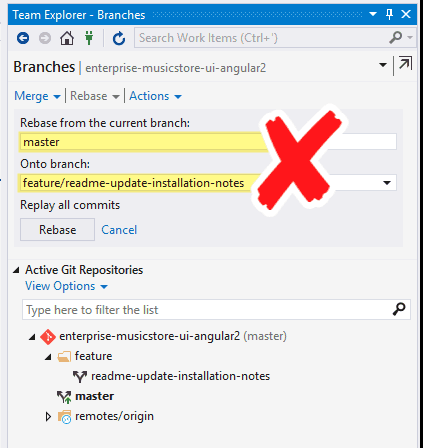
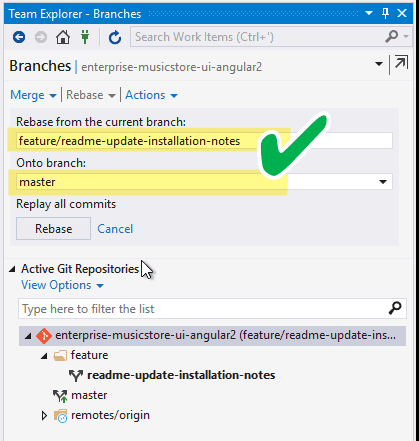
Figure: To get it wrong in Visual Studio you would need to change the current branch to master and then choose rebase. While this is possible, the VS team have done a good job making it hard to do the wrong thing Git has become the defacto standard for version control systems. It's distributed and decentralized and promotes working disconnected as default. It also takes away the pain of branching and merging and has a built in code review system with pull requests. Everybody should be using Git, and if you're not, you should be migrating the Git using one of the below tools.
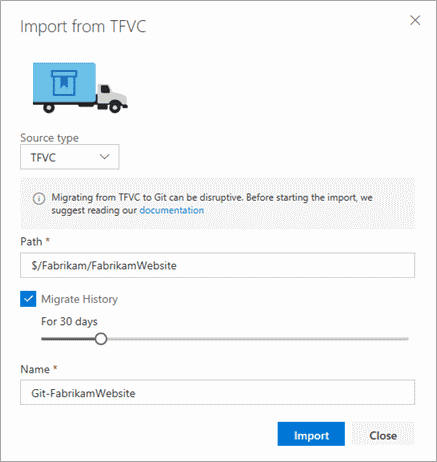
- VisualStudio.com - Import Repository
- Git-Tf
- Git-Tfs (recommended)
VisualStudio.com - Import Repository
VisualStudio.com gives you the ability to import from a TFVC repository into a new Git repository.
Bad Example - Built in tool has several limitations
If you don't care about source control history, then this inbuilt tool is the easiest to use. It has the limitations of:
- 180 days of history
- No branches
TIP - Use this if you don't care about source control history
Git -Tf
Git-Tf is an open source command line tool that works cross platform and use the Java TFS SDK. This tool is useful for migration if you're not on a Windows environment. This tool is not maintained and has issues with migrating branches.
To see how to use this to migrate see "Migrate an existing project from TFS to Git with changeset history intact" from Chris Kirby
TIP - Use Git-Tf if you don't have a Windows environment
Git-Tfs ( Recommended)
Git-Tfs is an open source command line tool that uses the .NET TFS SDK to interface between Git and TFVC. It has the following advantages over the other tools:
- Actively maintained
- Good support for branches
- Author mapping
- Migrates all history
Follow the migration guide to import from TFVC to Git and then proceed with the after migration steps. To help you do a smoother migration, you can refer to this tool.
When you create a new git repository and need to push it to VSTS you need to provide login credentials.
It isn't always clear how to do this.
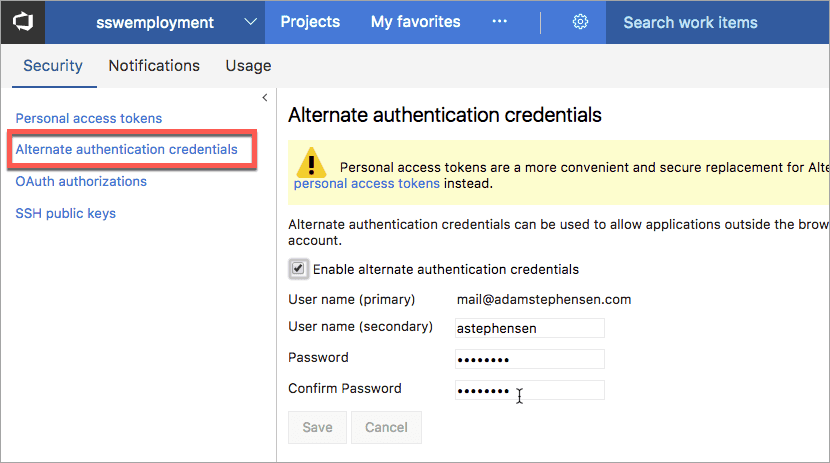
Figure: Bad Example - Alternate Authentication Credentials should not be used. When you change the password it invalidates all projects and can't be scoped to limit access to your Team Services data Instead, you should use Personal Access Token. You can do this in two ways.
The first option is to make sure your Git for Windows is up-to-date and when cloning the repository, you use Microsoft Account to log in. Personal Access Token for Git will be created for you.
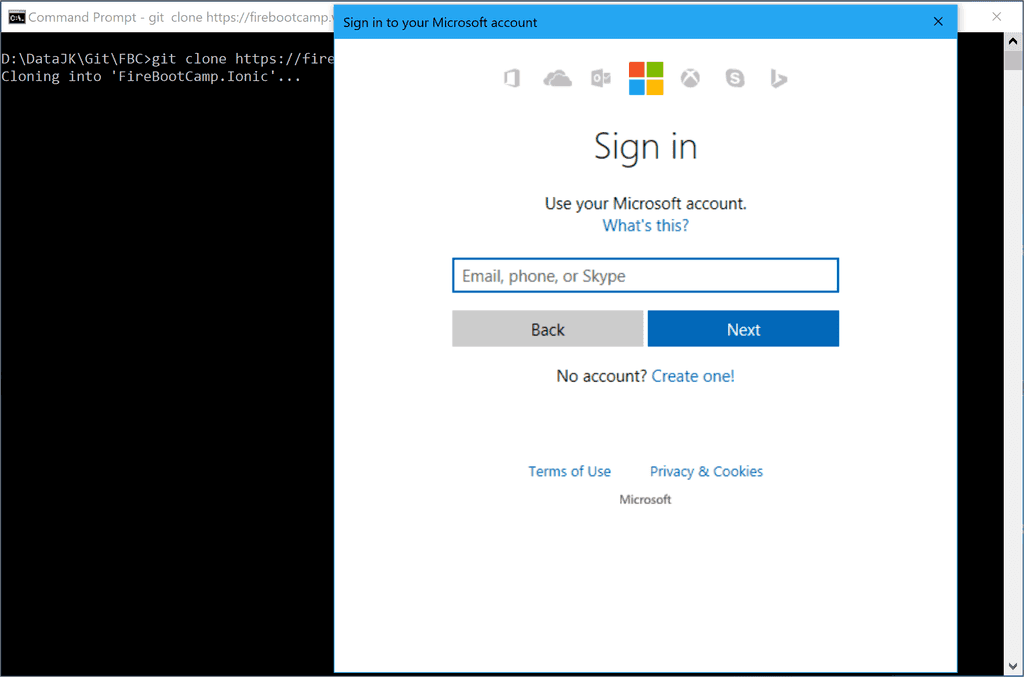
Figure: Good Example - Windows for Git credential manager will automatically create Personal Access Token for Git Option 2 is to manually create Personal Access Token and use it as a password for Git login.
You can follow this blog post for full instructions: Using Personal Access Tokens to access Visual Studio Online.
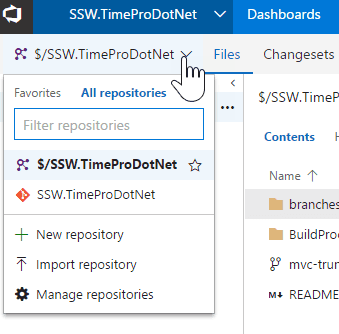
After you use the right tool to migrate from TFVC to Git, there's a few more things you need to do to clean things up for a new user joining the project. By default, if there is a TFVC repository, that will become the default in the UI.
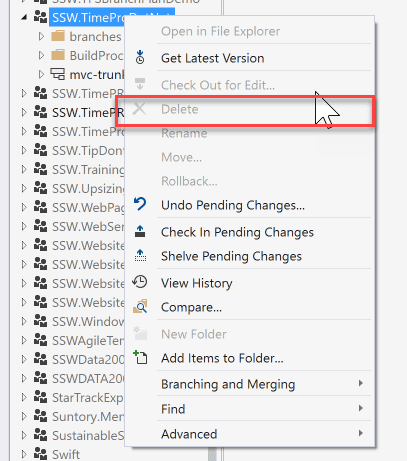
Unfortunately, you can't kill the TFVC repository and make Git the default one, so there's a few steps you need to follow.
Figure: Bad Example - Can't delete the now deprecated TFVC repository
Delete files from TFVC
Go into the repository, delete any existing files. Add a new document saying "_MigratedtoGit.md". This will stop people from getting the wrong code.
 **Figure: Clean up TFVC so developers can't accidentally get the wrong source code
**Note : All the source code is still there, it's just flagged as being deleted.
Lock down TFVC
In the TFVC repository, click Security
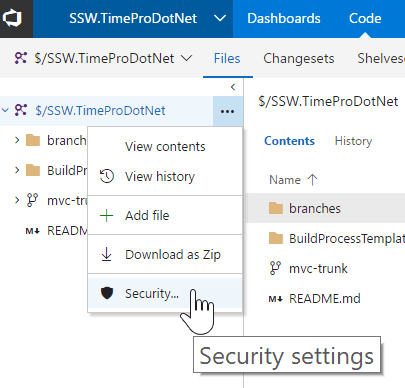 Figure: Configure the security of the TFVC repository
**
Then deny check-ins to **Contributors , P roject Administrators and Project Collection Administrators . This should stop anyone from committing new code to the repository.
Figure: Configure the security of the TFVC repository
**
Then deny check-ins to **Contributors , P roject Administrators and Project Collection Administrators . This should stop anyone from committing new code to the repository.Update the Dashboard
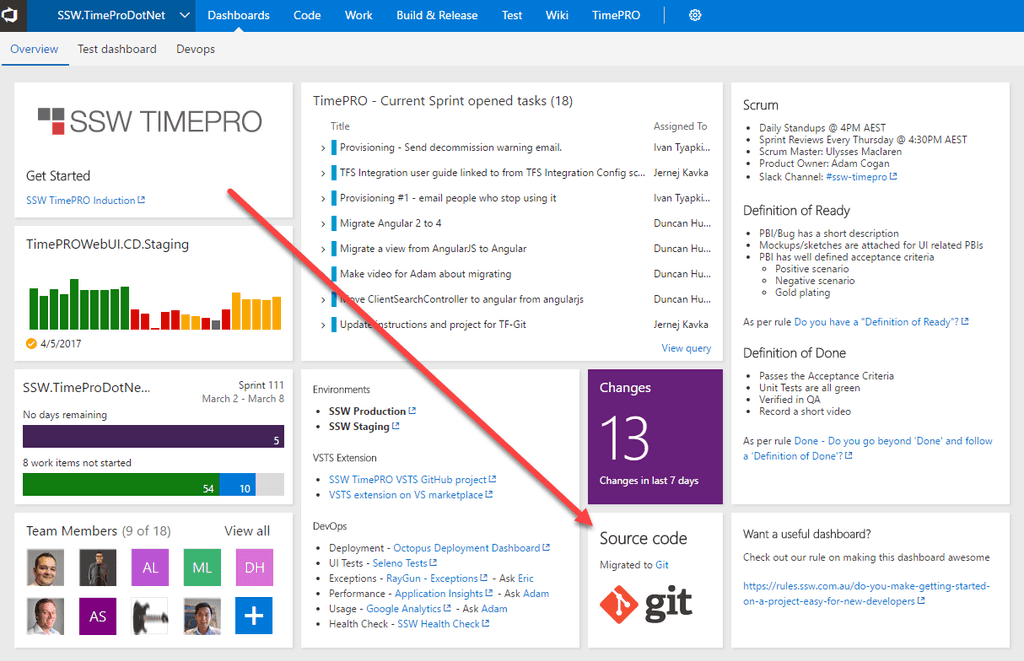
Next step is to update the dashboard to let new developers know.
Figure: Good example - Let new users know that the source control is now on Git
Suggestions for the VSTS team
- Give us the ability to hide a repository
- Give us the ability to set a repository as the default for all users
- Give us the ability to delete a TFVC repository
Having any of these suggestions will avoid the confusion on this screen
Figure: Bad Exmaple - This is confusing for a new dev
When starting to work on a project, it's common to wonder whether to fork an existing repository or create a new branch for it. Before making this decision, it's important to consider the key differences between the two options.
Figuring out whether to fork or branch
Generally, branching is a default option if you're working on a team developing a product. However, if you run into someone else's product and have new ideas you want to try, then forking is a good option because you can work on your ideas in isolation.
Tip: If unsure ask yourself 3 questions...
If your answer is 'no' to any of the following questions, then you should go for a fork:- Do you have access to the existing repository to clone a new branch?
- Is the change going to be part of that project and has it been approved by the Product Owner?
- Do you or anyone you're working with on that project own the existing repository?
Summary - Forking vs Branching
Fork Branch Purpose Create a separate copy of a repository for significant changes or different directions Develop new features or fix bugs without disrupting the main codebase Relationship to the original codebase Completely independent repository Linked to the original repository Ownership Owned by the user who created them Owned by the repository owner Scope of changes Typically involve significant changes Typically involve smaller changes Collaboration Used to develop ideas in isolation from the main team Used to develop ideas that the main team is working on Maintaining a clean git history is important for readability and understanding the changes that have been made to a codebase. This is especially important when working in a team, as it allows you to see the changes that have been made to a file over time, and who made them. This can be useful for debugging, and for understanding why a particular change was made.
Things that create a good git history include:
- Granularity of commits
- Descriptive commit messages
- Easy to maintain (i.e. easily revert an entire feature)
- Never lose history
Squashing Pull Requests
Video: Git MERGE vs REBASE: Everything You Need to Know (4 min)Squashing commits is the process of combining multiple commits into a single commit. This allows for the repository history to reflect changes to the application over time, rather than individual commits making up a feature which can be hard to follow as they give little context to the feature that the commit is being added for.
Good Pull Request titles
When creating a pull request, it's important to have a clear and descriptive title. This is important when looking back at the git history, as it allows you to see at a glance what changes were made in a particular pull request.
Preserving file history
Often developers will move files around and have major changes to the contents leading to the file history being lost as the the operation will be seen as a delete and add file because of the differences in contents.
This can be avoided by using the
git mvcommand to move files, or by breaking up the operation into smaller chunks i.e.: change content and then move the file as separate commits.
📝 Git Tips - Making structural and content changes (4 min)Merging multiple repositories
Sometimes you have a system that was designed in multiple repositories, and you want to merge them back together. This can be a complex process, but it's important that you know what to do when this situation comes up in order to not lose history.
Source tip
The process of a source tip is to stop using source code from 1 repository as of certain date, and start using it from another repository.
This process leads to a situation where you have a couple of projects/folders of code all being added to a repository as a new commit, and developers would need to look in an alternate place to see the history of that portion of the codebase.
Figure: Bad example
Merge multiple repository histories into one
It's important when combining git repositories that you bring all the history with you. This means that even if the files were added physically to a new repository today, developers will be able to see all the commits originally created in the original repository.
Figure: Good example
Writing descriptive commit messages
It's important to have descriptive names for commits so that you can easily keep track of what was achieved after each commit was applied. Knowing what was achieved when the commits were made will make it easier to retroactively squash related commits as you'll know what work was done. In addition having descriptive commit messages makes it easier for a reviewer to see what you were trying to achieve in your pull request.
Read more about writing descriptive commit messages.
Conclusion
Maintaining a clean git history is important for readability and understanding the changes that have been made to a codebase over the lifetime of the repository.
Below is a summary of the things that create a good git history and the methods to achieve them:
Granularity of commits Descriptive commit messages Easy to maintain Never lose history Squashing Pull Requests ✅ ✅ ✅ Good Pull Request titles ✅ ✅ Preserving file history ✅ ✅ Merging multiple repositories ✅ ✅ Updating commit information can be essential for maintaining accurate project history or correcting errors. Whether you need to change a commit date for clarity, compliance, or other reasons, you have a couple of methods at your disposal.
This rule outlines how to change the date of an existing commit using both a manual CLI approach and an automated script.
Method 1 – Use CLI
- Checkout to the branch containing the commit
git checkout -b {{ BRANCH NAME }} origin/{{ BRANCH NAME }}- Run git log to get the last commit hash
git log- Do an interactive rebase for the parent of the last commit
git rebase -i {{ COMMIT HASH }}^-
This opens vi editor:
- Press "I" key to enter interactive mode,
- Change "pick" to "edit",
- Press "escape" to exit interactive mode,
- Type ":wq" to save and exit
- Change the commit date
GIT_COMMITTER_DATE="{{ NEW DATE IN 'YYYY-MM-DD HH:MM:SS' FORMAT }}" GIT_AUTHOR_DATE="{{ NEW DATE IN 'YYYY-MM-DD HH:MM:SS' FORMAT }}" git commit --amend --no-edit- Finish the rebase
git rebase --continue- Force push to origin
git push origin {{ BRANCH NAME }} --forceMethod 2 (recommended) – Use a script
If the date change is to be applied on several branches, it is preferable to automate the process with a script.
BRANCH=$1
DATE=$2
if [ -z "$BRANCH" ] || [ -z "$DATE" ]; then
   echo "Usage: $0 {{ BRANCH NAME }} {{ NEW DATE IN  'YYYY-MM-DD HH:MM:SS' FORMAT }}"
   exit 1
fi
git checkout -b "$BRANCH" "origin/$BRANCH"
LAST_COMMIT_HASH=$(git log -n 1 --pretty=format:"%H")
git rebase -i "$LAST_COMMIT_HASH^"
GIT_COMMITTER_DATE="$DATE" GIT_AUTHOR_DATE="$DATE" git commit --amend --no-edit
git rebase --continue
git push origin "$BRANCH" --force
git checkout main
The script can be actioned with the following command:
./change_history.sh "{{ LOCAL PATH }}" "{{ NEW DATE IN 'YYYY-MM-DD HH:MM:SS' FORMAT }}"In today’s development world, teams often consist of developers working on different operating systems (OS), such as Windows, macOS, and Linux. While each OS has its own strengths, managing a cross-platform development environment can introduce challenges.
Issues like inconsistent line endings, platform-specific setup scripts, and configuration mismatches can lead to headaches for both individual developers and the team as a whole.
Addressing Line Ending differences (CRLF vs. LF)
One of the most common issues faced by teams working with Git across different platforms is the handling of line endings. Windows uses CRLF (Carriage Return + Line Feed) for line endings, while macOS and Linux use LF (Line Feed) only. This can lead to unnecessary diffs in Git and potential merge conflicts.
Solution: Use Git’s Line Ending configuration
Git provides a way to manage line endings across different operating systems by using the
core.autocrlfsetting. This configuration ensures that line endings are normalized when files are checked in and out of the repository.- Windows users: Set Git to automatically convert line endings to CRLF when checking out files, and convert them back to LF when committing.
git config --global core.autocrlf true- macOS/Linux users: Set Git to automatically convert CRLF line endings to LF when checking out files and leave them as LF when committing.
git config --global core.autocrlf input- Repository-Wide configuration: It's a good practice to enforce this configuration across the team via a
.gitattributesfile, which allows you to define how specific file types should be handled. For example:
* text=auto
*.sh text eol=lf
*.bat text eol=crlf
This ensures that, no matter what OS a developer is using, files are checked out and committed with consistent line endings. The
eolattribute specifically handles cases like batch scripts or shell scripts that may need different line endings.Creating Cross-Platform Setup Scripts for Easy Onboarding
Onboarding new developers is a critical step in ensuring that everyone is up and running quickly, but multi-OS teams often struggle with platform-specific setup instructions. The goal is to make onboarding as seamless as possible, whether a developer is using Windows, macOS, or Linux.
Solution: Write Cross-Platform Setup Scripts Using PowerShell
To streamline onboarding and ensure compatibility across different platforms, it’s crucial to write setup scripts that work on all major operating systems. PowerShell is an ideal choice because it is natively available on Windows and can also be installed on macOS and Linux, making it a truly cross-platform solution. Here's how you can approach writing cross-platform setup scripts with PowerShell:
- PowerShell for Windows, macOS, and Linux: Instead of using separate scripts for each platform, write a PowerShell script (
setup.ps1) that works on all platforms. PowerShell Core (now simply known as PowerShell) is cross-platform and can be run on Windows, macOS, and Linux, allowing you to write one script for all environments. You can use package managers likeChocolateyon Windows,Homebrewon macOS, orapt/yumon Linux within the same PowerShell script. - Handling OS-Specific Logic in PowerShell: PowerShell makes it easy to detect the operating system and execute different setup commands depending on the platform. For example, you can check whether the script is running on Windows, macOS, or Linux and then call the appropriate package manager or command for each environment.
Here’s an example of a cross-platform setup script in PowerShell:
# Detect the OS and perform platform-specific setup

$os = $env:OS

if ($os -like "*Windows*") {
    Write-Host "Setting up for Windows..."
    # Windows-specific setup, e.g., installing packages via Chocolatey
    choco install somepackage
}
elseif ($os -like "*Linux*" -or $os -like "*Unix*") {
    Write-Host "Setting up for Linux/macOS..."
    # Linux/macOS-specific setup
    if ($IsMacOS) {
        # macOS-specific package manager (Homebrew)
        brew install somepackage
    }
    else {
        # Linux-specific package manager (apt, yum, etc.)
        sudo apt-get install somepackage
    }
}
else {
    Write-Host "Unsupported OS detected."
}

Write-Host "Setup complete!"
This script does the following:
- It checks the environment variable
$env:OSto detect the operating system. -
Depending on the platform, it uses the appropriate package manager:
- Windows: Uses
choco(Chocolatey) to install software. - macOS: Uses
brew(Homebrew) for package installation. - Linux: Uses
apt-getor similar package managers.
- Windows: Uses
By using PowerShell, you can create a single script that works across all major platforms, reducing the need for platform-specific scripts and simplifying the setup process for your users.
Consistent Git configuration for Multi-OS Teams
To further ensure smooth collaboration among multi-OS teams, it’s important to standardize Git configurations. Beyond line endings, Git offers other configurations that help maintain consistency.
Key Git configurations for Multi-OS Teams
- User Name and Email: Ensure each developer has set up their user name and email, as this is crucial for committing with correct author information:
git config --global user.name "Your Name" git config --global user.email "youremail@example.com"- Global
.gitignore: A global.gitignorefile can help ensure that certain system files (e.g.,Thumbs.dbon Windows or.DS_Storeon macOS) are ignored across all repositories. You can create and set a global.gitignorefile using the following command:
git config --global core.excludesfile ~/.gitignore_globalAnd in
~/.gitignore_global:.DS_Store Thumbs.db- Hooks and Templates: Some repositories might require hooks or commit templates to enforce conventions like conventional commit messages or certain commit checks. Using a
.githooksor.gitmessagefile in the repository can help maintain consistency across platforms.
