Rules to Better Web API - REST - 11 Rules
Explore best practices for developing and managing your Web API using REST principles. This guide covers essential topics such as serialization of view models, documentation, versioning, and returning appropriate response codes.
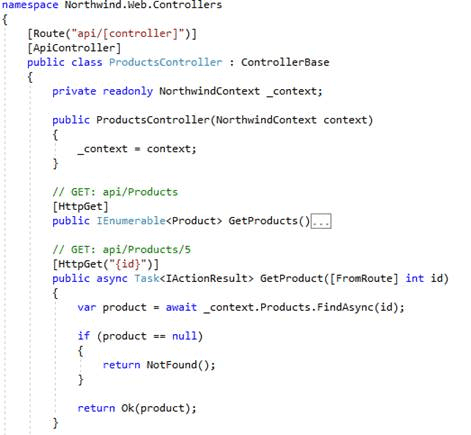
When building a simple API based on Entity Framework, It can be tempting to keep it simple and bind persistent entities directly to WebAPI output.
Although this code is very simple to write, there can be a number of potential problems:
- All fields in the entity will be sent to the client. Often there can be for-internal-use-only fields in a domain entity / database table that you do not want sent to the client. Or the particular client use-case does not require the full set of fields
- This might not a performant way of retrieving this data as, by default, the entity will be loaded into dbContext and change tracked. This tracking is unnecessary as the DbContext will be disposed when the request is finished
- Often domain entities can have bidirectional navigation properties and these will fail to serialize to JSON
- If your domain object contains computed properties, they get will be executed when serializing the object
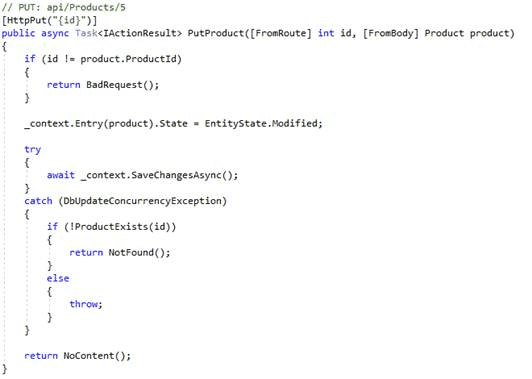
Update operations can be even more problematic:
Consider the Product object that is received as a
FromBodyparameter by the action.At the start of the action this is not a persistent entity that has been loaded from the database and attached to a DBContext. Instead it is an entirely new object that has been created by the MVC databinding system.
The next call to the DbContext will take that object – exactly as received and de-serialized from the network – and attach it as-is to the DBContext in the “Modified” state, to be later saved by the call to SaveChangesAsync()
Any fields that did not survive the "round-trip" from the server -> client-> server will be overwritten / lost. The mapping from "Object received from the web" to "Object saved into the database" is entirely implicit here.
For all these reasons, the use of DTOs or View Models is highly recommended:
- Complex domain objects can be simplified to contain only the exact set of fields required for a view
- Aggregate models can be created that simplify the results from joining related domain objects
- View Models can contain additional information or metadata required by the client such as value lookups
- View models can be extended containing details specific to the current user context such as "Does the current user have the required permissions to delete this item?"
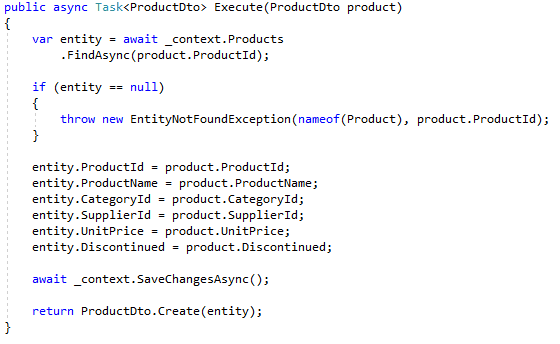
- Update operations can become far more explicit
- Validation rules can be written against the view model and for the specific context the view model exists for
- Consider this to be a case where the Single Responsibility Principle (SRP) generally outweighs Don’t Repeat Yourself (DRY)
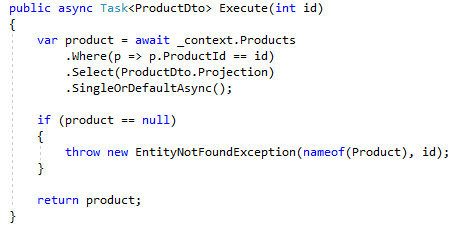
- Read operations can be optimised by selecting from DBSets directly into view models
This approach requires a bit more boiler-plate code as the fields to be updated are applied manually, but there is far less risk of unintended side effects.As the complexity of the code increases, it will be much easier for developers to keep a clear distinction between ViewModel objects that were received from web requests, and persistent entities that came from Entity Framework.
For the above read, Entity Framework will execute an SQL select statement containing only the fields that have been projected via .Select()
This will also prevent change tracking on the source entity.The above example also demonstrates how a projection / mapping from an entity to a view model can be reused by creating an Expression
<Func<EntityType, ViewModelType>>.Documenting your WebAPI is important but you don't want to spend a massive amount of time trying to keep documentation up to date. The solution is to use Swaggerand Swashbuckle.
Implementing Swagger will give you an automatic UI to explore and test your Web API methods.
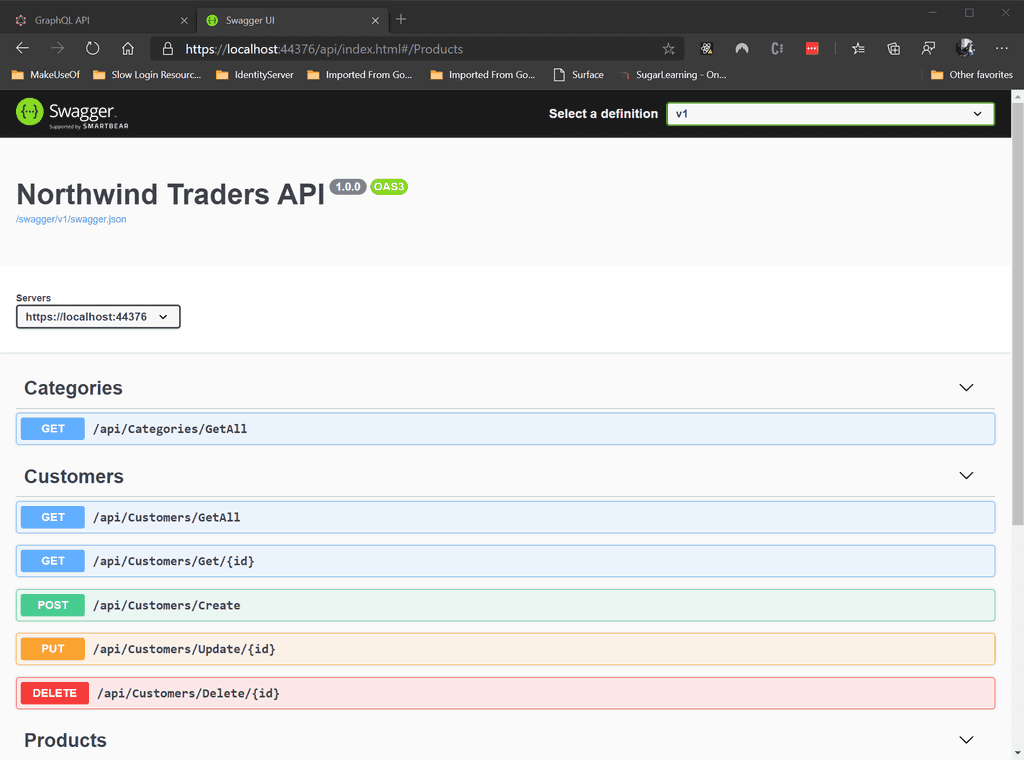
Swagger gives you a nice UI automatically generated on top of your WebAPI methods
When integrating with external Web APIs which return a JSON response, there is a quick and easy way to generate classes to handle that response.
If the API specification is published as per our rule: Do you document your Web API?
You can automatically generate your classes from that specification. See our other rule on how to do this: Do you know the best way to generate your classes from swagger? If the specification isn't publised you need to generate your clases from the response you get from calling the API. Here is a trick to do that.
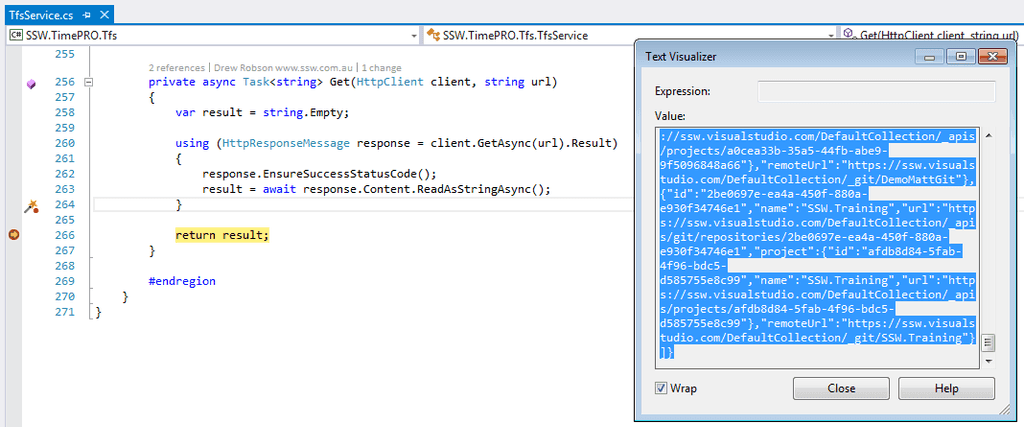
Execute the request, and copy the text of the JSON response.
Create a new class in Visual Studio, and Click Edit | Paste Special | Past As JSON Classes and classes will be generated from the JSON in the clipboard.
 Figure: Edit | Paste Special | Paste JSON As Classes
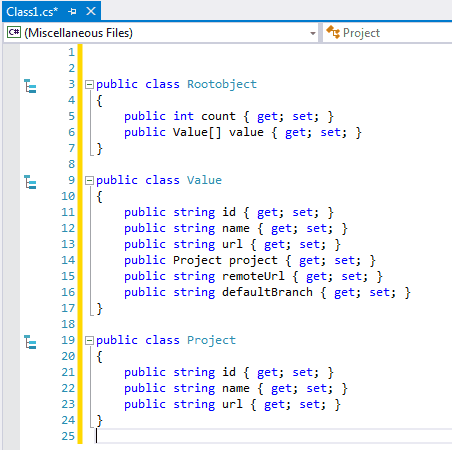 Figure: Classes generated from the JSON
The results may need cleaning up a little bit, but its much easier than trying to write them manually.
When creating WebAPIs for your applications, it is useful to keep the naming consistent all the way from the back-end to the front-end.
Table name: Employees Endpoint: /api/Users
Bad Example: The endpoint is different to the table name
Table name: Employees Endpoint: /api/Employees
Good Example: Table name is the same as the WebAPI endpoint
By making the endpoint name the same as the table name, you can simplify development and maintenance of the WebAPI layer.
In some circumstances you may not have direct control over the database, and sometimes you may be exposing a resource that doesn't have a meaningful analogue in the database. In these situations, it may make sense to have different endpoint names - if doing so will simplify development for consumers of your WebAPI endpoints.
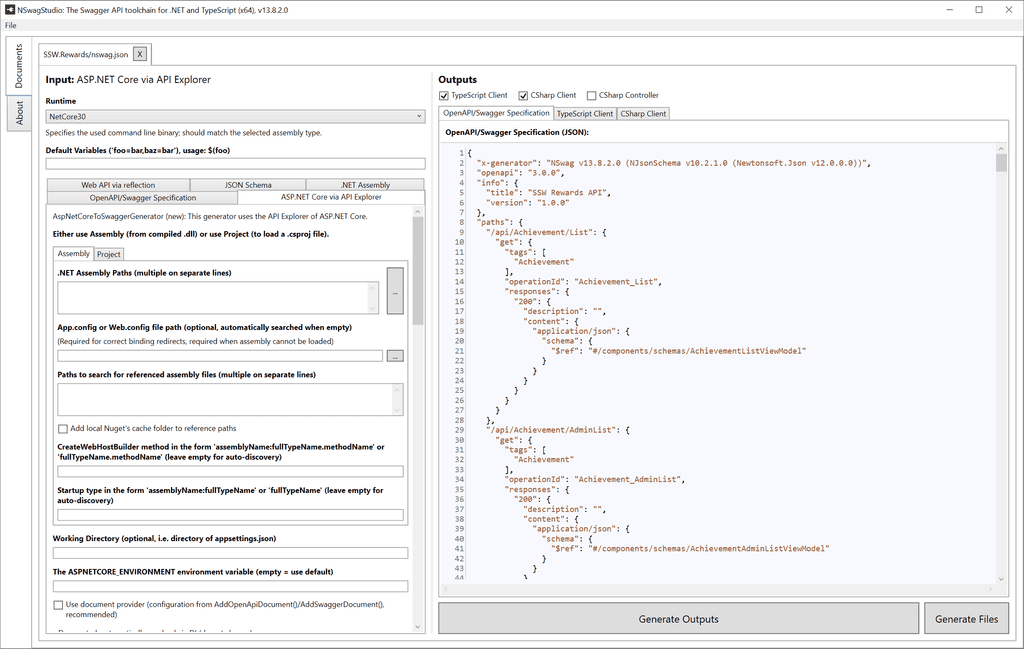
You can save time and reduce human error by automatically generating clients for your APIs.
The best tool for this is NSwag.
This is Microsoft's recommended approach, and you can read more about how to set this up in your ASP.Net Core project at the official documentation.
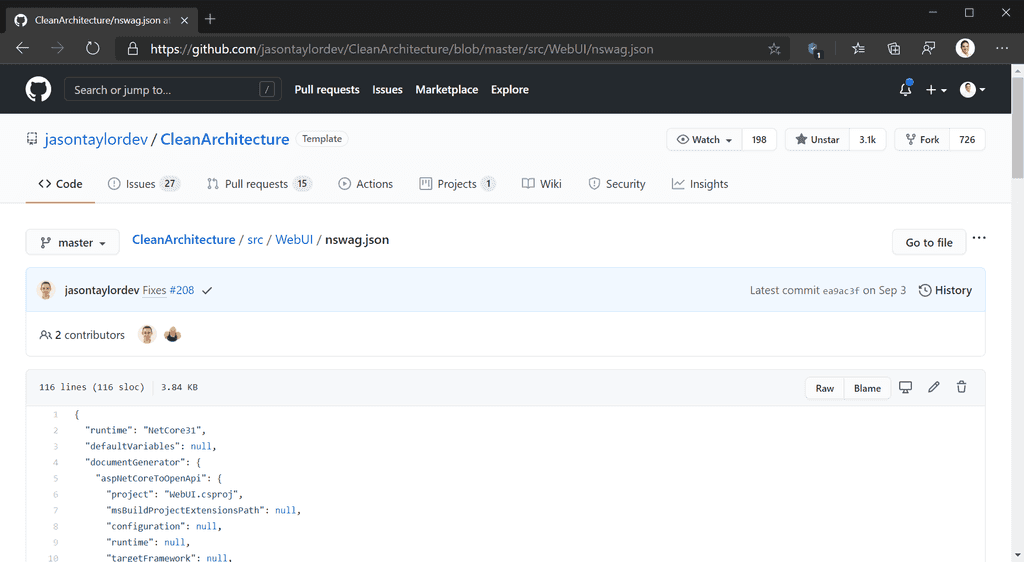
If you use the Clean Architecture template developed by SSW, this is built in out of the box. See our rule on getting started with clean architecture.
As an API provider, one of your most important tasks is to make sure that breaking changes will never occur in your API. Making breaking changes will make life difficult for the developers who depend on your service and can easily start causing frustration when things start to break.
There are typically three main ways people provide versioning.
- Change the URL: Append a version number in the path e.g. https://developer.github.com/v3/ 1. Best choice for anonymous API access (callers may not be authenticated) 2. E.g. Github, Twitter
-
Based upon caller:The caller has been authenticated and you determine the version of the API based upon the customer's record.
- Your URL's never change
- Allows you to see the oldest version that customers are using and notifying customers to upgrade
- E.g. Salesforce
-
Custom request header:You can use the same URL but add a header such as "api-version: 2"
- Your URL's never change
All of these methods work well. The above list is in order of our recommendations.
Option 2 is a viable solution as you only have a few authenticated users that will consume the web service. It also allows you to notify users if they are using an old version that will be decommissioned.
If you are working with objects, keep the object id in the URL and leave everything else to the query string.
When the Web API creates a resource, it should include the URI of the new resource in the Location header of the response.
public Product PostProduct(Product item)
 {
 item = repository.Add(item);
 return item;
 }
Figure: Bad example – The response does not contain a reference to the location of the new resource
public HttpResponseMessage PostProduct(Product item)

{

    item = repository.Add(item);

    var response = Request.CreateResponse(HttpStatusCode.Created, item);


    string uri = Url.Link("DefaultApi", new { id = item.Id });

    response.Headers.Location = new Uri(uri);

    return response;

}
Figure: Good example – The response message contains a link in the header to the created resource (plus the “Created” status code is returned)
Good error design is as important to the success of an API as the API design itself. A good error message provides context and visibility on how to troubleshoot and resolve issues at critical times.
REST API
Use the correct HTTP Status Codes
The HTTP/1.1 RFC lists over 70 different HTTP Status Codes. Only some developers will be able to remember all of them, so it pays to keep it simple and use the most common Status Codes. Below are the most common HTTP status codes:
-
2XX - Success. Examples:
- 200 OK - Generic success response.
-
4XX - Client errors. Examples:
- 400 Bad Request - The server cannot understand the request.
- 401 Unauthorised - Invalid/non-existent credential for this request.
-
5XX - Server errors. Examples:
- 500 Internal Server Error - The server encountered errors preventing the request from being fulfilled.
Use ProblemDetails Format
RFC 7807 - Problem Details for HTTP APIs details the specification for returning errors from your API.
Problem Details defines a standardised way for HTTP APIs to communicate errors to clients. It introduces a simple and consistent format for describing errors, providing developers with a clear and uniform way to understand and handle errors in HTTP APIs.
Below is an example of an error message in Problem Details format:
{
  "type": "https://example.com/probs/invalid-id",
  "title": "Invalid ID",
  "status": 400,
  "detail": "The provided ID has invalid characters.",
  "instance": "/account/12%203",
  "allowedCharacters": "^[a-zA-Z0-9]+$"
}
In the above example:
typespecifies a URI that uniquely identifies the type of the problem.titleprovides a short, human-readable summary of the problem.statusindicates the HTTP status code for the response.detailgives a human-readable explanation specific to the occurrence of the problem.instanceprovides a URI reference that identifies the specific occurrence of the problem.allowedCharactersis an example property specificly added to the problem.
Using the above structured message format, APIs can now reliably communicate problems to clients to enable better error handling.
Use .NET Exception Handler
ASP.NET Core has built-in support for the problem details specification since .NET 7.
Option 1 - Use built-in ProblemDetails service
// Program.cs
// This adds ProblemDetails service
// Read more on https://learn.microsoft.com/en-us/aspnet/core/fundamentals/error-handling?view=aspnetcore-8.0#problem-details&WT.mc_id=DT-MVP-33518
builder.Services.AddProblemDetails();

...

// This instructs the API to use the built-in exception handler
app.UseExceptionHandler();
Using this option, the API will generate a problem details response for all HTTP client and server error responses that don't have body content yet.
You can also customise the
ProblemDetailsServicebehaviour - read more about it in the following link Handle errors in ASP.NET Core | Customise Problem Details.⚠️ Important On certain templates, the default .NET Exception Handler middleware will only produce ProblemDetails responses for exceptions when running in a non-Development environment. See Option 2 below on how to make this consistent across environments.
Option 2 - Customise Exception Handler Middleware (Recommended)
This option provides more flexibility in controlling the API's behaviour when it encounters thrown exceptions. Read more about it here. By Customising the
ExceptionHandlermiddleware, developers have complete control over what format endpoints should return under a particular scenario.Below is an example of customising the
ExceptionHandlermiddleware to produce aProblemDetailsresponse for any exception.app.UseExceptionHandler(exceptionHandlerApp => exceptionHandlerApp.Run(async context => { // Obtain the exception Exception? exception = context.Features.Get<IExceptionHandlerFeature>()?.Error; // Produce a ProblemDetails response await Results.Problem( statusCode: StatusCodes.Status500InternalServerError, type: "https://tools.ietf.org/html/rfc7231#section-6.6.1", title: exception?.Message ).ExecuteAsync(context); }));API will produce consistent response formats in any environment using the above approach.This approach is the recommended approach for frontend and backend development.
Any API (REST, gRPC and GraphQL)
Add Sufficient Details in Error Message
Error messages should contain sufficient information that a developer or consuming client can act upon.
{
  "errorMessage": "An error has occurred."
}
Figure: Bad example - The error message does not contain information that can be acted upon
{
  "errorMessage": "Client ID is a required field. Please provide a Client ID."
}
Figure: Good example - The error message provides explicit detail and a short description on how to fix the issue
Sanitize Response
HTTP/1.1 500 Internal Server Error
Transfer-Encoding: chunked
Content-Type: text/plain
Server: Microsoft-IIS/10.0
X-Powered-By: ASP.NET
Date: Fri, 27 Sep 2019 16:13:16 GMT

System.ArgumentException: We don't offer a weather forecast for chicago. (Parameter 'city')
   at WebApiSample.Controllers.WeatherForecastController.Get(String city) in C:\working_folder\aspnet\AspNetCore.Docs\aspnetcore\web-api\handle-errors\samples\3.x\Controllers\WeatherForecastController.cs:line 34
   at lambda_method(Closure , Object , Object[] )
   at Microsoft.Extensions.Internal.ObjectMethodExecutor.Execute(Object target, Object[] parameters)
   at Microsoft.AspNetCore.Mvc.Infrastructure.ActionMethodExecutor.SyncObjectResultExecutor.Execute(IActionResultTypeMapper mapper, ObjectMethodExecutor executor, Object controller, Object[] arguments)
   at Microsoft.AspNetCore.Mvc.Infrastructure.ControllerActionInvoker.<InvokeActionMethodAsync>g__Logged|12_1(ControllerActionInvoker invoker)
   at Microsoft.AspNetCore.Mvc.Infrastructure.ControllerActionInvoker.<InvokeNextActionFilterAsync>g__Awaited|10_0(ControllerActionInvoker invoker, Task lastTask, State next, Scope scope, Object state, Boolean isCompleted)
   at Microsoft.AspNetCore.Mvc.Infrastructure.ControllerActionInvoker.Rethrow(ActionExecutedContextSealed context)
   at Microsoft.AspNetCore.Mvc.Infrastructure.ControllerActionInvoker.Next(State& next, Scope& scope, Object& state, Boolean& isCompleted)
   at Microsoft.AspNetCore.Mvc.Infrastructure.ControllerActionInvoker.InvokeInnerFilterAsync()
--- End of stack trace from previous location where exception was thrown ---
   at Microsoft.AspNetCore.Mvc.Infrastructure.ResourceInvoker.<InvokeFilterPipelineAsync>g__Awaited|19_0(ResourceInvoker invoker, Task lastTask, State next, Scope scope, Object state, Boolean isCompleted)
   at Microsoft.AspNetCore.Mvc.Infrastructure.ResourceInvoker.<InvokeAsync>g__Logged|17_1(ResourceInvoker invoker)
   at Microsoft.AspNetCore.Routing.EndpointMiddleware.<Invoke>g__AwaitRequestTask|6_0(Endpoint endpoint, Task requestTask, ILogger logger)
   at Microsoft.AspNetCore.Authorization.AuthorizationMiddleware.Invoke(HttpContext context)
   at Microsoft.AspNetCore.Diagnostics.DeveloperExceptionPageMiddleware.Invoke(HttpContext context)

HEADERS
=======
Accept: */*
Host: localhost:44312
User-Agent: curl/7.55.1
Figure: Bad example - this level of data should not be returned in a production environment
Provide a Tracking or Correlation ID
A tracking or correlation ID will allow the consuming clients to provide the API developers with a reference point in their logs.
{
  "errorMessage": "An error has occurred. Please contact technical support"
}
Figure: Bad example - No tracking or correlation ID is provided
{
  "errorMessage": "An error has occurred. Please contact technical support",
  "errorId": "3022af02-482e-4c06-885a-81d811ce9b34"
}
Figure: Good exmaple - A error ID is provided as part of the reponse
Provide an additional Help Resource
Providing a URI to an additional help resources as part of your request will allow consuming clients to find additional resources or documentation that relates to the defined problem.
{
  "ErrorType": "DoesNotExist",
  "Id": "3022af02-482e-4c06-885a-81d811ce9b34",
  "Message": "No Client with a ID of 999999999 was found",
  "StatusCode": 404
}
Figure: Bad example - No help link provided
{
  "ErrorType": "DoesNotExist",
  "HelpLink": "http://www.myapiapplication/api/help/doesnotexist",
  "Id": "3022af02-482e-4c06-885a-81d811ce9b34",
  "Message": "No Client with a ID of 999999999 was found",
  "StatusCode": 404
}
Figure: Good example - A help link is provided as part of the response
-
The use of correct response codes is a simple yet crucial step towards building a better WebAPI. In ASP.NET Core, by default the WebAPI framework sets the response status code to 200 (OK), regardless of whether the task succeed or an error occurred.
You can save yourself countless hours of painful debugging , by specifying the correct response code.
For example: According to the HTTP/1.1 protocol, when a POST request results in the creation of a resource, the server should reply with status 201 (Created).
public Product PostProduct(Product item)
 {
 item = repository.Add(item);
 return item;
 }
Figure: Bad Example – By default a 200 status code is returned.
[ResponseType(typeof(CreditSnapshot))]
 public HttpResponseMessage PostProduct(Product item)
 {
 item = repository.Add(item);
 var response = Request.CreateResponse(HttpStatusCode.Created, item);


 return response;
 }
Figure: Good Example – When creating objects the “Created” status code is returned.
public void PutProduct(int id, Product product)
{

    product.Id = id;

    if (!repository.Update(product))

    {

        return Request.CreateResponse(HttpStatusCode.NotFound, ex.Message);

    }

}
Figure: Good Example – When updating or deleting objects, if the object to be modified cannot be found throw exception with HttpStatusCode.NotFound
Client-side validation provides a great user experience but this must always be backed up by server-side validation.

Figure: Client-side validation does not provide effective data security for your Web API endpoints .NET and .NET Core Web APIs provide built-in support for validation using Data Annotations:
- Decorate your model classes with validation attributes, e.g. [Required], [MaxLength(60)]
- The MVC data binding system will automatically validate all entities sent to a controller and set ModelState.IsValid and ModelState.Values / Errors
- As per Do you apply the ValidateModel attribute to all controllers? you can create an attribute to apply this validation to all your Web API endpoints
Fluent Validation improves the built-in capabilities in a number of ways:
- It is outside of your ApiController, so can be shared with other API protocols (like GraphQL or gRPC).
- It plugs directly into the existing data binding and validation engine (as above) so you can adopt Fluent Validation without changing the client-side
- It is also easy to apply Fluent Validation to inner layers of your application
- You can specify multiple rulesets for a model without modifying the model itself
- Fluent validation uses a powerful Fluent API with LINQ expressions
using FluentValidation;

public class CustomerValidator: AbstractValidator<Customer> {
  public CustomerValidator() {
    RuleFor(x => x.Surname).NotEmpty();
    RuleFor(x => x.Forename).NotEmpty().WithMessage("Please specify a first name");
    RuleFor(x => x.Discount).NotEqual(0).When(x => x.HasDiscount);
    RuleFor(x => x.Address).Length(20, 250);
    RuleFor(x => x.Postcode).Must(BeAValidPostcode).WithMessage("Please specify a valid postcode");
  }

  private bool BeAValidPostcode(string postcode) {
    // custom postcode validating logic goes here
  }
}
Good example: Fluent Validation uses LINQ expressions allowing the development of powerful, type-checked rulesets without needing to modify the class under validation.
- You can write conditional rules with the .When clause. This is great for complex form validation.
RuleFor(x => x.Discount).NotEqual(0).When(x => x.HasDiscount);Good Example: Conditional validation with the .When() clause allows for complex logic such as “Discount number cannot be 0 if the HasDiscount boolean is true”
- Fluent Validation provides a great entry-point for writing your own custom, complex rules. For most modern Web APIs the response type is usually JSON. The validation errors raised by Fluent Validation serialize easily to JSON making it fairly trivial to handle these errors from whatever client-side framework you are using.
{
  "CompanyName": ["The CompanyName field is required."]
}
Good Example: This is the JSON returned from Fluent Validation when a validation rule fails. This is exactly the same format as what would be returned by the built-in ModelState validation.
REST APIs are everywhere in our daily lives — from social media updates and online shopping to weather forecasts and GPS navigation. These interfaces allow different applications to connect seamlessly, providing the backbone for countless modern conveniences.
Video: Good APIs Vs Bad APIs: 7 Tips for API Design (6 min)Recommended configuration for most REST APIs
Building a high-quality API means adhering to best practices that enhance clarity, reliability, and security, creating a more consistent experience for developers and users.
1. Security
Most REST APIs are hosted online, and you don't want to rely on "security via obscurity". Ensure you spend time hardening your surface area.
Common sense approaches include protecting your endpoints via short-lived access tokens (even for seemingly benign functionality), as well as your typical security headers such as:
- Content-Security-Policy (CSP)
- Strict-Transport-Security (HSTS)
- X-Content-Type-Options
- X-Frame-Options
Enforce HTTPS for encrypted communication and consider OAuth for user authentication and authorization, protecting against unauthorized access.
2. Clear naming
Choose descriptive, intuitive names for endpoints and parameters following REST conventions.
- Use nouns and verbs logically (e.g.,
/api/usersfor accessing user data,/api/users/{id}for specific user information) - Endpoints should also use plurals. i.e
/api/usersinstead of/api/user
This provides a much more consistent API structure when querying both collections and single entities.
3. Idempotent requests
Design requests as idempotent operations, where repeating an action yields the same result as performing it once. This avoids unintended actions from repeated requests.
Typically,
GET,PUTandDELETEare idempotent by default, but special handling needs to be added to makePOSTrequests idempotent.If a
DELETErequest removes a record, re-sending it should not throw errors if the record is already deleted.Figure: Good example - This prevents accidental duplicate data processing
4. Pagination
For endpoints that return lists, it's best to apply pagination to prevent overwhelming the client with too much data.
When paging parameters are omitted from the request, the API should apply some sensible defaults (e.g. page 1, 50 records).
Use query parameters like
?page=and?limit=to specify page numbers and size, offering a more manageable data experience while improving performance.5. Meaningful query parameter names
When supporting sorting, apply clear query strings. Query params should generally be optional making the API easier to consume.
Consistent sorting parameters allow developers to retrieve and organize data efficiently and minimize confusion in handling API responses.
`?x=name&y=asc`Figure: Bad example - It's impossible to understand what those query string mean!
`?sortBy=name&order=asc`Figure: Good example - Query strings are meaningful
6. Simple cross-resource references
For APIs that reference multiple resources (e.g.,
userIdin a post endpoint), keep relationships simple to prevent over-complicating endpoints.Provide clear references or IDs rather than nested data whenever possible to keep API responses readable and easy to follow.
`api/products?user_id=123&product_id=321`Figure: Bad example - Messy query parameter
`api/orders/123/items/456/products/789`Figure: Bad example - Overly complicated endpoint
`api/products/789`Figure: Good example - Clearly defined endpoint
Optional configurations
These other design choices may only be required in certain circumstances. You should consider the specific use case of your API e.g. public facing or under heavy load.
7. Rate limiting
Rate limiting controls the number of requests per user within a time frame, protecting the API from abuse.
When adding rate limiting you should provide appropriate status codes and messages (e.g.,
HTTP 429) when limits are reached.8. Caching
- Implement caching for frequently requested data to reduce server load and response times
- Cache static data responses at the client or server side where appropriate, especially for resources that don't change frequently
- Use HTTP cache headers like
Cache-ControlandETagto guide clients on when to use cached data or refresh it, balancing speed and data freshness
9. Compression
Enabling compression for API responses, especially for large data payloads, reduces bandwidth and improves loading times.
- Use GZIP or Brotli compression formats, which are widely supported and effective in reducing data sizes
10. Versioning
Introduce versioning from the start (e.g.,
/v1/resource) to maintain backward compatibility when updating the API.Versioning helps users manage changes without breaking existing implementations, allowing them to adopt new features gradually. There are 3 common ways to implement versioning:
- Route
- Query String
- Header
For more details, see Do you provide versioning?
