Rules to Better Scrum using Azure DevOps (Work Items) - 19 Rules
Learn more on Rules to Better Scrum.
When initiating a new project in Azure DevOps, selecting the right template is crucial as it sets the groundwork for project management and collaboration. The Scrum template is a recommended choice due to its adherence to widely recognized Scrum terminology and practices. This rule guides you on how to select the Scrum template and elaborates on the benefits of doing so.
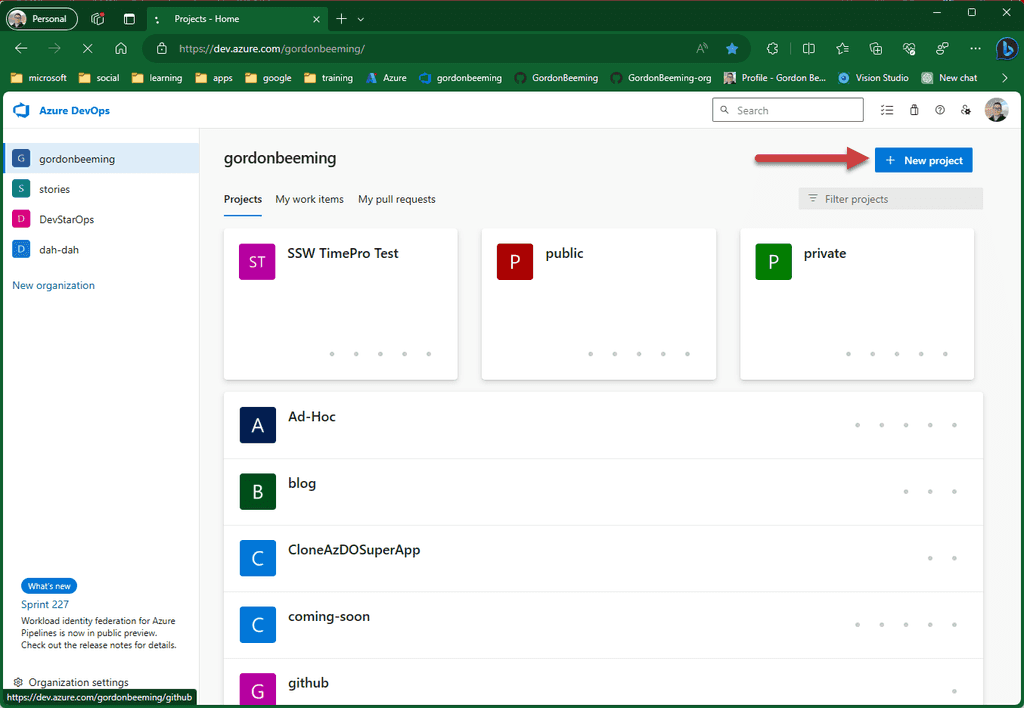
- Go to Azure DevOps | New Project.
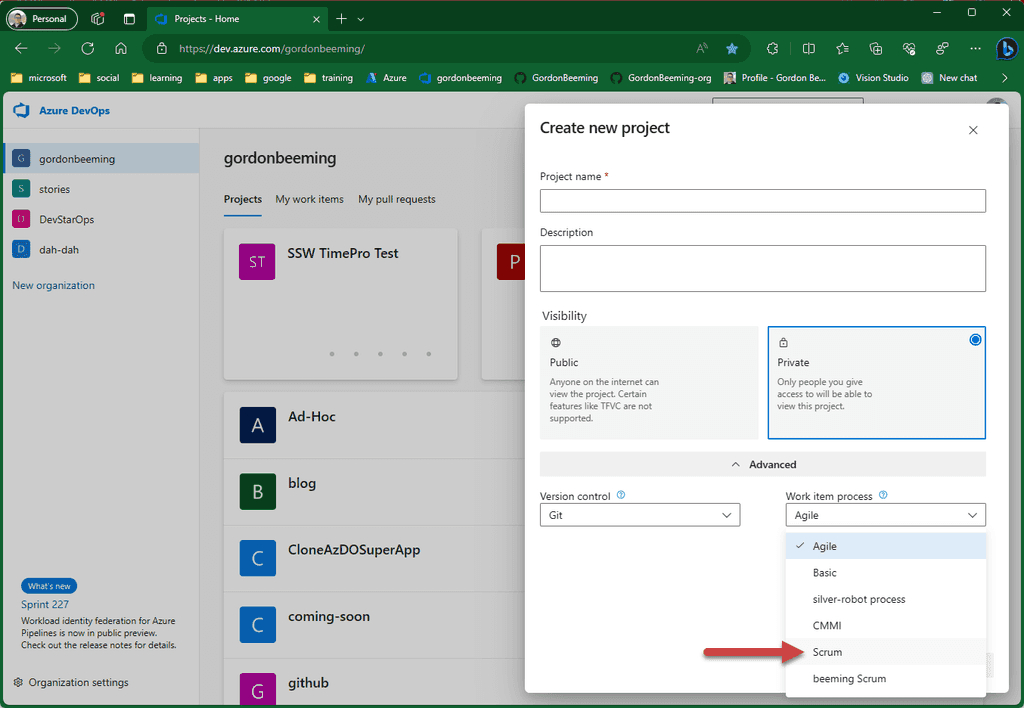
- Fill in the Name, Description, Visibility.
- Click Work item process | Scrum.
- Click Create.
Using the Scrum template has its fair share of cool perks:
Terminology: The work item types and states are all in Scrum-speak, which helps everyone on the team get on the same page quickly.
Consistency: It keeps things uniform across projects, so jumping in and out or teaming up is a breeze.
Azure DevOps does have other templates like Agile and CMMI, but the Scrum template has a special spot. It sticks to the Scrum playbook, making it a go-to for teams keen on keeping the Scrum spirit alive. It's all about boosting agility, making chats flow easily, and letting new folks blend in without a hitch.
Prior to your meeting with the customer you should prepare. Get your Sprint Planning (was Release Plan) email ready, so after the meeting you can adjust and promptly send it.
Learn how to create your Sprint backlog:
Once the backlog is ready, you should send the Sprint Forecast email to the client.
In Scrum you work only on tasks in a Sprint, and the task must belong to a committed PBI. As such, when you commit code in Azure DevOps (was TFS), you should associate it with the task you are working on rather than the PBI.
The reason behind this is that doing so provides a better way to track change sets in a Sprint and give full traceability for work done during the Sprint.
Change set 123 was associated to PBI 'As an end user I want to be able to lookup customers'
Bad Example - The change set was associated to a User Story not a Task
Change Set 123 was associated to Task 'Create database fields for customer' which is part of PBI 'As an end user I want to be able to lookup customers
Good Example - The change set was associated to a Task
Emails are a natural way for people to give feedback about a product. Unfortunately, they also serve as a poor mechanism for performing work. As work is done, the thread can become untenable by splitting off into multiple different threads and becoming buried among other emails.
That's why when a feedback email is received, it is important to turn it into a Product Backlog Item (PBI) and communicate that back to the sender.
If someone often sends email tasks rather than creating PBIs, kindly suggest they create PBIs directly to save time and keep workflows organized.
✅ Benefits of turning emails into PBIs
There are several benefits of turning an email into a PBI including:
- Providing one source of truth
- Better prioritization
- Easily accessible by anyone in the team
When should the email become a PBI?
You should use your judgement to decide if the email needs to become a PBI. For example:
- Does the email contain 1 or more actionable tasks? If not, do not turn into an PBI
- Does the feedback contain confidential information that should not be on the backlog? If so, do not turn into an PBI
- Will the task take less than 15 minutes to complete? If so, do not turn into an PBI and follow the "touch it once" principle and do it immediately
- Is the emails marked urgent? If so, do not turn into an PBI. Urgent emails should be done immediately unless they are clearly not an emergency
Use the following flow chart to determine if an urgent email should be turned into a PBI.
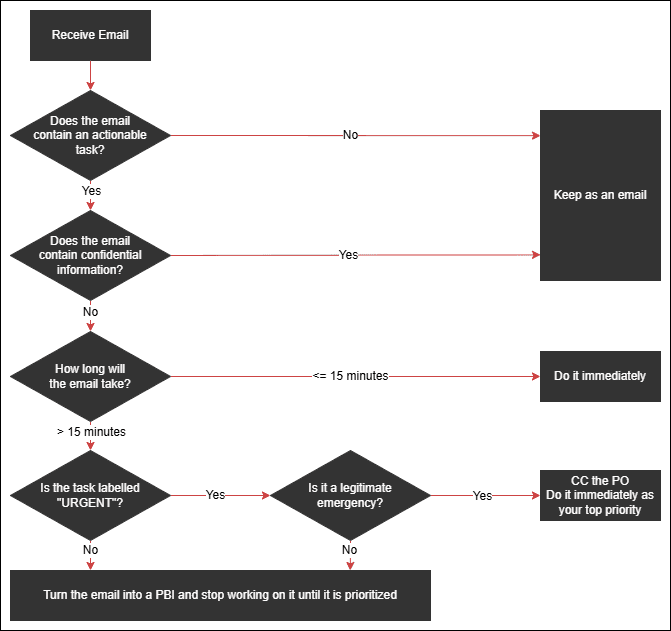
Figure: Should the email be turned into a PBI? New PBI - Steps to turn an email into a PBI
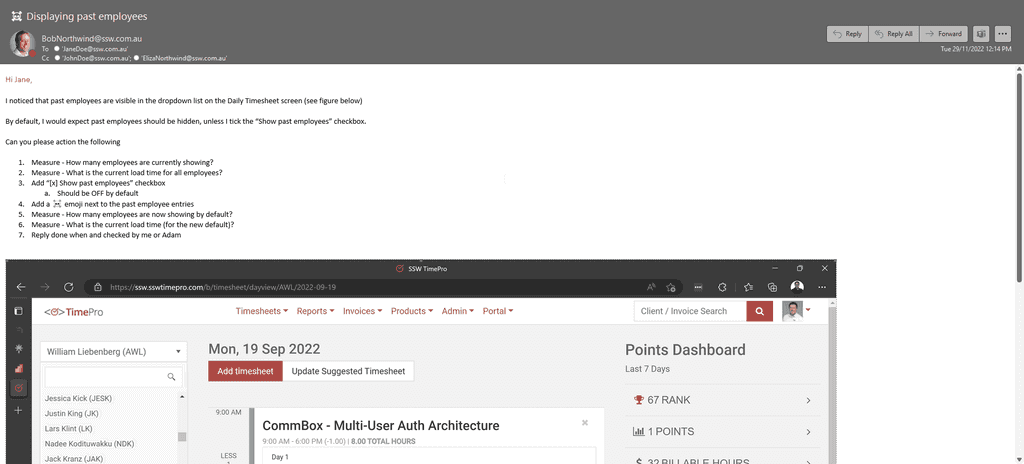
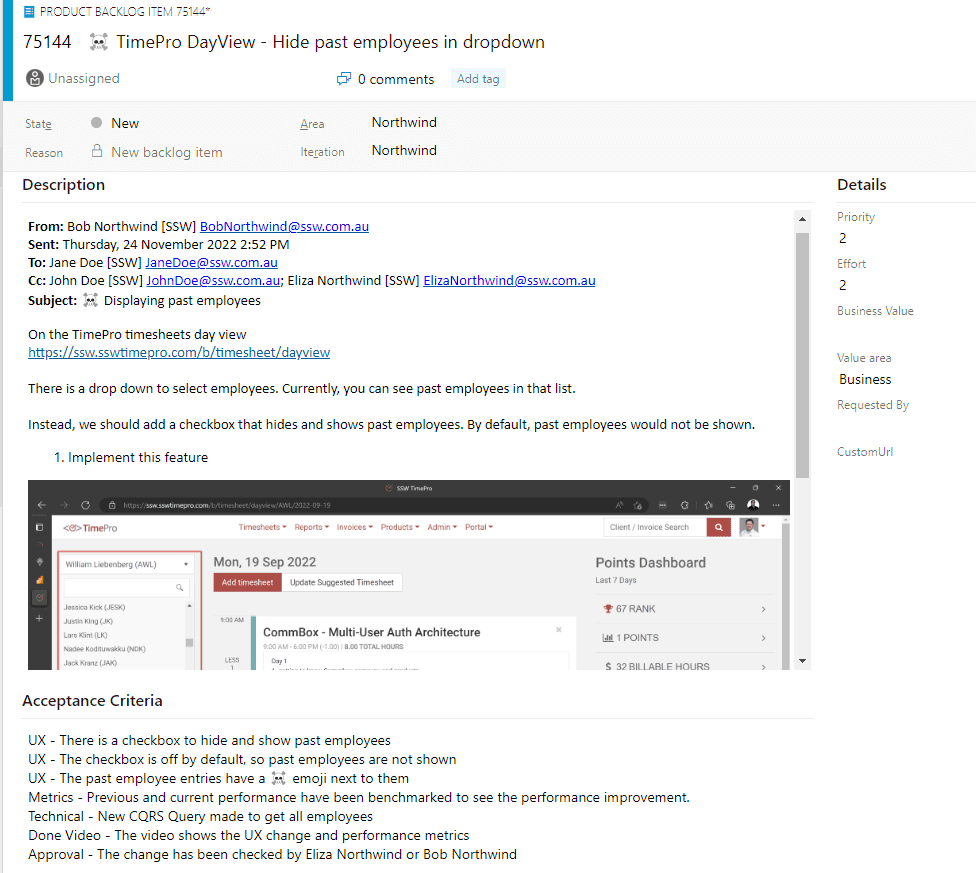
It's important that you follow the right steps so that the PBI contains all the information someone would need to find the original email thread, and also so that the original sender knows where the PBI is, and whether it has completed.
- Create a PBI in the backlog and give it a name
- Copy the email header into the top of the PBI, indent it and add the words "Based on email chain:" so that the email can be found later
- If possible, replace the users with @mentions, if you'd like to keep those users informed
- Fill out the Description
- Ensure that the Product Owner is @mentioned in the PBI
- Add an Acceptance Criteria: "Reply 'Done' to all emails mentioned in this PBI and @mention the sender with 'Done'"
- Prioritize the PBI. If it is important, then it should be added at the top of the Product Backlog after the current Sprint items. Otherwise, you should make your best guess as to its priority.
- Reply back to the original email saying: "That's awesome feedback, we have a PBI for prioritization: {{ URL }}
For future issues, if you have access, please add your comments to items in that backlog 🙂"
Based on email chain:
From: Bob Northwind "BobNorthwind@northwind.com"
Sent: Thursday, 24 November 2023
To: Jane Doe "JaneDoe@northwind.com"
Cc: John Davis "JohnDavis@northwind.com"; Eliza Northwind "ElizaNorthwind@northwind.com"
Subject: TimePro PBI 50209: ☠️ Displaying past employeesFigure: OK example - Has the email header data but not @mentioning users
Based on email chain:
From: @BobNorthwind
Sent: Thursday, 24 November 2023
To: @JaneDoe
Cc: @JohnDavis @ElizaNorthwind
Subject: TimePro PBI 50209: ☠️ Displaying past employeesFigure: Good example - Has the email header data and @mentions users
Tip: If the request from the client is too large for one PBI, then it will need to be turned into multiple PBIs as per the rule Do you keep your PBIs smaller than 2 days' effort? In this case, you will need to let the client know this and include URLs to each PBI
Existing PBI - Steps to update a PBI according to an email comment
Sometimes you'll receive feedback on an existing PBI in an email or a Word document. Make sure those files are attached to the corresponding PBI, and let the sender know once it's done.
- Copy the email header into to a comment within the PBI, indent it and add the words "Based on email chain:"
- If possible, replace the users with @mentions, if you'd like to keep those users informed
- Add an Acceptance Criteria: "Reply 'Done' to all emails mentioned in this PBI and @mention the sender with 'Done'"
Keeping the PBI up-to-date
If there is more communication in emails at a later date, it's important to make sure the PBI stays in sync with the emails. Otherwise, the source of truth will become confusing since there will be differing information in 2 places.
When there is a new update in emails do the following ASAP:
- Update the PBI with any relevant information
- Mention that it was updated as per the email thread in the discussion
Escalating key updates after completing a PBI
Once you’ve turned an email into a PBI and the work is complete, it’s crucial to ensure that all relevant stakeholders are informed about key updates or deliverables.
Refer to rule on escalating key updates and deliverables for guidance on how to share critical updates effectively.
For example:
- After completing a Done Video or resolving a major issue, communicate results via email to ensure visibility
- Use emails for high-priority updates that require stakeholder attention
- Keep @mentions in PBIs for less critical updates
This ensures a seamless workflow from task creation to stakeholder communication, preventing updates from being missed.
Turn emails into tickets
If you use a ticketing system like Zendesk, you should follow a similar process to the above to turn emails with tasks into tickets.
- Reply All to the email, add "(zendesking)" to the top and remind the sender that the email should have been sent to Zendesk instead, e.g. "Please remember to send tasks to our Zendesk address in the future :)"
- CC your Zendesk email address on the reply - no need to copy the header info, since this will already be included
- When the task is done (or if there are other updates), reply in Zendesk - the email will go to everyone originally included in the email
To: Bob Cc: Tim, SysAdmins@northwind.zendesk.com Subject: Re: Add me to Azure DevOps Figure: Good example - send it to Zendesk!
In Scrum it's important to flesh out the details of a PBI when it makes sense to do so.
You should estimate your PBIs as soon as you can, but you don't need to break all of your PBIs down into fully-estimated tasks as soon as they're added to the backlog.
However, before starting work on a Sprint, you should always break the PBIs in that Sprint into estimated tasks.
Azure DevOps can use the remaining hours assigned to tasks to calculate the burndown. By breaking the PBIs down into tasks with estimates, your burndown will start looking correct right from the first day of the Sprint.
Note: If you're not using task estimates, you can configure Azure DevOps to create a Sprint Burndown using PBI Effort instead.
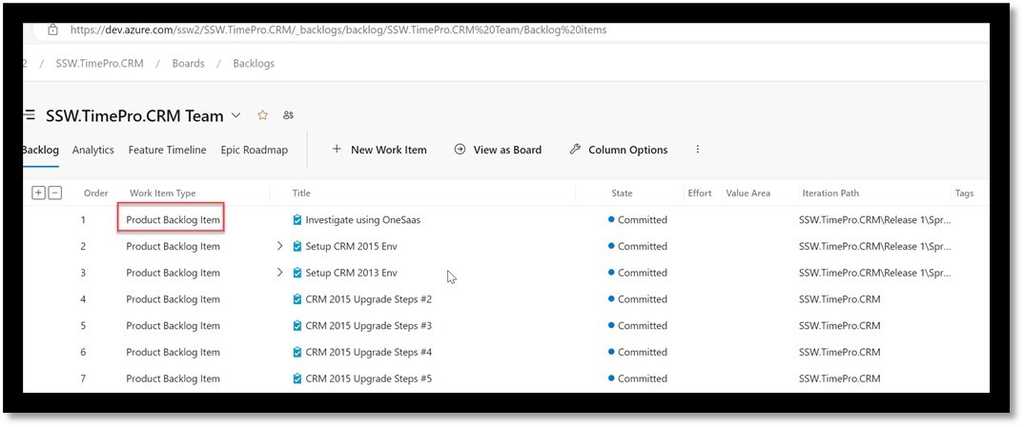
A PBI (Product Backlog Item) is a term commonly used in Agile project management and software development to represent a unit of work. It refers to an item in the Product Backlog, which is a prioritized list of features, enhancements, or fixes to be addressed in a project.
Before a PBI is worked on it should be added to the current Sprint Backlog during Sprint Planning. If your PBI doesn't exist, or is in an email then you need to turn it into a PBI to be prioritized in Sprint Planning.
Tip: After reviewing a PBI, don’t forget to react with 👍 or 👎 to show it’s been validated.
Use YakShaver and make it even easier
You can save time by not writing PBIs manually.
With YakShaver, simply record your message and let the AI do the rest. YakShaver writes a clear and complete PBI, GitHub Issue, or even an email (for projects without a backlog), mentioning the right people and assigning it to the correct team.
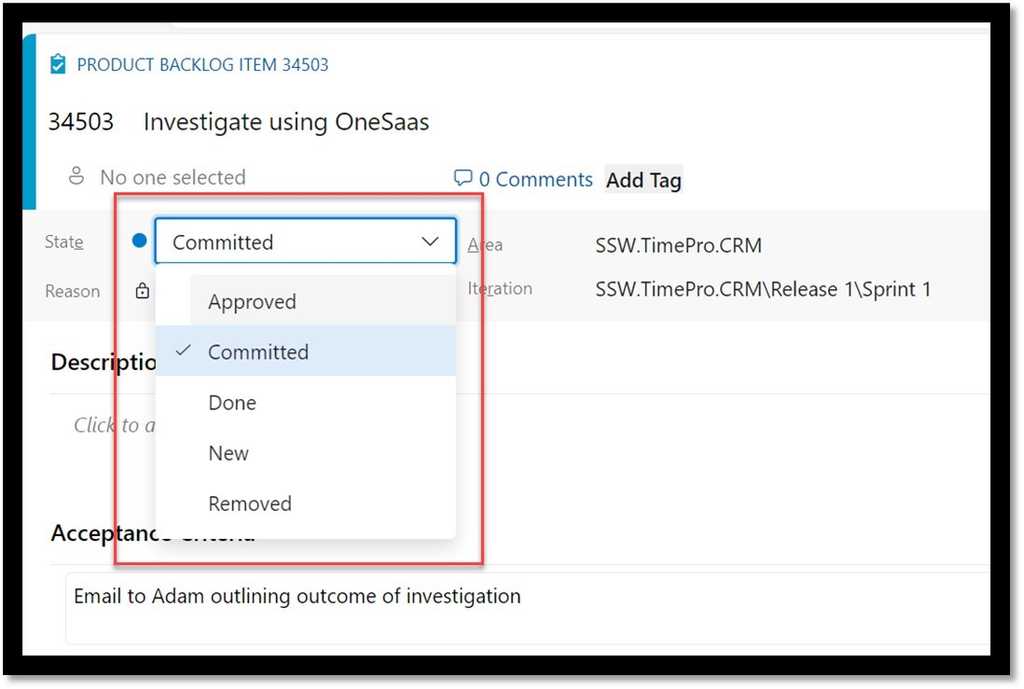
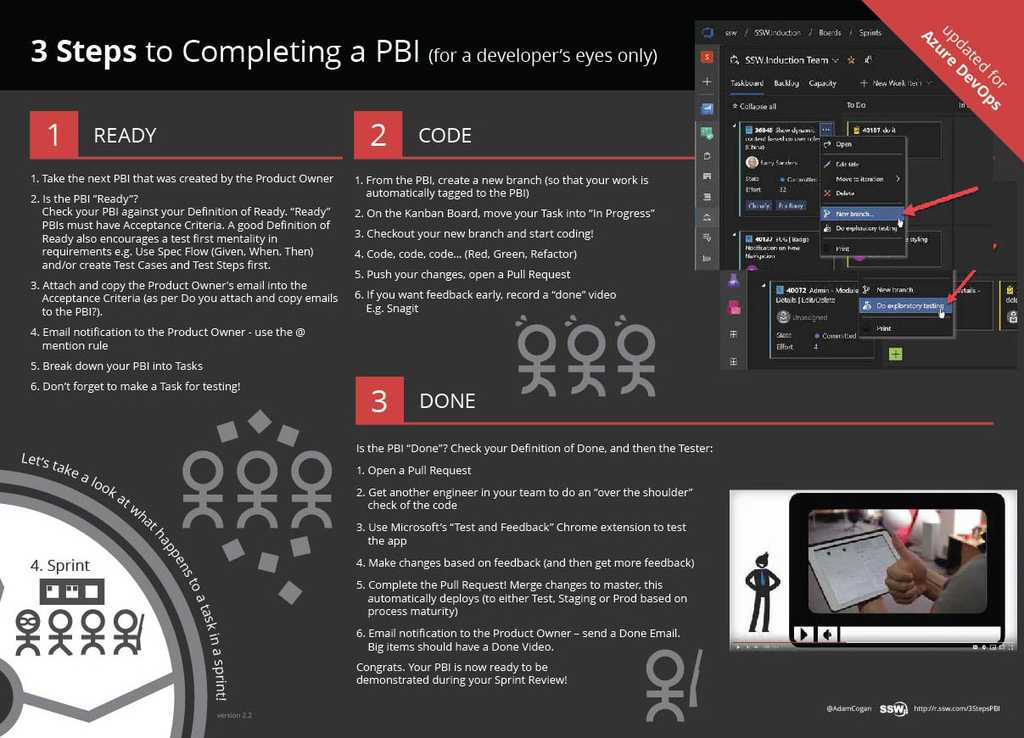
Once a PBI is in the Sprint Backlog, it's lifecycle can be broken down into 3 steps:
1. Ready
You have a Sprint Backlog of PBIs (tasks, features, and fixes) which are already prioritized and approved by the Product Owner.
- Choose a PBI and assign yourself to it
- Double check the Definition of Ready
- Break the PBI into tasks (optional)
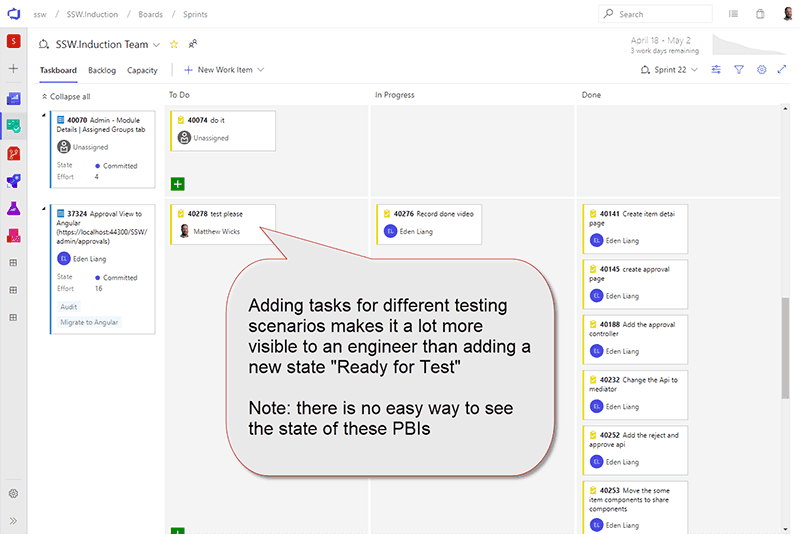
Figure: "Testing Task" added to a PBI. This is the board the team will use for 90% of the Sprint so that testing is visible to everyone 2. Time to Code
This step depends on the complexity and nature of the task, especially if the PBI involves intricate coding or extensive testing to meet the defined Acceptance Criteria.
- Move PBI to "In Progress"
- Create a branch
- Code, code, code... (make sure to Red-Green-Refactor)
- Make a Pull Request with lots of context
- Get an "over the shoulder" review
- Record a Done Video so you get your ducks in a row for the explanation to the Product Owner
- Show the Product Owner so they give you earlier feedback
- Action the feedback (and then get more feedback)
- Check your Definition of Done and complete the Pull Request!
3. Done
This should be the easiest part!
- Check code is deployed 🚀
-
Reply 'done' to the PBI and also in the email thread, as per when to send a 'done' email in Scrum
Note: Remember to close PBIs, tasks and goals with context
- Close the PBI
Congrats, your PBI is ready to be demonstrated during your Sprint Review!
Print out the SSW 3 Steps to a PBI PDF and put it on your "War Room" wall.
When an Issue or Product Backlog Item (PBI) is created, it's important that team members review the title and content to ensure it is clear and correct.
Video: Liking Github issues when they are read | Adam Cogan (2 min)Once you've done that, react with a 👍 (like) to show you have read and agree.
If you don’t agree with a GitHub issue, please leave a quick comment to share why so everyone can understand your 👎 (dislike) and keep the discussion helpful.
This is especially useful for PBIs created by YakShaver, as those are ai-generated and may need refinement.

Figure: Good example - A clear indication to the team that this GitHub Issue has been reviewed and validated This small action keeps everyone informed and encourages collaboration and ownership across the team.
Bugs are often hard enough to resolve but when they don't detail how to reproduce the bug, or what the expected behaviour is, it wastes a lot of time and gets frustrating for the developers. Detail in a bug report is key to your teams effectiveness and success. This is not limited to bug reports, for example PBIs can be missing Acceptance Criteria.
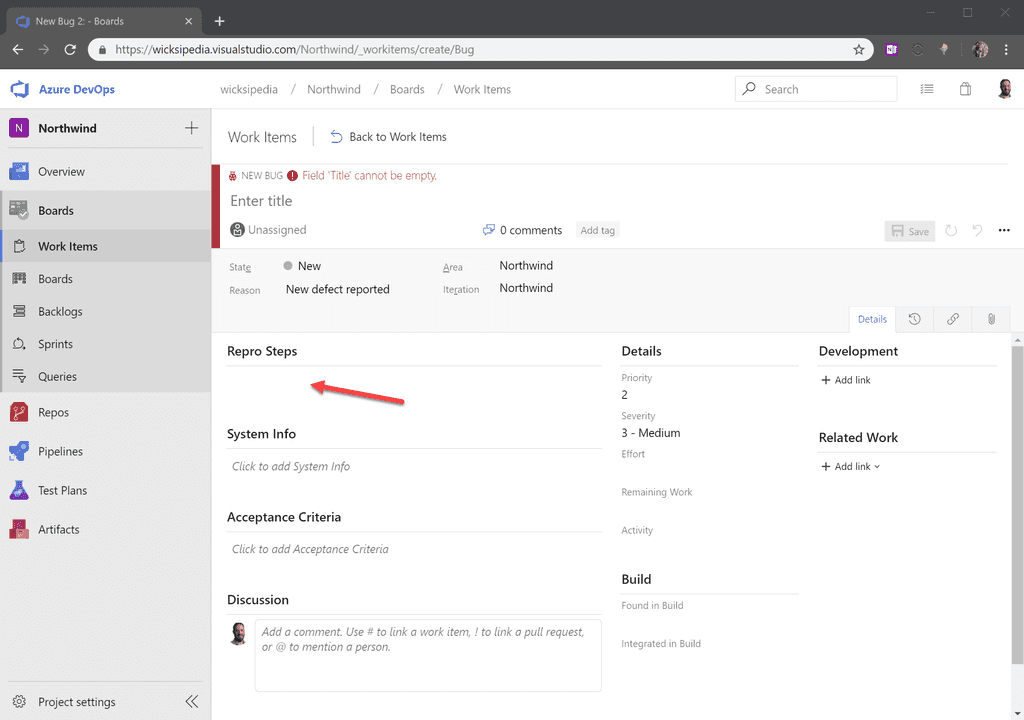
In Azure DevOps, a great way to ensure you capture all the information required is through templates for your work items. Templates allow you to guide users through all the required info in a clear and concise manner, ensuring you will always have clean and detailed steps to reproduce a bug.
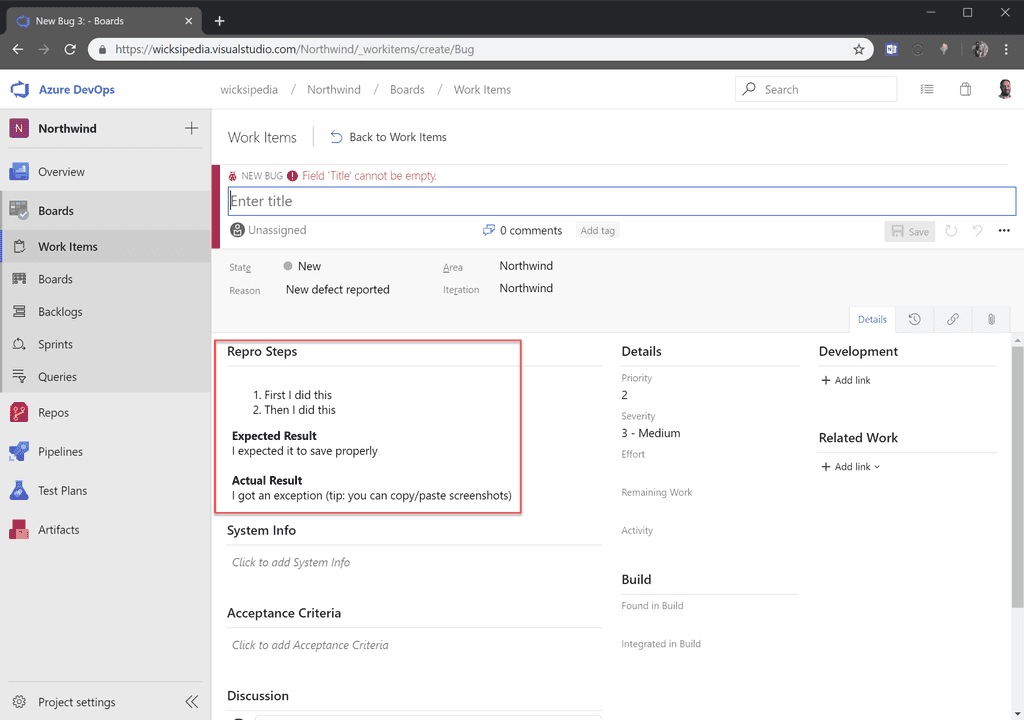
Good example – This new bug template guides the user to fill in the steps to repro in an ordered list and even prompts them to fill in what they expected to happen (and what actually happened) Setting this up is pretty easy:
- First you need to customize the template for a work item type
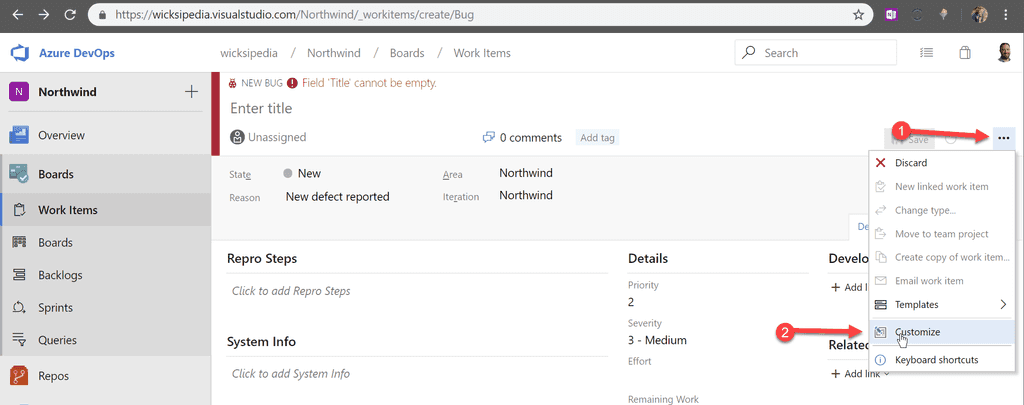
Figure: Customizing a bug work item - Choose the form control to edit
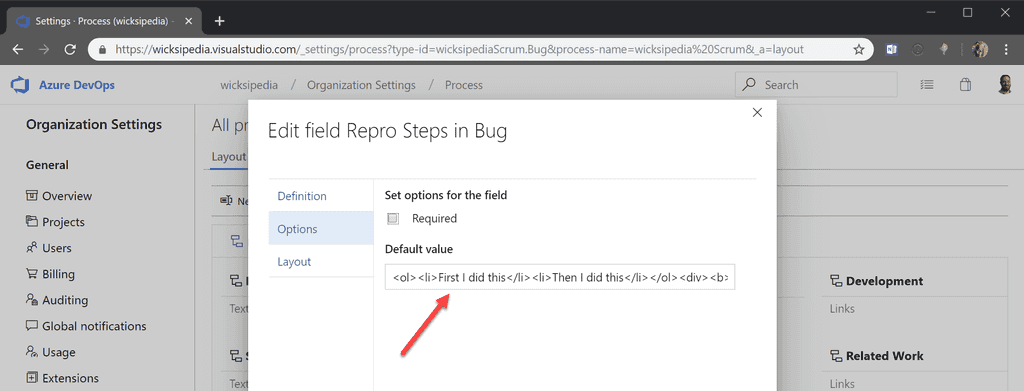
Figure: Set the default value for the Repro Steps field (Tip: use HTML) - Save Template
Sample code template
<!-- These comments automatically delete --> <!-- **Tip:** Delete parts that are not relevant --> <!-- Next to Cc:, @ mention users who should be in the loop --> Cc: <!-- add intended user next to **Hi** --> Hi ### Describe the Bug <!-- A clear and concise description of what the bug is. --> ### To Reproduce Steps to reproduce the behavior: 1. Go to '...' 2. Click on '....' 3. Scroll down to '....' 4. See error ### Expected Behavior <!-- A clear and concise description of what you expected to happen. --> ### Tasks - [ ] Investigate - [ ] Fix ### More Information <!-- Add any other context about the problem here. --> ### Environment - Device: [e.g. iPhone 12] - Browser: [e.g. chrome, safari] - OS: [e.g. iOS] ### Screenshots <!-- If applicable, add screenshots to help explain your problem. --> Thanks!- First you need to customize the template for a work item type
Bugs that are introduced and found because of the current work in the Sprint are included in the Sprint and estimated immediately so the burndown remains accurate. All other bugs found independent of the work on the current Sprint are placed on the Product Backlog.
See Do you know when to create bugs? for detailed information on identifying when something is a bug, and when to just fix it.
Using the Agile process template
In the Agile template, you can't assign Story Points to bugs, meaning that they will negatively impact on Sprint velocity.
Bugs found that are independent of the work on the current Sprint are placed on the Product Backlog as a work item “Bug”. The product Owner then ranks the Bugs with priority amongst the User Stories. Bugs cannot have Story Points allocated to them so User Stories need to be created with Bugs as Child Work Items. This is only done when the PO has prioritized the Bug and the Bug is likely to make the next Sprint. At the Planning Meeting, the PO elects which Bugs are to be included and new User Stories are created to group them appropriately with due regard to Severity and Stack Rank. Once the User Stories have been created, The Team estimates the Story Points for each one; the Product confirms User Stack Rank and the Sprint Backlog is planned as normal.
This process:
- Works around the problem of Bugs not having Story Points
- Allows Bugs of the same rank to be sensibly grouped together
- Prevents arbitrary groupings of Bugs which cannot be properly ranked
- Follows the estimate just-in-time philosophy of Scrum
- Prevents small Bugs taking up a whole Story Point
Using the Scrum process template
In the Visual Studio Scrum template, bugs are just another PBI and you can assign a business priority and an effort estimate in Story Points. Bugs that make the cut for the next Sprint can be broken down into tasks and estimated as required.
As bugs from previous Sprints are just PBI’s, the PO agrees to a list of bugs that will be fixed in the current Sprint.
The team just fixes any new bugs they introduced in the current Sprint.
If the team finds bugs due to functionality accepted in a previous Sprint they log it as a PBI and will complete the fix in a future Sprint, unless it is a critical bug, in which case they raise it as an impediment to the current Sprint to the PO.
Examples:
- Small bug – Text on a label is spelled incorrectly
- Big bug - There is an error thrown when transitioning from page 1 to page 2 when you hold down the Ctrl key
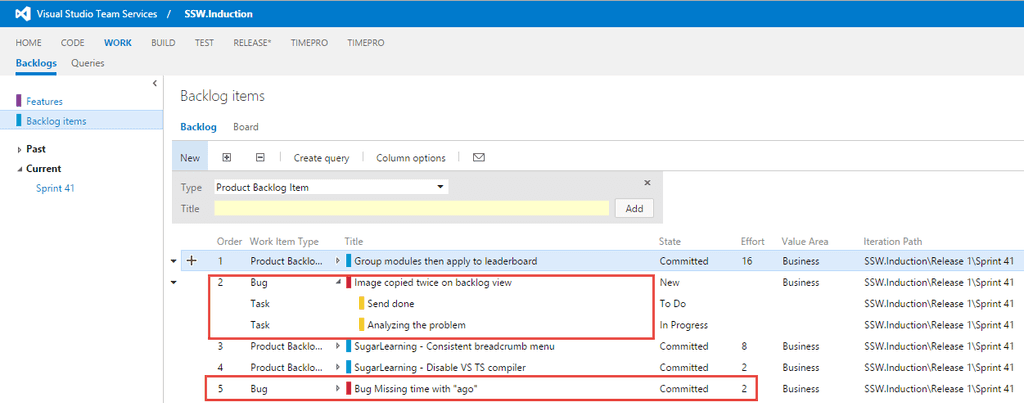
Figure: Bugs can be added "out of Sprint" directly into the Product Backlog in Azure DevOps (was TFS) The Visual Studio team provides good guidance on managing bugs in VSTS
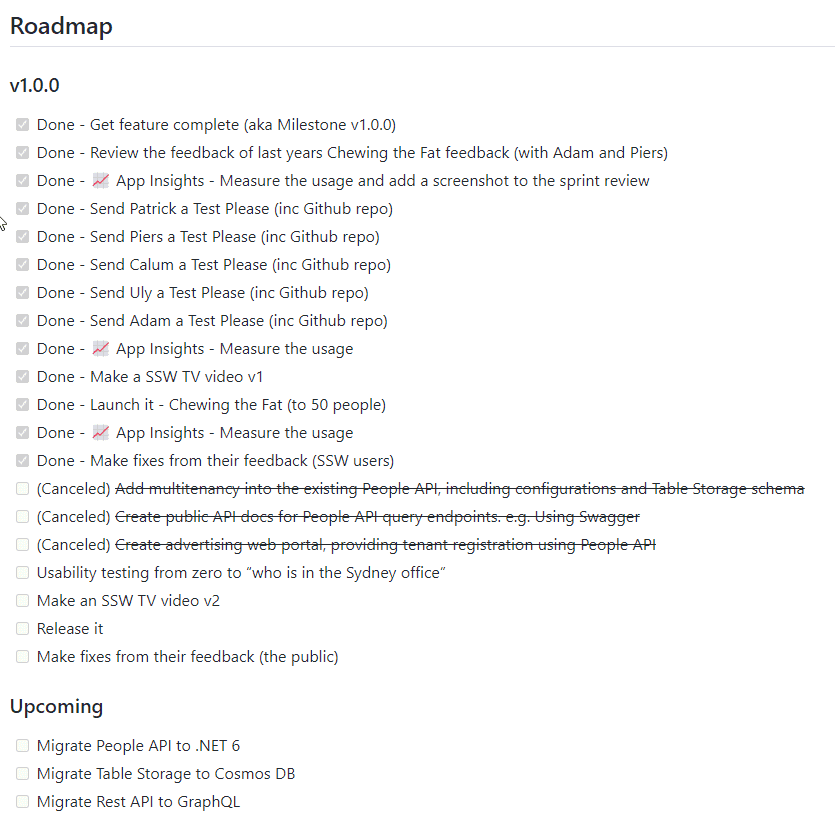
A Product Backlog is a great way to see the fairly small broken up Product Backlog Items (PBIs) that make up your team's "to do" list, but it can be a bit too zoomed in and makes it easy to stray from the Product Goal.
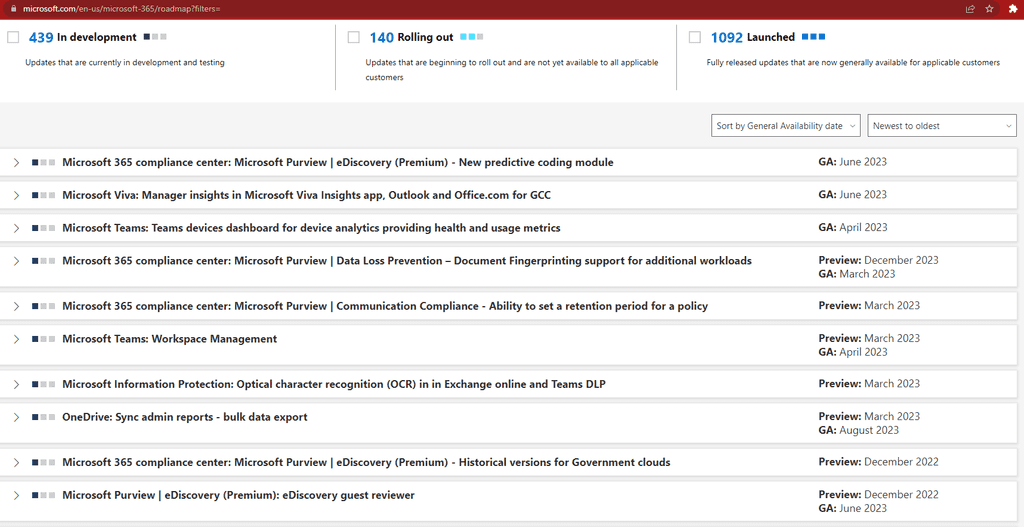
To get a better zoomed out view, you should have a product roadmap.
Video: Do you have a product roadmap? (3 min)
You can think of it as a list of milestones to reach a goal.
Here's a simple example about going on a trip to Beijing
- ✅ Visit the Great Wall of China
- ✅ Visit the Forbidden City
- ⬜ Visit the Summer Palace
- ⬜ Visit a popular street food area
- ⬜ Leave for Sydney on 25th of September
Here you can see that the goal was to visit various attractions in Beijing and each attraction is a milestone to be reached before returning home to Sydney.
For software development, you simply replace the milestones with ✨features, 🐛fixes, etc.
Having this zoomed out view helps the team to stay focused on the overall goal of the project and the long term priorities. It also prevents the team from getting side-tracked on issues that are not really what the business wants.
Building the product roadmap
It's important to think about the scope of the product when building the product roadmap so that the milestones are an achievable grouping of tasks. Consider the size of your team:
- For small teams that shift to different products a lot, you might want to make the milestones a bit more granular and short term.
- For larger product oriented teams, it is more important to have a general overview of what is going to happen across a longer timeframe.
By factoring in the size of the team, it keeps everyone accountable while remaining realistic.
Ways to track a roadmap
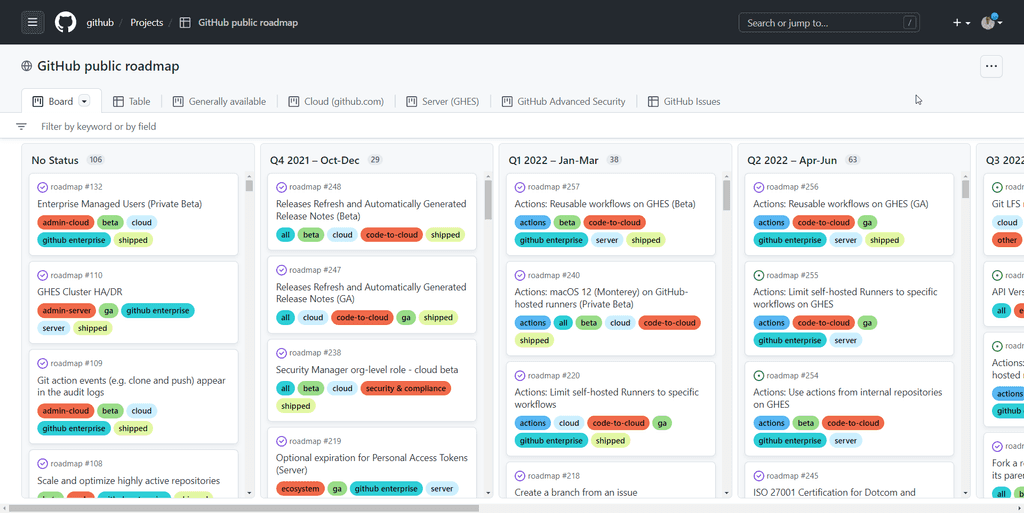
There are heaps of tools out there you can use to make a product roadmap including:
- GitHub Projects and GitHub Issues
- GitHub Milestones
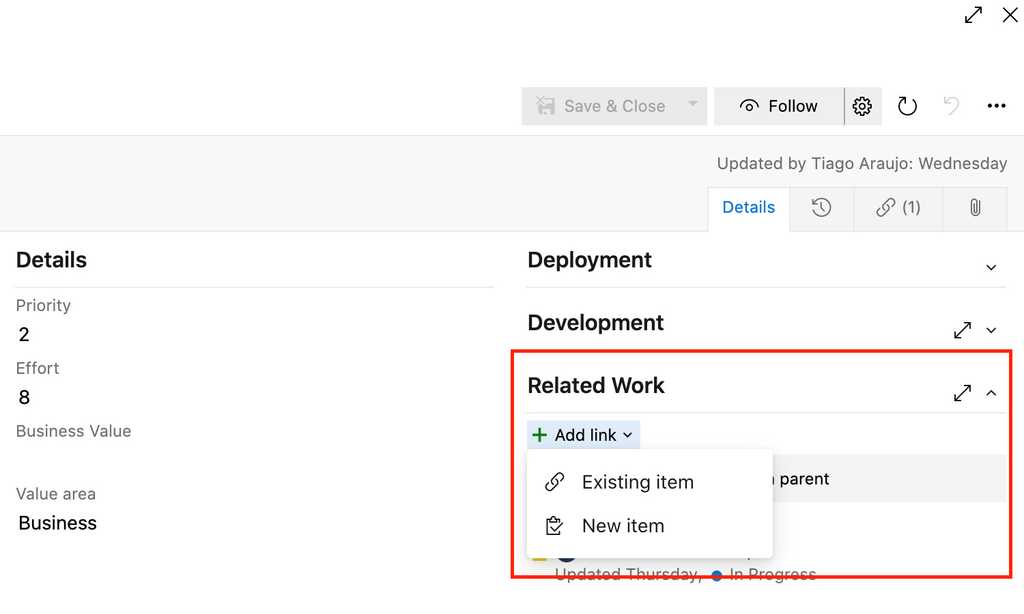
- Azure DevOps - Team delivery plans in Azure Boards
- Azure DevOps - Feature Timeline
- Azure DevOps - Using the Epic roadmap to provide a calendar view
- Aha!
These tools have a lot of functionality and use differing complicated terminology like Features, Epics or MMFs (Minimum Marketable Features). So, they can be an intimidating first step into product roadmaps.
At their core, product roadmaps are simply a list of critical milestones to tick off as they are completed. So, as a stepping stone, you can store them in your project wiki.
The project wiki makes the concept much easier to understand and implement. Once the team is comfortable with the idea, move on to more complex tools.
Ideally, you want to make some progress on product roadmap items in every Sprint, so make sure to review your product roadmap during your regular Sprint Reviews.
See SophieBot product roadmap.
Initializing the Project - See how to get the work items into Azure DevOps via Excel:
- Open SSW Priorities Estimate Template in Excel
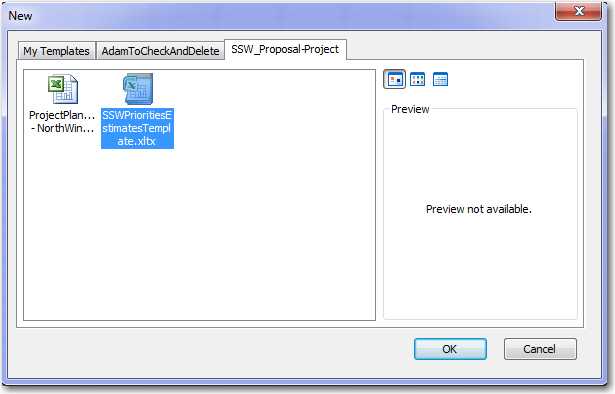
Figure: Find SSW Template - 'New | My templates... | SSW_Proposal-Project | SSWPrioritiesEstimateTemplate.xltx'' - Add the tasks and additional tasks into ReleaseXX sheet 
Note: The Project Management tasks will be calculated based on your tasks
- Create a new sheet and go to Team tab
-
Click "New List" and choose your project
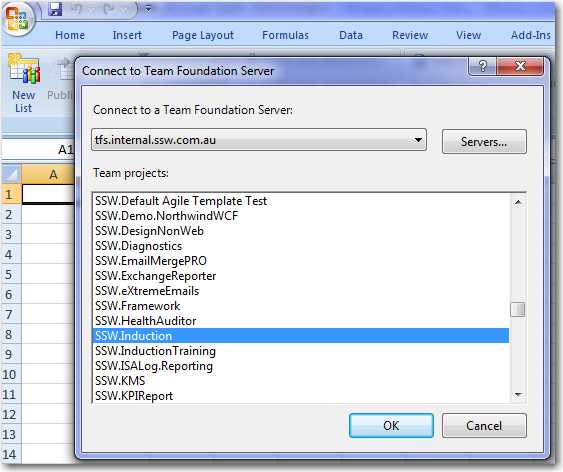
Figure: Find your project in the list 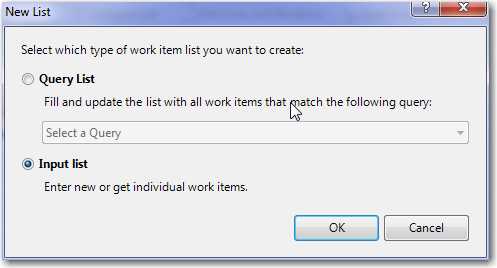
Figure: Choose 'Input list' to download the empty template -
Add the other useful columns e.g. Baseline Work, Remaining Work, Completed Work into Excel
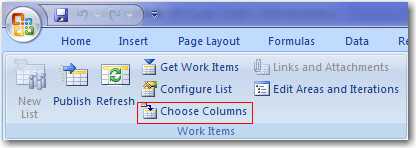
Figure: Click 'Choose columns' 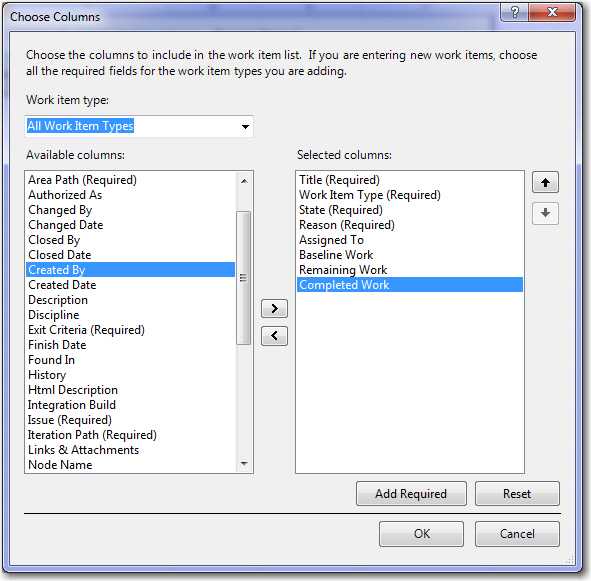
Figure: Select columns in the left list - Copy work items (including the Project Management tasks) from ReleaseXX to the new sheet 
- Click "Publish" button to upload the work items to TFS
- Open SSW Priorities Estimate Template in Excel
Unfortunately the Azure DevOps team did not have time to build the feature to create a SharePoint site, after the project is created. Next version, we hope.
There is a goofy work around:
- Create a new temporary project (with a SharePoint site for it)
- Disable the site for the new project, by checking off '[x] Enable team project portal'
- Go back to the old Azure DevOps project
- Enable the site for the original one (pointing to that newly created site)
- Finally, delete the temporary project you created
More info at Configure or add a project portal
The goal is always to complete Product Backlog Items (PBIs) for the Sprint Review.
Often PBIs grow or change and it does not make sense to deliver what was originally proposed in the Acceptance Criteria.
So think of a way to deliver business value and get it in production, then have a hallway conversation with the Product Owner to see if he agrees with you.
Assuming approval, then adjust some of the Acceptance Criteria, add "v1" to the PBI name and move some of the functionality to a new PBI with the same title and "v2".
e.g.
- Customer and Contact Form v1
- Customer and Contact Form v2
Note: A common example for when to use this is when the full acceptance criteria of a large PBI (or Epic) would not be attainable within one Sprint, so splitting an Epic into 2 attainable PBIs is a better option.
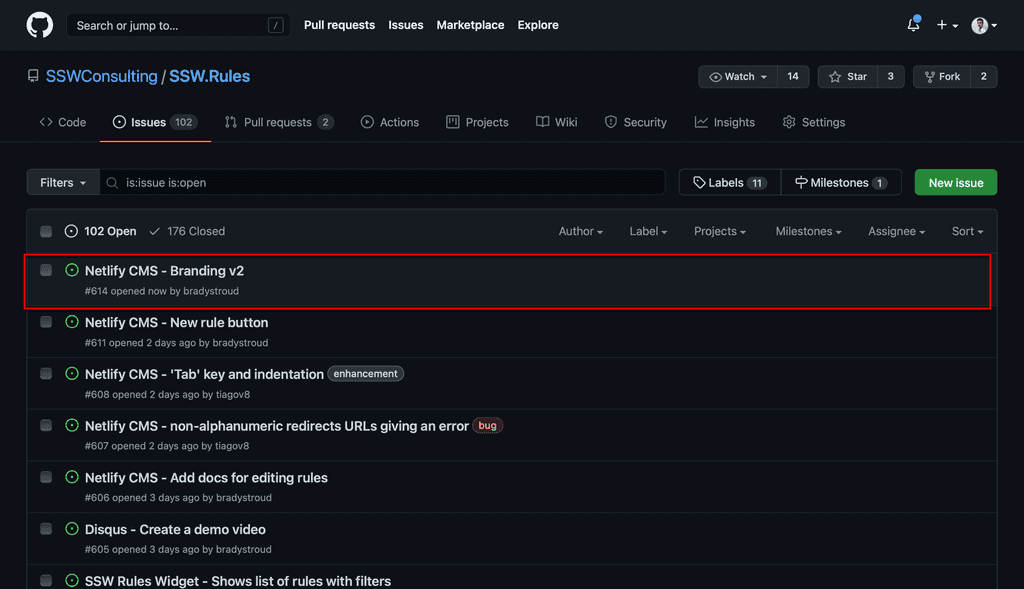
Figure: A v2 PBI in GitHub 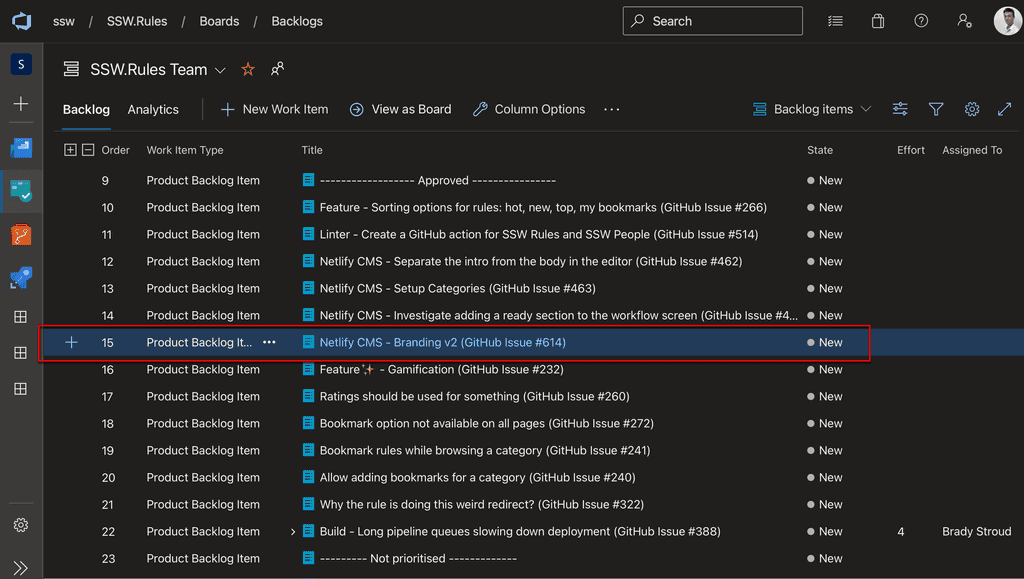
Figure: A v2 PBI in Azure DevOps All good Scrum teams have a backlog. The backlog is built by taking a conversation and recording it as one or more Product Backlog Items (PBIs) (e.g. Azure DevOps) or Issues (e.g. GitHub, JIRA).
You should create PBIs during or straight after the conversation, rather than using emails that may never be entered into the backlog.

Figure: Get typing during a conversation to make the meeting tangible The Product Owner is responsible for owning the Product Backlog. See the video on "Do you know how to be a good Product Owner?"
Although these requirements come from the Product Owner, it is often the developers who will record these PBIs.
1. Emails
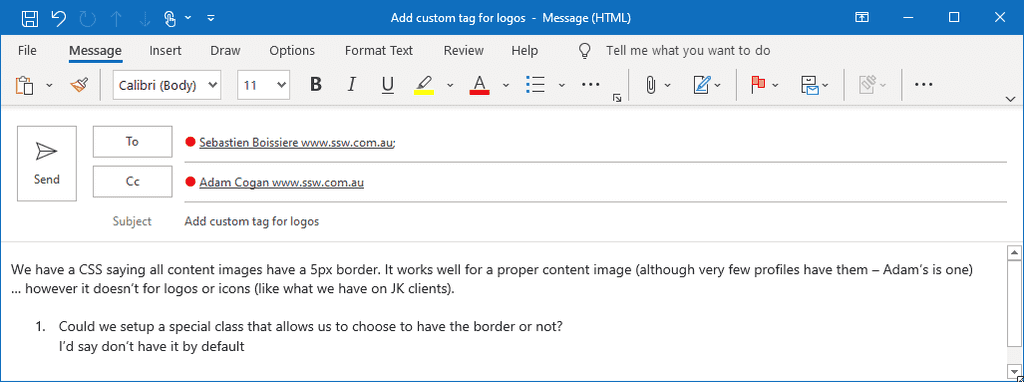
Figure: Bad example - This is a poor way to add a PBI/Issue as you can’t order emails by the business priority GitHub Issues (Recommended)
3. Azure DevOps - E.g. https://ssw.visualstudio.com
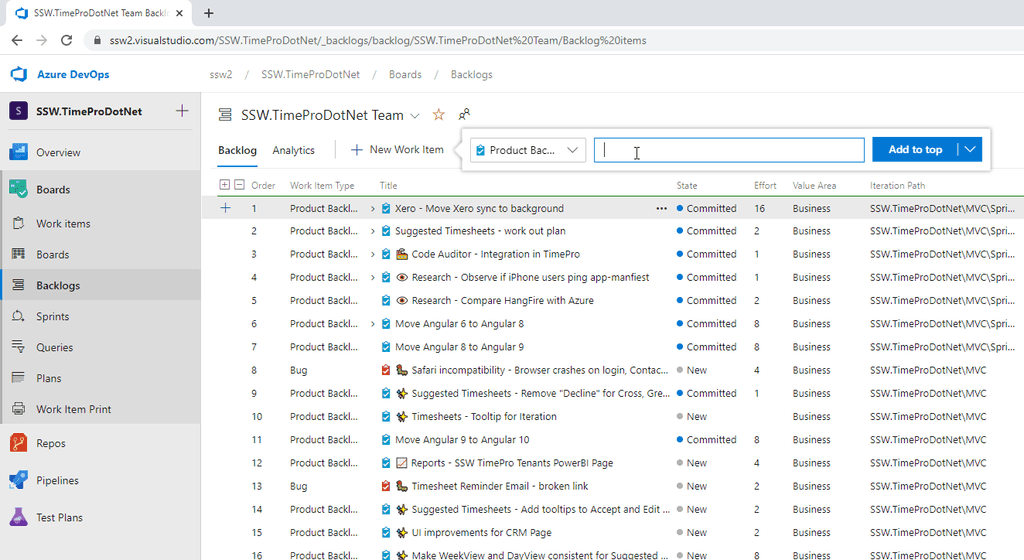
Figure: Good example - Azure DevOps allows you to enter an item into the backlog, in any priority order What's next?
A Minimum Viable Product (MVP) is the core of your application that you should be aiming to build before you spend time on nice-to-haves, bells-and-whistles, and stretch-goals.
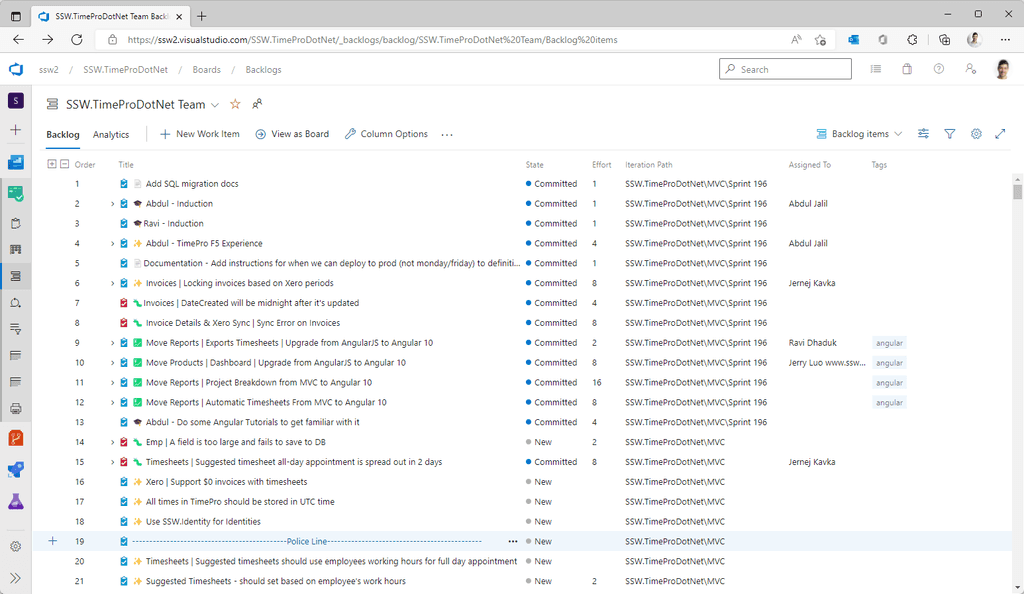
To help focus your Product Owner and team on the core Product Backlog Items (PBIs) needed to fulfil the MVP, it can help to add a Police Line to your backlog.
-
Create a PBI and call it either:
- -----------------------------------MVP----------------------------------
- -------------------------------Police Line------------------------------
- ---------------------------------Phase 1--------------------------------
Then when deciding if a feature is vital or not, simply drag it above or below this line.
-
With automatically sent backlog emails (Azure DevOps or GitHub), there is a risk of people deleting them without reading the content – it doesn't happen with manual emails that have unique subjects and a real person as the sender.
If you have an important PBI and want to improve its visibility, then duplicate the content of the PBI into an email.
To: Gary Green Subject: SugarLearning Leaderboard - Create leaderboard for approvals count (copy of the PBI - {{ PBI LINK }} as per rule https://ssw.com.au/rules/email-copy-to-raise-pbi-visibility)
Hi Gary
We want to have a visual reference for how many approvals each admin have in SugarLearning. E.g. my.sugarlearning.com/SSW/leaderboard-admin/all
- Please create an “Admin Leaderboard” that will show how many each of the Admin user approved (overtime, per year, and per month)?
Dan Duke
Figure: PBI details copied to an email for better visibility, and also the email can get replied to with a ‘done’
Key updates on projects may include Done Videos, critical text additions, or specification documents. Typically, links to these deliverables would be added to the PBI that they relate to and the relevant people would be mentioned.
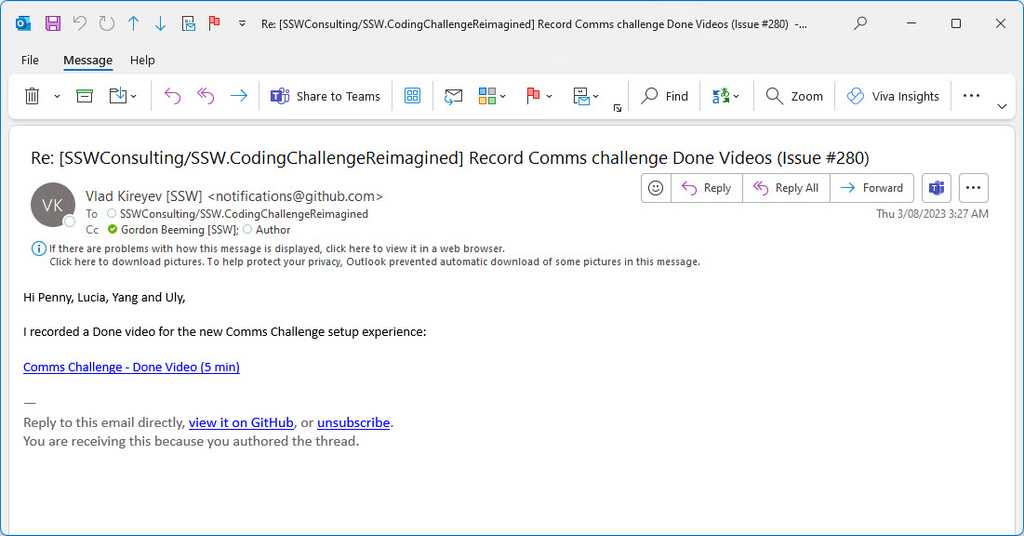
Figure: Bad example - Automated notifications from project management tools can be easily missed or overlooked amidst other notifications 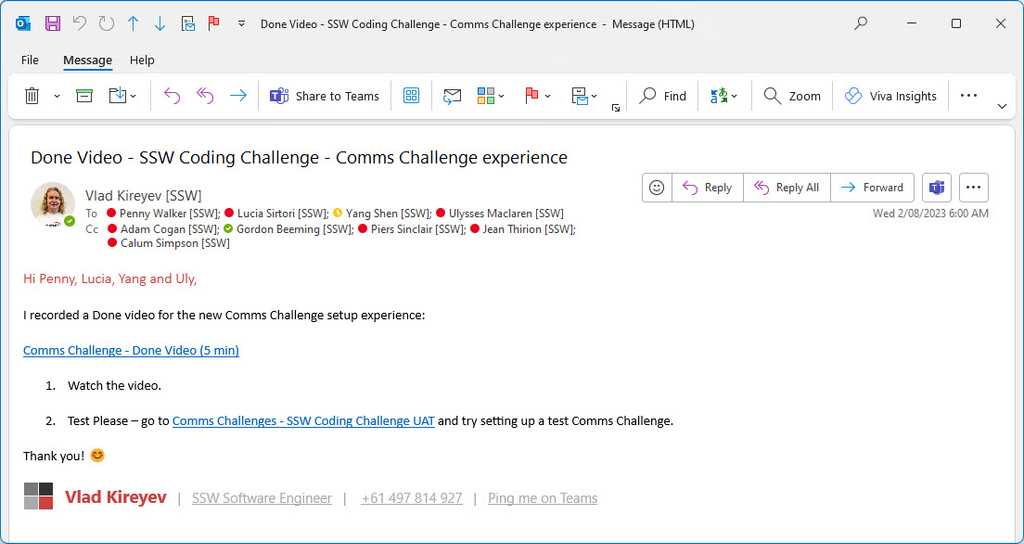
Figure: Good example - For visibility and to ensure all stakeholders are in the loop, you should also send an email to the relevant people Not every PBI will require an email, but if it is a key update or deliverable, it should be escalated. The developers would make this judgement call, although this could also be added upfront by the Product Owner in the Acceptance Criteria for the PBI. Here are the 3 scenarios:
- Standard PBI - needed but the outcome is not very interesting: Do the PBI, just following the DoD
- Interesting to someone - @ mention them
- Really important - Make sure it’s top of mind, email it
For example, you can send an email similar to this to share a new Done Video to the relevant stakeholders. If you working on a big system or internal projects, include the feature area or project name in the subject for additional context.
To: {{ PRODUCT OWNER }}; {{ OTHER STAKEHOLDERS }} Subject: ���🎥 {{ PROJECT NAME }} - Done Video for {{ PBI TITLE }} Hi Team
I just made a Done Video for this PBI {{ LINK TO PBI }}.
{{ LINK TO VIDEO }}
If you have any feedback, please post it on the PBI.
<This email was sent as per https://www.ssw.com.au/rules/escalate-key-updates>
This email is especially important for stakeholders that don't use, want to use, or have access to the project management tools. If they do have access, remember to also @mention them in the PBI update.
Sometimes the PBI work originated from an email, in which case you should reply to the email instead of starting a new email. This will allow stakeholders to have additional context.
Additionally, giving the the Product Owner and/or Stakeholder(s) a call to show them the video is great - this ensures they watch it and you can get instant feedback.
Note: Major bugs found on the product should also be communicated to the PO as soon as they are found, e.g. unable to create an invoice
